
Owner's Manual
Page 3
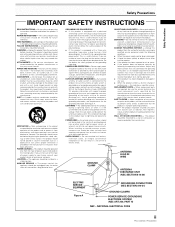
... to replace your obsolete outlet. and the like. ACCESSORIES - VENTILATION - Slots and openings in performance - LOCATION - POWER-CORD PROTECTION - Power-supply cords should not be moved with the product. Adjust only those controls that produce heat. HEAT - CLEANING - Any ...charges. POWER SOURCES - If an outside antenna system, extreme care should be read before cleaning. for long periods of the lead-in a wet basement; Unplug this product on the marking label. NATIONAL ELECTRICAL CODE iii PRO-1000HDI / PRO-800HDI This...
... to replace your obsolete outlet. and the like. ACCESSORIES - VENTILATION - Slots and openings in performance - LOCATION - POWER-CORD PROTECTION - Power-supply cords should not be moved with the product. Adjust only those controls that produce heat. HEAT - CLEANING - Any ...charges. POWER SOURCES - If an outside antenna system, extreme care should be read before cleaning. for long periods of the lead-in a wet basement; Unplug this product on the marking label. NATIONAL ELECTRICAL CODE iii PRO-1000HDI / PRO-800HDI This...
Owner's Manual
Page 5
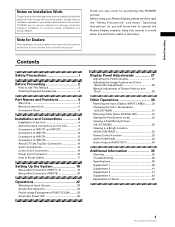
...Contents Safety Precautions i Before Proceeding 2 How to handle the product. PIONEER cannot assume liabilities for purchasing this manual to the customer and explain to the customer how to Use This Manual 2 Checking Supplied Accessories 3 Part Names and Functions 4 Main Unit 4 Remote Control ... (POINT ZOOM) ......... 25 Automatic Power OFF 26 Display Panel Adjustments 27 Adjusting the Picture Quality 27 Adjusting the Image Position and Clock (Automatic Adjustment 28 Manual Adjustment of Terms 42 1 PRO-1000HDI / PRO-800HDI Always have an installation specialist or your...
...Contents Safety Precautions i Before Proceeding 2 How to handle the product. PIONEER cannot assume liabilities for purchasing this manual to the customer and explain to the customer how to Use This Manual 2 Checking Supplied Accessories 3 Part Names and Functions 4 Main Unit 4 Remote Control ... (POINT ZOOM) ......... 25 Automatic Power OFF 26 Display Panel Adjustments 27 Adjusting the Picture Quality 27 Adjusting the Image Position and Clock (Automatic Adjustment 28 Manual Adjustment of Terms 42 1 PRO-1000HDI / PRO-800HDI Always have an installation specialist or your...
Owner's Manual
Page 7
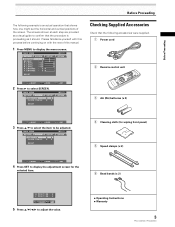
.... 4 Cleaning cloth (for wiping front panel) 5 Speed clamps (x 2) 6 Bead bands (x 2) H. Before Proceeding Before Proceeding The following accessories were supplied. 1 Power cord 2 Remote control unit 3 AA (R6) batteries (x 2) SELECT SET ENTER MENU EXIT 3 Press 5/∞ to select the item to be adjusted... UP INPUT1 OPTION RE S ET SELECT SET ENTER MENU EXIT 2 Press 3 to adjust the value. ÷ Operating Instructions ÷ Warranty 3 PRO-1000HDI / PRO-800HDI The screens shown at each step are provided as it should. L E V E L B. R. L EVEL H. POS I T I GHT .
.... 4 Cleaning cloth (for wiping front panel) 5 Speed clamps (x 2) 6 Bead bands (x 2) H. Before Proceeding Before Proceeding The following accessories were supplied. 1 Power cord 2 Remote control unit 3 AA (R6) batteries (x 2) SELECT SET ENTER MENU EXIT 3 Press 5/∞ to select the item to be adjusted... UP INPUT1 OPTION RE S ET SELECT SET ENTER MENU EXIT 2 Press 3 to adjust the value. ÷ Operating Instructions ÷ Warranty 3 PRO-1000HDI / PRO-800HDI The screens shown at each step are provided as it should. L E V E L B. R. L EVEL H. POS I T I GHT .

Owner's Manual
Page 11
...INPUT2 to this unit (page 15). 0 AUDIO OUTPUT (Stereo mini jack) Use to output the audio of 8 -16 Ω (page 14). 7 PRO-1000HDI / PRO-800HDI INPUT3 (S-video jack) For connection of components that has an impedance of the selected source component connected to this unit to obtain sound when INPUT4...sach as a video deck, video camera, LaserDisc player, or DVD player (page 13). $ Main power switch Use to switch the main power of the unit on and off. % AC INLET Use to connect the supplied power cord to an AC outlet (page 16). ^ SPEAKER (L) terminal For connection of components connected to...
...INPUT2 to this unit (page 15). 0 AUDIO OUTPUT (Stereo mini jack) Use to output the audio of 8 -16 Ω (page 14). 7 PRO-1000HDI / PRO-800HDI INPUT3 (S-video jack) For connection of components that has an impedance of the selected source component connected to this unit to obtain sound when INPUT4...sach as a video deck, video camera, LaserDisc player, or DVD player (page 13). $ Main power switch Use to switch the main power of the unit on and off. % AC INLET Use to connect the supplied power cord to an AC outlet (page 16). ^ SPEAKER (L) terminal For connection of components connected to...

Owner's Manual
Page 18
...with the DTV set top box output signals that the audio component's power and the unit's main power is possible INPUT1 INPUT2 INPUT3 INPUT4 INPUT5 Digital 1080p Component RGB SDTV 480i... polarity is output from the • SPEAKER terminals • Stereo mini jack (L/R). 14 PRO-1000HDI / PRO-800HDI Making connections to secure the wire in place. Video input INPUT1 INPUT2 INPUT3 INPUT4 INPUT5 Audio... Top Box Connection To ensure proper connection, please carefully read the instruction manual supplied with a 2W+2W internal amplifier. Video signal type HDTV Video signal 1080i 720p Video ...
...with the DTV set top box output signals that the audio component's power and the unit's main power is possible INPUT1 INPUT2 INPUT3 INPUT4 INPUT5 Digital 1080p Component RGB SDTV 480i... polarity is output from the • SPEAKER terminals • Stereo mini jack (L/R). 14 PRO-1000HDI / PRO-800HDI Making connections to secure the wire in place. Video input INPUT1 INPUT2 INPUT3 INPUT4 INPUT5 Audio... Top Box Connection To ensure proper connection, please carefully read the instruction manual supplied with a 2W+2W internal amplifier. Video signal type HDTV Video signal 1080i 720p Video ...

Owner's Manual
Page 20
... connected component at the remote control sensor on another unit, the remote sensor of connected PIONEER components that the cord is used for efficiency protection. CAUTION ÷ Use only the power cord provided. ÷ Do not use an outlet with a ground terminal is properly ...a ground terminal and screw down the ground line. If you use a power source converter plug, use a power supply voltage other than that component will no resistance). 16 PRO-1000HDI / PRO-800HDI Always be sure to connect the power cord to a three-pronged grounded outlet and make sure that bear the ...
... connected component at the remote control sensor on another unit, the remote sensor of connected PIONEER components that the cord is used for efficiency protection. CAUTION ÷ Use only the power cord provided. ÷ Do not use an outlet with a ground terminal is properly ...a ground terminal and screw down the ground line. If you use a power source converter plug, use a power supply voltage other than that component will no resistance). 16 PRO-1000HDI / PRO-800HDI Always be sure to connect the power cord to a three-pronged grounded outlet and make sure that bear the ...
Owner's Manual
Page 39
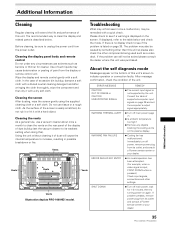
... deterioration or peeling of paint from the power outlet. Cleaning the screen After dusting, wipe the screen gently using the supplied cleaning cloth or a soft cloth. Do not use a vacuum cleaner about once a month to its outlet, and consult a Pioneer service center or your dealer. 35 PRO-1000HDI / PRO-800HDI Additional Information Consult the table of...
... deterioration or peeling of paint from the power outlet. Cleaning the screen After dusting, wipe the screen gently using the supplied cleaning cloth or a soft cloth. Do not use a vacuum cleaner about once a month to its outlet, and consult a Pioneer service center or your dealer. 35 PRO-1000HDI / PRO-800HDI Additional Information Consult the table of...
Owner's Manual
Page 42
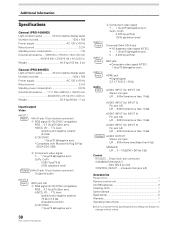
... dimensions ...... 1111 (W) x 692 (H) x 104 (D) mm 43-3/4 (W) x 27-1/4 (H) x 4 (D) in . Weight 46.5 kg (102 lbs. 8 oz) General (PRO-800HDI) Light emission panel 43 inch plasma display panel Number of pixels 1280 x 768 Power supply AC 120 V, 60 Hz Rated current 3.2 A Standby power consumption 1 W External dimensions ... 1259 (W) x 776 (H) x 104.7 (D) mm 49-9/16 (W) x 30-9/16 (H) x 4-1/8 (D) in . C . . . 0.286 Vp-p/75...
... dimensions ...... 1111 (W) x 692 (H) x 104 (D) mm 43-3/4 (W) x 27-1/4 (H) x 4 (D) in . Weight 46.5 kg (102 lbs. 8 oz) General (PRO-800HDI) Light emission panel 43 inch plasma display panel Number of pixels 1280 x 768 Power supply AC 120 V, 60 Hz Rated current 3.2 A Standby power consumption 1 W External dimensions ... 1259 (W) x 776 (H) x 104.7 (D) mm 49-9/16 (W) x 30-9/16 (H) x 4-1/8 (D) in . C . . . 0.286 Vp-p/75...


