Owner's Manual
Page 3
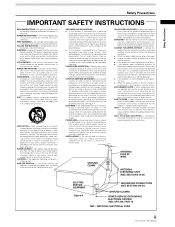
...SAFETY CHECK - NATIONAL ELECTRICAL CODE iii PRO-1000HD / PRO-800HD HEED WARNINGS - All warnings on the marking label. CLEANING - ATTACHMENTS - This product should be blocked by the manufacturer. The power cord of time, unplug it from touching such power lines or circuits as this product is ...other products (including amplifiers) that could result in the operating instructions should be blocked or covered. CART - NONUSE PERIODS - Power-supply cords should use this product from heat sources such as a bookcase or rack unless proper ventilation is in a wet basement...
...SAFETY CHECK - NATIONAL ELECTRICAL CODE iii PRO-1000HD / PRO-800HD HEED WARNINGS - All warnings on the marking label. CLEANING - ATTACHMENTS - This product should be blocked by the manufacturer. The power cord of time, unplug it from touching such power lines or circuits as this product is ...other products (including amplifiers) that could result in the operating instructions should be blocked or covered. CART - NONUSE PERIODS - Power-supply cords should use this product from heat sources such as a bookcase or rack unless proper ventilation is in a wet basement...
Owner's Manual
Page 5
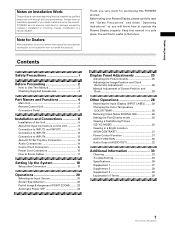
...Power Control Function 31 AUTO FUNCTION 32 Audio Output (AUDIO OUT 32 Additional Information 33 Cleaning 33 Troubleshooting 33 Specifications 36 Supplement 1 37 Supplement 2 39 Supplement 3 39 Explanation of Terms 39 1 PRO-1000HD / PRO-800HD... much for Dealers: After installation, be sure to Use This Manual 2 Checking Supplied Accessories 3 Part Names and Functions 4 Main Unit 4 Remote Control Unit 5 Connection... place. Contents Safety Precautions i Before Proceeding 2 How to deliver this PIONEER product. Before using your dealer install and set up the product. Before...
...Power Control Function 31 AUTO FUNCTION 32 Audio Output (AUDIO OUT 32 Additional Information 33 Cleaning 33 Troubleshooting 33 Specifications 36 Supplement 1 37 Supplement 2 39 Supplement 3 39 Explanation of Terms 39 1 PRO-1000HD / PRO-800HD... much for Dealers: After installation, be sure to Use This Manual 2 Checking Supplied Accessories 3 Part Names and Functions 4 Main Unit 4 Remote Control Unit 5 Connection... place. Contents Safety Precautions i Before Proceeding 2 How to deliver this PIONEER product. Before using your dealer install and set up the product. Before...

Owner's Manual
Page 7
...L E V E L B. POS I T I GHT . Please familiarize yourself with this manual. 1 Press MENU to adjust the value. ÷ Operating Instructions ÷ Warranty 3 PRO-1000HD / PRO-800HD L EVEL G. MAIN MENU PICTURE SCREEN CONT RAST BR I ON : 0 V. POS I T I ON : CL OCK / PHASE : SET UP 0/ 0 0/ 0 INPUT1 OPTION... screens shown at each step are provided as it should. E NHANCE V. Before Proceeding Before Proceeding The following accessories were supplied. 1 Power cord 2 Remote control unit 3 AA (R6) batteries (x 2) VIDEO S-VIDEO SELECT SET ENTER MENU EXIT 3 Press 5/∞ to ...
...L E V E L B. POS I T I GHT . Please familiarize yourself with this manual. 1 Press MENU to adjust the value. ÷ Operating Instructions ÷ Warranty 3 PRO-1000HD / PRO-800HD L EVEL G. MAIN MENU PICTURE SCREEN CONT RAST BR I ON : 0 V. POS I T I ON : CL OCK / PHASE : SET UP 0/ 0 0/ 0 INPUT1 OPTION... screens shown at each step are provided as it should. E NHANCE V. Before Proceeding Before Proceeding The following accessories were supplied. 1 Power cord 2 Remote control unit 3 AA (R6) batteries (x 2) VIDEO S-VIDEO SELECT SET ENTER MENU EXIT 3 Press 5/∞ to ...
Owner's Manual
Page 11
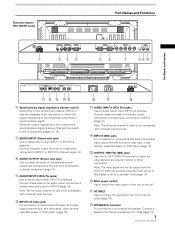
... The video signal will not be necessary to set this unit to the audio output connectors of 8 -16 Ω (page 14). 7 PRO-1000HD / PRO-800HD Connect these terminals to match the output impedance of the connected component's synchronization signal. INPUT4 (BNC jack) For connection of the component's synchronization signal... Ω, set this display is off or in standby mode (page 13). # Main power switch Use to switch the main power of the unit on and off. $ AC INLET Use to connect the supplied power cord to an AC outlet (page 16). % SPEAKER (L) terminal For connection of components ...
... The video signal will not be necessary to set this unit to the audio output connectors of 8 -16 Ω (page 14). 7 PRO-1000HD / PRO-800HD Connect these terminals to match the output impedance of the connected component's synchronization signal. INPUT4 (BNC jack) For connection of the component's synchronization signal... Ω, set this display is off or in standby mode (page 13). # Main power switch Use to switch the main power of the unit on and off. $ AC INLET Use to connect the supplied power cord to an AC outlet (page 16). % SPEAKER (L) terminal For connection of components ...
Owner's Manual
Page 17
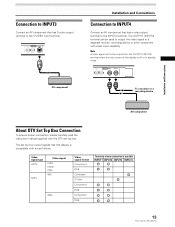
... device Installation and Connections AV component About DTV Set Top Box Connection To ensure proper connection, please carefully read the instruction manual supplied with video input capability. Video signal type HDTV SDTV Video signal 1080i 1080p 720p 480i 480p Video signal format Component RGB Composite...box output signals that this display is possible INPUT1 INPUT2 INPUT3 INPUT4 13 PRO-1000HD / PRO-800HD The OUTPUT (INPUT4) terminal can be output from the OUTPUT (INPUT4) terminal when the main power of this display is compatible with are as follows. Connection to INPUT3 Connect...
... device Installation and Connections AV component About DTV Set Top Box Connection To ensure proper connection, please carefully read the instruction manual supplied with video input capability. Video signal type HDTV SDTV Video signal 1080i 1080p 720p 480i 480p Video signal format Component RGB Composite...box output signals that this display is possible INPUT1 INPUT2 INPUT3 INPUT4 13 PRO-1000HD / PRO-800HD The OUTPUT (INPUT4) terminal can be output from the OUTPUT (INPUT4) terminal when the main power of this display is compatible with are as follows. Connection to INPUT3 Connect...
Owner's Manual
Page 19
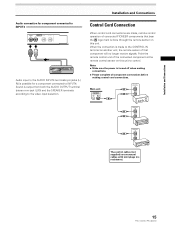
... the remote control sensor on this unit. Notes ÷ Make sure the power is turned off when making connections. ÷ Please complete all component connections before...CONTROL IN OUT CONTROL IN OUT CONTROL IN OUT CONTROL IN OUT The control cables (not supplied) are made to the video input selection. Sound is output from both the AUDIO OUTPUT... the remote sensor on another unit, the remote sensor of connected PIONEER components that component will no resistance). 15 PRO-1000HD / PRO-800HD Installation and Connections Audio connection for component connected to INPUT4 AUDIO R...
... the remote control sensor on this unit. Notes ÷ Make sure the power is turned off when making connections. ÷ Please complete all component connections before...CONTROL IN OUT CONTROL IN OUT CONTROL IN OUT CONTROL IN OUT The control cables (not supplied) are made to the video input selection. Sound is output from both the AUDIO OUTPUT... the remote sensor on another unit, the remote sensor of connected PIONEER components that component will no resistance). 15 PRO-1000HD / PRO-800HD Installation and Connections Audio connection for component connected to INPUT4 AUDIO R...

Owner's Manual
Page 20
.... 2 Plug the power cord into a power outlet. CAUTION ÷ Use only the power cord provided. ÷ Do not use an outlet with a ground terminal is properly grounded. If you use a power source converter plug, use a power supply voltage other than that... the cord is used for efficiency protection. Always be sure to connect the power cord to this may cause fire or electric shock. ÷ For the plasma display, a three-core power cord with a ground terminal and screw down the ground line. 16 PRO-1000HD / PRO-800HD...
.... 2 Plug the power cord into a power outlet. CAUTION ÷ Use only the power cord provided. ÷ Do not use an outlet with a ground terminal is properly grounded. If you use a power source converter plug, use a power supply voltage other than that... the cord is used for efficiency protection. Always be sure to connect the power cord to this may cause fire or electric shock. ÷ For the plasma display, a three-core power cord with a ground terminal and screw down the ground line. 16 PRO-1000HD / PRO-800HD...
Owner's Manual
Page 37
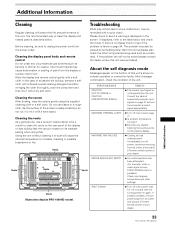
... . If displayed, refer to clean the display and related parts is described below and check the mode. Immediately turn off power, remove power plug from the display or remote control unit. Use of such liquids may be remedied with a hard object. In the ...malfunction, may cause deterioration or peeling of paint from its outlet, and consult a Pioneer service center or your dealer. 33 PRO-1000HD / PRO-800HD Additional Information Cleaning the screen After dusting, wipe the screen gently using the supplied cleaning cloth or a soft cloth. Cleaning the vents As a general rule, ...
... . If displayed, refer to clean the display and related parts is described below and check the mode. Immediately turn off power, remove power plug from the display or remote control unit. Use of such liquids may be remedied with a hard object. In the ...malfunction, may cause deterioration or peeling of paint from its outlet, and consult a Pioneer service center or your dealer. 33 PRO-1000HD / PRO-800HD Additional Information Cleaning the screen After dusting, wipe the screen gently using the supplied cleaning cloth or a soft cloth. Cleaning the vents As a general rule, ...
Owner's Manual
Page 40
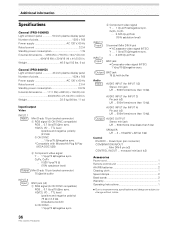
... dimensions ...... 1111 (W) x 692 (H) x 104 (D) mm 43-3/4 (W) x 27-1/4 (H) x 4 (D) in . Weight 46.5 kg (102 lbs. 8 oz) General (PRO-800HD) Light emission panel 43 inch plasma display panel Number of pixels 1280 x 768 Power supply AC 120 V, 60 Hz Rated current 3.2 A Standby power consumption 1 W External dimensions ... 1259 (W) x 776 (H) x 104.7 (D) mm 49-9/16 (W) x 30-9/16 (H) x 4-1/8 (D) in . C . . . 0.286 Vp-p/75...
... dimensions ...... 1111 (W) x 692 (H) x 104 (D) mm 43-3/4 (W) x 27-1/4 (H) x 4 (D) in . Weight 46.5 kg (102 lbs. 8 oz) General (PRO-800HD) Light emission panel 43 inch plasma display panel Number of pixels 1280 x 768 Power supply AC 120 V, 60 Hz Rated current 3.2 A Standby power consumption 1 W External dimensions ... 1259 (W) x 776 (H) x 104.7 (D) mm 49-9/16 (W) x 30-9/16 (H) x 4-1/8 (D) in . C . . . 0.286 Vp-p/75...
Other Manual
Page 11
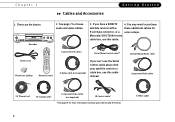
If you can't use the Serial Control cable above with your satellite receiver or cable box, use this cable: Power Cord Phone Line Splitter T T u er DVD op Men Live TV Guide Info Menu Select Window Vol Mute Chan Page Record ...V CR Plus + Slow Clear 1 Stop Enter 2 3 4 5 6 7 8 9 V Pow T 0 V Inpu t Remote Control Composite A/V cables Serial (Data) Control cable* S-Video cable (not supplied) If you have a DIRECTV 4. You may want to choose audio and video cables: 3. Chapter 1 Cables and Accessories Getting Started 1. These are the basics: Recorder 2. See...
If you can't use the Serial Control cable above with your satellite receiver or cable box, use this cable: Power Cord Phone Line Splitter T T u er DVD op Men Live TV Guide Info Menu Select Window Vol Mute Chan Page Record ...V CR Plus + Slow Clear 1 Stop Enter 2 3 4 5 6 7 8 9 V Pow T 0 V Inpu t Remote Control Composite A/V cables Serial (Data) Control cable* S-Video cable (not supplied) If you have a DIRECTV 4. You may want to choose audio and video cables: 3. Chapter 1 Cables and Accessories Getting Started 1. These are the basics: Recorder 2. See...
Other Manual
Page 57
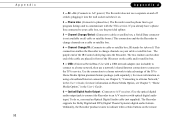
If you need an Optical Digital Audio cable (not supplied). Channel Change/IR: (Connects to change channels on all cable or satellite boxes.) This connection enables the Recorder to an A/V receiver with the TiVo service. ... two emitters on the other end of the IR sensor on . 2 - USB: (Universal Serial Bus.) Use with a USB network adapter (not included) to connect to A/C power.) The Recorder does not use a separate on the remote Use the connection to a home network to indicate when certain buttons on and off switch; To...
If you need an Optical Digital Audio cable (not supplied). Channel Change/IR: (Connects to change channels on all cable or satellite boxes.) This connection enables the Recorder to an A/V receiver with the TiVo service. ... two emitters on the other end of the IR sensor on . 2 - USB: (Universal Serial Bus.) Use with a USB network adapter (not included) to connect to A/C power.) The Recorder does not use a separate on the remote Use the connection to a home network to indicate when certain buttons on and off switch; To...


