Owner's Manual
Page 5
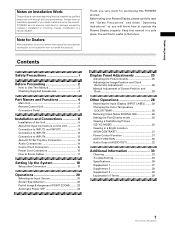
...2 How to Use This Manual 2 Checking Supplied Accessories 3 Part Names and Functions 4 Main Unit 4 Remote Control Unit 5 Connection Panel 6 Installation and Connections 8 Installation of Terms 39 1 PRO-1000HD / PRO-800HD Before Proceeding Notes on this PIONEER product. PIONEER cannot assume liabilities for damage ...OFF 24 Display Panel Adjustments 25 Adjusting the Picture Quality 25 Adjusting the Image Position and Clock (Automatic Adjustment 26 Manual Adjustment of Screen Position and Clock 26 Other Operations 28 Rewriting the Input Display (INPUT LABEL) ........ 28 Changing ...
...2 How to Use This Manual 2 Checking Supplied Accessories 3 Part Names and Functions 4 Main Unit 4 Remote Control Unit 5 Connection Panel 6 Installation and Connections 8 Installation of Terms 39 1 PRO-1000HD / PRO-800HD Before Proceeding Notes on this PIONEER product. PIONEER cannot assume liabilities for damage ...OFF 24 Display Panel Adjustments 25 Adjusting the Picture Quality 25 Adjusting the Image Position and Clock (Automatic Adjustment 26 Manual Adjustment of Screen Position and Clock 26 Other Operations 28 Rewriting the Input Display (INPUT LABEL) ........ 28 Changing ...
Owner's Manual
Page 6
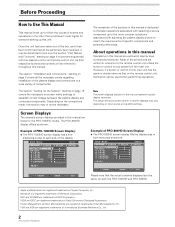
... Management and Sun Microsystems are registered trademarks of International Business Machines Co., Inc. 2 PRO-1000HD / PRO-800HD About operations in this manual. L EVEL G. displaying border at each side of PRO-800HD Screen Display: ÷ The PRO-800HD screen display fills the display area in this manual are registered trademarks of Video Electronics Standards Association. E NHANCE V. R. L EV EL H. MAIN MENU...
... Management and Sun Microsystems are registered trademarks of International Business Machines Co., Inc. 2 PRO-1000HD / PRO-800HD About operations in this manual. L EVEL G. displaying border at each side of PRO-800HD Screen Display: ÷ The PRO-800HD screen display fills the display area in this manual are registered trademarks of Video Electronics Standards Association. E NHANCE V. R. L EV EL H. MAIN MENU...

Owner's Manual
Page 7
... the procedure is an actual operation that shows how one might set the horizontal and vertical positions of this manual. 1 Press MENU to adjust the value. ÷ Operating Instructions ÷ Warranty 3 PRO-1000HD / PRO-800HD The screens shown at each step are provided as it should. MAIN MENU PICTURE SCREEN POS I T I ON : 0 ADJUST MENU...
... the procedure is an actual operation that shows how one might set the horizontal and vertical positions of this manual. 1 Press MENU to adjust the value. ÷ Operating Instructions ÷ Warranty 3 PRO-1000HD / PRO-800HD The screens shown at each step are provided as it should. MAIN MENU PICTURE SCREEN POS I T I ON : 0 ADJUST MENU...
Owner's Manual
Page 12
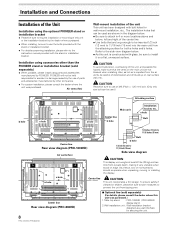
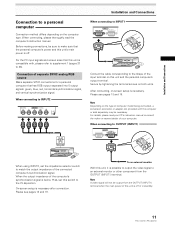
... b hole Installation bracket, etc.. CAUTION This unit incorporates a thin design. The installation holes that are long enough to the instruction manual provided with glass, be used are not blocked when installing. a hole Bolt 1/2 inches (12 mm) to 11/16 inches (18...Installation using parts and accessories manufactured by other than the PIONEER stand or installation bracket (sold separately) (For details, please consult the dealer where this unit is expelled from tipping over. Center line Rear view diagram (PRO-800HD) 7 Optional line (sold separately) ÷ When ...
... b hole Installation bracket, etc.. CAUTION This unit incorporates a thin design. The installation holes that are long enough to the instruction manual provided with glass, be used are not blocked when installing. a hole Bolt 1/2 inches (12 mm) to 11/16 inches (18...Installation using parts and accessories manufactured by other than the PIONEER stand or installation bracket (sold separately) (For details, please consult the dealer where this unit is expelled from tipping over. Center line Rear view diagram (PRO-800HD) 7 Optional line (sold separately) ÷ When ...
Owner's Manual
Page 15
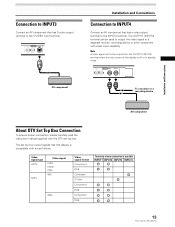
...INPUT1 OUTPUT ANALOG RGB (ANALOG RGB) Connect the cable corresponding to the 75 Ω position. For details, please read the computer's instruction manual. Note A video signal will not be output from the OUTPUT (INPUT1) terminal. Before making connections, be necessary. Note Depending on the ...personal computer's power and this switch to the shape of the input terminal on this unit is off or in standby. 11 PRO-1000HD / PRO-800HD When connecting, please thoroughly read your computer. For the PC input signals and screen sizes that has RGB output separated into 5...
...INPUT1 OUTPUT ANALOG RGB (ANALOG RGB) Connect the cable corresponding to the 75 Ω position. For details, please read the computer's instruction manual. Note A video signal will not be output from the OUTPUT (INPUT1) terminal. Before making connections, be necessary. Note Depending on the ...personal computer's power and this switch to the shape of the input terminal on this unit is off or in standby. 11 PRO-1000HD / PRO-800HD When connecting, please thoroughly read your computer. For the PC input signals and screen sizes that has RGB output separated into 5...
Owner's Manual
Page 17
... About DTV Set Top Box Connection To ensure proper connection, please carefully read the instruction manual supplied with the DTV set top box output signals that this display is possible INPUT1 INPUT2 INPUT3 INPUT4 13 PRO-1000HD / PRO-800HD Video signal type HDTV SDTV Video signal 1080i 1080p 720p 480i 480p Video signal format...
... About DTV Set Top Box Connection To ensure proper connection, please carefully read the instruction manual supplied with the DTV set top box output signals that this display is possible INPUT1 INPUT2 INPUT3 INPUT4 13 PRO-1000HD / PRO-800HD Video signal type HDTV SDTV Video signal 1080i 1080p 720p 480i 480p Video signal format...
Owner's Manual
Page 23
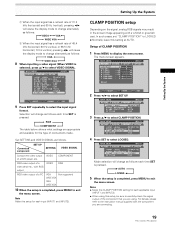
...screen. Notes ÷ Make this setup, be sure to carefully check the signal output of the component that you are connecting. 19 PRO-1000HD / PRO-800HD RGB COMPONENT The table below shows what settings are using this CLAMP POSITION setting for each input (INPUT1 and INPUT2). Setting Up the ...VIDEO of CLAMP POSITION 1 Press MENU to display the menu screen. Note Make this setting at AUTO. R. For details, please refer to the instruction manual supplied with a whitish or greenish cast. MAIN MENU PICTURE SCREEN CONT RAST BR I NG : VGA 4 Press SET to select LOCKED. MAIN MENU...
...screen. Notes ÷ Make this setup, be sure to carefully check the signal output of the component that you are connecting. 19 PRO-1000HD / PRO-800HD RGB COMPONENT The table below shows what settings are using this CLAMP POSITION setting for each input (INPUT1 and INPUT2). Setting Up the ...VIDEO of CLAMP POSITION 1 Press MENU to display the menu screen. Note Make this setting at AUTO. R. For details, please refer to the instruction manual supplied with a whitish or greenish cast. MAIN MENU PICTURE SCREEN CONT RAST BR I NG : VGA 4 Press SET to select LOCKED. MAIN MENU...
Owner's Manual
Page 30
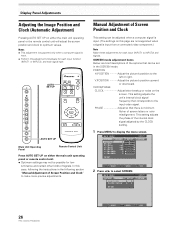
... MENU PICTURE SCREEN CONT RAST BR I ON : CL OCK / PHASE : SET UP 0/ 0 0/ 0 RE S ET INPUT1 OPTION 26 PRO-1000HD / PRO-800HD SELECT SET ENTER MENU EXIT This setting adjusts the phase of signals. R. AUTO SET UP S-VIDEO VIDEO AUTO SET UP Main Unit Operating Panel... Remote Control Unit Press AUTO SET UP on this case, following section "Manual Adjustment of screen letters or color misalignment. L EVEL ...
... MENU PICTURE SCREEN CONT RAST BR I ON : CL OCK / PHASE : SET UP 0/ 0 0/ 0 RE S ET INPUT1 OPTION 26 PRO-1000HD / PRO-800HD SELECT SET ENTER MENU EXIT This setting adjusts the phase of signals. R. AUTO SET UP S-VIDEO VIDEO AUTO SET UP Main Unit Operating Panel... Remote Control Unit Press AUTO SET UP on this case, following section "Manual Adjustment of screen letters or color misalignment. L EVEL ...

Other Manual
Page 33
... cable. (Skip this step if you still don't see the Welcome screen, press the TV/Video, Source, or Input button on your A/V receiver. (See the manual that cycles through the inputs. Once you can play and record DVDs 28 Be sure both emitters stick out about 1.5 inches directly in front of...
... cable. (Skip this step if you still don't see the Welcome screen, press the TV/Video, Source, or Input button on your A/V receiver. (See the manual that cycles through the inputs. Once you can play and record DVDs 28 Be sure both emitters stick out about 1.5 inches directly in front of...
Other Manual
Page 50
... Change/ Serial connector on choosing an IR code. • Try using the cable or satellite box's remote to Serial-MPG.) You can also check the manual for assistance. If you chose during Guided Setup. Next, go to TiVo Central, then 5 select Messages & Setup, then Settings, then Channels, then Channel Changing, and...
... Change/ Serial connector on choosing an IR code. • Try using the cable or satellite box's remote to Serial-MPG.) You can also check the manual for assistance. If you chose during Guided Setup. Next, go to TiVo Central, then 5 select Messages & Setup, then Settings, then Channels, then Channel Changing, and...
Other Manual
Page 65
...the above listed number for assistance. and you wish to locate the nearest Pioneer Authorized Independent Service Company, or if you wish to purchase replacement parts, operating instructions, service manuals, or accessories, please call the number shown below. 1-800-421-1404 ...this Recorder require service in the U.S.A. BOX 1540, Long Beach, California 90810-1540, U.S.A. PIONEER CORPORATION 4-1, Meguro 1-Chome, Meguro-ku, Tokyo 153-8654, Japan PIONEER ELECTRONICS (USA) INC. Pioneer Electronics (USA) Inc. TROUBLESHOOTING Check the Troubleshooting section of the User's Guide that came ...
...the above listed number for assistance. and you wish to locate the nearest Pioneer Authorized Independent Service Company, or if you wish to purchase replacement parts, operating instructions, service manuals, or accessories, please call the number shown below. 1-800-421-1404 ...this Recorder require service in the U.S.A. BOX 1540, Long Beach, California 90810-1540, U.S.A. PIONEER CORPORATION 4-1, Meguro 1-Chome, Meguro-ku, Tokyo 153-8654, Japan PIONEER ELECTRONICS (USA) INC. Pioneer Electronics (USA) Inc. TROUBLESHOOTING Check the Troubleshooting section of the User's Guide that came ...


