
Owner's Manual
Page 1
...After installation, be sure to deliver this manual to the customer and explain to the customer how to operate the Plasma Display properly. Note for damage caused by qualified personnel with enough skill and competence. Keep this PIONEER product. Always have an installation specialist ...or your Plasma Display, please carefully read the "Important Information" and these "Operating Instructions" so you very much for purchasing this manual in a safe place. Notes on Installation Work:...
...After installation, be sure to deliver this manual to the customer and explain to the customer how to operate the Plasma Display properly. Note for damage caused by qualified personnel with enough skill and competence. Keep this PIONEER product. Always have an installation specialist ...or your Plasma Display, please carefully read the "Important Information" and these "Operating Instructions" so you very much for purchasing this manual in a safe place. Notes on Installation Work:...
Owner's Manual
Page 2
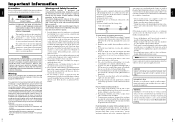
... phosphor burn under certain circumstances. To avoid shock and fire hazards: 1. If the problem persists, contact your plasma monitor and keep the manual handy for use solvents such as the continuous display of a static image over a long period. 6. If you to lead, a chemical...INSERTED. Do not attempt to water or moisture. 4. To protect your particular application needs. English Important Information Precautions Please read this manual carefully before using it. Therefore, it is strongly recommended to use with more of phosphor burn: * Lower the Brightness and ...
... phosphor burn under certain circumstances. To avoid shock and fire hazards: 1. If the problem persists, contact your plasma monitor and keep the manual handy for use solvents such as the continuous display of a static image over a long period. 6. If you to lead, a chemical...INSERTED. Do not attempt to water or moisture. 4. To protect your particular application needs. English Important Information Precautions Please read this manual carefully before using it. Therefore, it is strongly recommended to use with more of phosphor burn: * Lower the Brightness and ...
Owner's Manual
Page 4
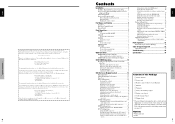
... TIMER 7 To set the off timer 7 To check the remaining time 7 To cancel the off timer 7 WIDE Operations 8 SCREEN SIZE Operation (manual 8 When viewing videos or digital video discs 8 SCREEN SIZE Operation with Computer Signals .......... 9 Setting the black level for HDMI signal 20 Setting the...the correct RGB select screen 19 Contents of the Package Ⅺ Plasma monitor Ⅺ Power cord Ⅺ Remote control with two AAA Batteries Ⅺ Manual Ⅺ Warranty Ⅺ Safety metal fittings (2pcs)* Ⅺ Ferrite cores (2pcs) Ⅺ Cable clamps (5pcs) Ⅺ Wiping cloth * ...
... TIMER 7 To set the off timer 7 To check the remaining time 7 To cancel the off timer 7 WIDE Operations 8 SCREEN SIZE Operation (manual 8 When viewing videos or digital video discs 8 SCREEN SIZE Operation with Computer Signals .......... 9 Setting the black level for HDMI signal 20 Setting the...the correct RGB select screen 19 Contents of the Package Ⅺ Plasma monitor Ⅺ Power cord Ⅺ Remote control with two AAA Batteries Ⅺ Manual Ⅺ Warranty Ⅺ Safety metal fittings (2pcs)* Ⅺ Ferrite cores (2pcs) Ⅺ Cable clamps (5pcs) Ⅺ Wiping cloth * ...
Owner's Manual
Page 6
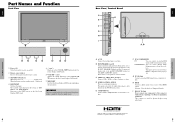
... L and R Connect speakers (optional) here. Maintain the correct polarity. Please refer to this connector without first consulting your speaker's owner's manual. The input is on and off switch does not disconnect the plasma display completely from a source with an RGB or component source (see ... 19). This input can be set for use with a HDMI output. here. I RS-232C (D-Sub) Never connect any component to your Pioneer installation technician. Lights red. The available inputs depend on both LEFT and RIGHT channels. F PC2/ COMPONENT2 PC2: You can connect DVDs, High...
... L and R Connect speakers (optional) here. Maintain the correct polarity. Please refer to this connector without first consulting your speaker's owner's manual. The input is on and off switch does not disconnect the plasma display completely from a source with an RGB or component source (see ... 19). This input can be set for use with a HDMI output. here. I RS-232C (D-Sub) Never connect any component to your Pioneer installation technician. Lights red. The available inputs depend on both LEFT and RIGHT channels. F PC2/ COMPONENT2 PC2: You can connect DVDs, High...
Owner's Manual
Page 8
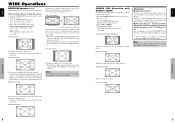
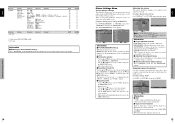
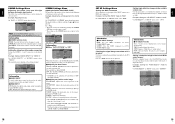
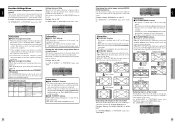
.... The image is expanded in the full size screen, select the 2.35:1 size screen to fill the entire screen. 1. English WIDE Operations SCREEN SIZE Operation (manual) With this function, you can select one correspondence with input signals, can be switched only when a 1280 dot x 768 line signal is input. Ⅵ When...
.... The image is expanded in the full size screen, select the 2.35:1 size screen to fill the entire screen. 1. English WIDE Operations SCREEN SIZE Operation (manual) With this function, you can select one correspondence with input signals, can be switched only when a 1280 dot x 768 line signal is input. Ⅵ When...
Owner's Manual
Page 11
...←→S BY S1←→S BY S2←→BTM LEFT←→BTM RIGHT←→TOP RIGHT←→TOP LEFT YES MANUAL/AUTO YES ABL 100/75/50/25 YES ORBITER OFF/AUTO1/AUTO2 YES INVERSE/WHITE OFF/INVERSE/WHITE YES SCREEN WIPER ON/OFF YES SOFT...
...←→S BY S1←→S BY S2←→BTM LEFT←→BTM RIGHT←→TOP RIGHT←→TOP LEFT YES MANUAL/AUTO YES ABL 100/75/50/25 YES ORBITER OFF/AUTO1/AUTO2 YES INVERSE/WHITE OFF/INVERSE/WHITE YES SCREEN WIPER ON/OFF YES SOFT...
Owner's Manual
Page 13
...PHASE features are available only when the "Auto Picture" is set to RGB and can 't be adjusted, set Auto Picture to OFF and adjust manually. Ⅵ Adjusting the position of the image V.POSITION: Adjusts the vertical position of the image can be switched by pressing the SCREEN SIZE button..." appears... The mode switches as follows each time the ᮤ or ᮣ button is off . * The AUTO PICTURE, PHASE and CLOCK are made manually. * If PHASE can not be adjusted and flickering of the image. EXIT RETURN Information Ⅵ When "AUTO PICTURE" is 1080I or 1035I or 540P. ...
...PHASE features are available only when the "Auto Picture" is set to RGB and can 't be adjusted, set Auto Picture to OFF and adjust manually. Ⅵ Adjusting the position of the image V.POSITION: Adjusts the vertical position of the image can be switched by pressing the SCREEN SIZE button..." appears... The mode switches as follows each time the ᮤ or ᮣ button is off . * The AUTO PICTURE, PHASE and CLOCK are made manually. * If PHASE can not be adjusted and flickering of the image. EXIT RETURN Information Ⅵ When "AUTO PICTURE" is 1080I or 1035I or 540P. ...
Owner's Manual
Page 15
... settings OFF: Will not show the still image. P DETECT : OFF ZOOM NAV : BTM LEFT PICTURE FREEZE : S BY S1 LONG LIFE : MANUAL SEL. EXIT RETURN Information Ⅵ ZOOM NAV Function * This feature is available only for PC1 or PC2 input signals. * This feature does not ...button will not function either. Ⅵ SUB. P DETECT function. P DETECT : AUTO ZOOM NAV : S BY S PICTURE FREEZE : S BY S1 LONG LIFE : MANUAL SEL. button FUNCTION POWER MGT. : OFF INPUT SKIP : OFF SUB. P DETECT" of the signal, scan and display all signals. ADJ. FUNCTION POWER MGT. :...
... settings OFF: Will not show the still image. P DETECT : OFF ZOOM NAV : BTM LEFT PICTURE FREEZE : S BY S1 LONG LIFE : MANUAL SEL. EXIT RETURN Information Ⅵ ZOOM NAV Function * This feature is available only for PC1 or PC2 input signals. * This feature does not ...button will not function either. Ⅵ SUB. P DETECT function. P DETECT : AUTO ZOOM NAV : S BY S PICTURE FREEZE : S BY S1 LONG LIFE : MANUAL SEL. button FUNCTION POWER MGT. : OFF INPUT SKIP : OFF SUB. P DETECT" of the signal, scan and display all signals. ADJ. FUNCTION POWER MGT. :...


