Owner's Manual
Page 4
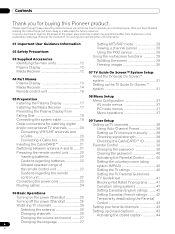
...Display 17 Installing the Media Receiver 17 Preventing the Plasma Display from that shown in a safe place for buying this Pioneer product. However the method of the remote control unit 22 Cautions regarding batteries 22 Allowed operation range of connecting and operating the unit is the same. 01 ... 03 Supplied Accessories Identifying the main units 12 Plasma Display 12 Media Receiver 12 04 Part Names Plasma Display 13 Media Receiver 14 Remote control unit 16 Setting MTS/SAP mode 28 Viewing a channel banner 29 Using the POD service 29 Using the multiscreen functions 29 ...
...Display 17 Installing the Media Receiver 17 Preventing the Plasma Display from that shown in a safe place for buying this Pioneer product. However the method of the remote control unit 22 Cautions regarding batteries 22 Allowed operation range of connecting and operating the unit is the same. 01 ... 03 Supplied Accessories Identifying the main units 12 Plasma Display 12 Media Receiver 12 04 Part Names Plasma Display 13 Media Receiver 14 Remote control unit 16 Setting MTS/SAP mode 28 Viewing a channel banner 29 Using the POD service 29 Using the multiscreen functions 29 ...
Owner's Manual
Page 6
... single-image screen 81 Starting the Slide Show Setup screen 81 Starting the Slide Show screen 81 Adjusting the picture quality 81 13 Useful Remote Control Features Learning function of the remote control unit 82 Using the learning function 82 Presetting manufacturer codes ...........82 Manufacture codes 83 Using the... remote control unit to control other devices 84 Receiver control buttons 84 Cable control buttons 85 SAT control buttons 86 VCR control buttons 87 ...
... single-image screen 81 Starting the Slide Show Setup screen 81 Starting the Slide Show screen 81 Adjusting the picture quality 81 13 Useful Remote Control Features Learning function of the remote control unit 82 Using the learning function 82 Presetting manufacturer codes ...........82 Manufacture codes 83 Using the... remote control unit to control other devices 84 Receiver control buttons 84 Cable control buttons 85 SAT control buttons 86 VCR control buttons 87 ...
Owner's Manual
Page 8
...the Plasma Display. • Do not use the handles to clean the Infrared rays The Plasma Display releases infrared rays because of its remote control sensor is detected for a long period of pixels. (Depending on and run the product occasionally. If you clean the surface ...for the purpose of this product, gently wipe it with a clean soft cloth (e.g., cotton and flannel). This principle may be adversely affected. Pioneer plasma display panels contain a very large number of time. Switch on the panel size; If the defective pixels are manufactured using the product for...
...the Plasma Display. • Do not use the handles to clean the Infrared rays The Plasma Display releases infrared rays because of its remote control sensor is detected for a long period of pixels. (Depending on and run the product occasionally. If you clean the surface ...for the purpose of this product, gently wipe it with a clean soft cloth (e.g., cotton and flannel). This principle may be adversely affected. Pioneer plasma display panels contain a very large number of time. Switch on the panel size; If the defective pixels are manufactured using the product for...
Owner's Manual
Page 12
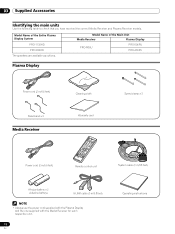
... the Entire Plasma Display System PRO-1130HD PRO-930HD Model Name of the Main Unit Media Receiver Plasma Display PRO-R06U PRO-506PU PRO-436PU The speakers are available as options. Plasma Display Power cord (2 m/6.6 feet) Bead band × 3 Media Receiver Cleaning cloth Warranty card Speed clamp × 3 Power cord (2 m/6.6 feet) Remote control unit System cable (3 m/9.8 feet...
... the Entire Plasma Display System PRO-1130HD PRO-930HD Model Name of the Main Unit Media Receiver Plasma Display PRO-R06U PRO-506PU PRO-436PU The speakers are available as options. Plasma Display Power cord (2 m/6.6 feet) Bead band × 3 Media Receiver Cleaning cloth Warranty card Speed clamp × 3 Power cord (2 m/6.6 feet) Remote control unit System cable (3 m/9.8 feet...
Owner's Manual
Page 13
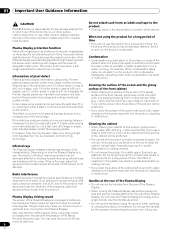
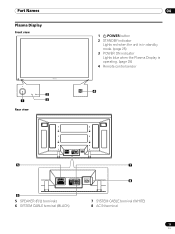
Part Names Part Names Plasma Display Front view 2 1 3 Rear view 04 1 a POWER button 2 STANDBY indicator Lights red when the unit is in standby mode. (page 25) 3 POWER ON indicator Lights blue when the Plasma Display is operating. (page 25) 4 Remote control sensor 4 5 SYSTEM CABLE WHITE BLACK SYSTEM CABLE WHITE BLACK 6 5 SPEAKER (R/L) terminals 6 SYSTEM CABLE terminal (BLACK) 7 8 7 SYSTEM CABLE terminal (WHITE) 8 AC IN terminal 13 En
Part Names Part Names Plasma Display Front view 2 1 3 Rear view 04 1 a POWER button 2 STANDBY indicator Lights red when the unit is in standby mode. (page 25) 3 POWER ON indicator Lights blue when the Plasma Display is operating. (page 25) 4 Remote control sensor 4 5 SYSTEM CABLE WHITE BLACK SYSTEM CABLE WHITE BLACK 6 5 SPEAKER (R/L) terminals 6 SYSTEM CABLE terminal (BLACK) 7 8 7 SYSTEM CABLE terminal (WHITE) 8 AC IN terminal 13 En
Owner's Manual
Page 16
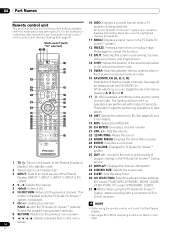
... menu page. screen. 16 En When the TV Guide On Screen™ system is displayed. 31 (REC): When using the remote control unit, point it into standby mode. 27 DISPLAY: Displays the channel information. 2 Transmission confirmation LED 28 SCREEN SIZE: Selects the screen...MOVIE, GAME, 4 0 - 9: Selects the channel. Mode switch (with a connected VCR or D-VHS recorder. 7 CH +/-: Selects the channel. 04 Part Names Remote control unit This section describes the functions of the buttons available when the mode switch has been set channels by pressing A, B, C and D. 7 21 17 D: ...
... menu page. screen. 16 En When the TV Guide On Screen™ system is displayed. 31 (REC): When using the remote control unit, point it into standby mode. 27 DISPLAY: Displays the channel information. 2 Transmission confirmation LED 28 SCREEN SIZE: Selects the screen...MOVIE, GAME, 4 0 - 9: Selects the channel. Mode switch (with a connected VCR or D-VHS recorder. 7 CH +/-: Selects the channel. 04 Part Names Remote control unit This section describes the functions of the buttons available when the mode switch has been set channels by pressing A, B, C and D. 7 21 17 D: ...
Owner's Manual
Page 21
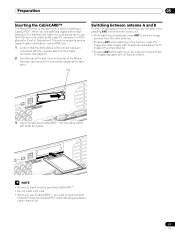
... use the POD service provided by pressing ANT on the rear of Deployment. See page 20. 2 Hold the tab of the slot cover on the remote control unit. • While watching a broadcast, press ANT to view the image received from the Cable Converter.
... use the POD service provided by pressing ANT on the rear of Deployment. See page 20. 2 Hold the tab of the slot cover on the remote control unit. • While watching a broadcast, press ANT to view the image received from the Cable Converter.
Owner's Manual
Page 22
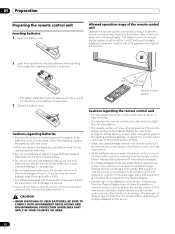
... system if the batteries in the unit are weak. Replace the batteries with new ones. • When you place such equipment operated through infrared remote control as a VCR nearby, that equipment at the bottom right of the front panel of new batteries or cause chemical leakage in old batteries. ... receive commands from the Plasma Display may not allow this system to the sensor must correspond with this product may not work properly if the remote sensor window of different types. If you will occur. If this happens, replace the batteries with new ones if necessary. • The ...
... system if the batteries in the unit are weak. Replace the batteries with new ones. • When you place such equipment operated through infrared remote control as a VCR nearby, that equipment at the bottom right of the front panel of new batteries or cause chemical leakage in old batteries. ... receive commands from the Plasma Display may not allow this system to the sensor must correspond with this product may not work properly if the remote sensor window of different types. If you will occur. If this happens, replace the batteries with new ones if necessary. • The ...
Owner's Manual
Page 25
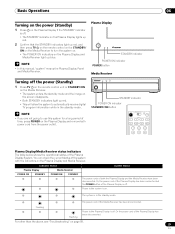
... . • The STANDBY indicator on the Plasma Display lights up red. 2 Confirm that the STANDBY indicators light up red, and then press TV a on the remote control unit or STANDBY/ ON on the Media Receiver to turn the system on. • The POWER ON indicators on the Plasma Display and Media... the STANDBY indicator is off . NOTE • If you are not going to the Plasma Display is off the power (Standby) 1 Press TV a on the remote control unit or STANDBY/ON on the Media Receiver. • The system enters the standby mode and the image on the screen disappears. • Both...
... . • The STANDBY indicator on the Plasma Display lights up red. 2 Confirm that the STANDBY indicators light up red, and then press TV a on the remote control unit or STANDBY/ ON on the Media Receiver to turn the system on. • The POWER ON indicators on the Plasma Display and Media... the STANDBY indicator is off . NOTE • If you are not going to the Plasma Display is off the power (Standby) 1 Press TV a on the remote control unit or STANDBY/ON on the Media Receiver. • The system enters the standby mode and the image on the screen disappears. • Both...

Owner's Manual
Page 26
...8226; Each time you cannot tune in those channels. Selecting the antenna After confirming that shows information about the currently selected channel. on the remote control unit Select channels directly by TV stations as CH +/- To clear the channel banner, press INFO. • If you may not... Screen™ system, the channel banner may press CH ENTER to the previously tuned channel. Using 0 - 9 and • (dot) on the remote control unit. • Press CH RETURN to switch the currently tuned channel to tune in emergency situations. EXAMPLE • To select channel 5 (1-digit ...
...8226; Each time you cannot tune in those channels. Selecting the antenna After confirming that shows information about the currently selected channel. on the remote control unit Select channels directly by TV stations as CH +/- To clear the channel banner, press INFO. • If you may not... Screen™ system, the channel banner may press CH ENTER to the previously tuned channel. Using 0 - 9 and • (dot) on the remote control unit. • Press CH RETURN to switch the currently tuned channel to tune in emergency situations. EXAMPLE • To select channel 5 (1-digit ...
Owner's Manual
Page 27
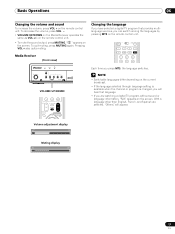
...switches. With a language other than English, French, and Spanish are watching a digital TV program without sound or language information, "N/A" appears on the remote control unit. Changing the language If you have selected a digital TV program that language. • If you are selected, "Others" will appear.... To decrease the volume, press VOL -. • VOLUME UP/DOWN on the remote control unit. • To mute the sound output, press MUTING. on the Media Receiver operates the same as VOL +/- Basic Operations 06 Changing...
...switches. With a language other than English, French, and Spanish are watching a digital TV program without sound or language information, "N/A" appears on the remote control unit. Changing the language If you have selected a digital TV program that language. • If you are selected, "Others" will appear.... To decrease the volume, press VOL -. • VOLUME UP/DOWN on the remote control unit. • To mute the sound output, press MUTING. on the Media Receiver operates the same as VOL +/- Basic Operations 06 Changing...
Owner's Manual
Page 40
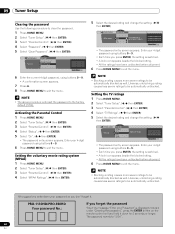
... using buttons 0 - 9. • Each time you press ENTER, the setting is displayed in step 6 under "Clearing the password", press the ENTER button on the remote control unit and hold it down your password so you forget the password When the message "Enter your 4-digit password using buttons 0 - 9. 6 Press HOME MENU... xxxxxxxxxxxxxxxxxxxxx xxxxxxxxxxxxxxxxxxxxx Home Menu Exit 6 Enter the current 4-digit password, using buttons 0 - 9. • A confirmation screen appears. 7 Press A. 8 Press HOME MENU to exit the menu. PRO-1130HD/PRO-930HD Your password No.: If you don't forget it.
... using buttons 0 - 9. • Each time you press ENTER, the setting is displayed in step 6 under "Clearing the password", press the ENTER button on the remote control unit and hold it down your password so you forget the password When the message "Enter your 4-digit password using buttons 0 - 9. 6 Press HOME MENU... xxxxxxxxxxxxxxxxxxxxx xxxxxxxxxxxxxxxxxxxxx Home Menu Exit 6 Enter the current 4-digit password, using buttons 0 - 9. • A confirmation screen appears. 7 Press A. 8 Press HOME MENU to exit the menu. PRO-1130HD/PRO-930HD Your password No.: If you don't forget it.
Owner's Manual
Page 43
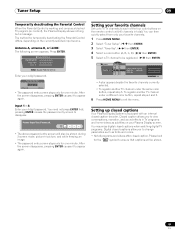
... effects in -picture, and while freezing an image. • The password entry screen stays only for temporarily deactivating the Parental Control differs, depending on the remote control unit (40 channels in total). B) xxxxxxxxxxxxxxxxxxxxx xxxxxxxxxxxxxxxxxxxxx xxxxxxxxxxxxxxxxxxxxx Enter Disable Parental Control Enter your 4-digit password. Input 1 - 4: Enter your 4-digit password. You need not...
... effects in -picture, and while freezing an image. • The password entry screen stays only for temporarily deactivating the Parental Control differs, depending on the remote control unit (40 channels in total). B) xxxxxxxxxxxxxxxxxxxxx xxxxxxxxxxxxxxxxxxxxx xxxxxxxxxxxxxxxxxxxxx Enter Disable Parental Control Enter your 4-digit password. Input 1 - 4: Enter your 4-digit password. You need not...
Owner's Manual
Page 47
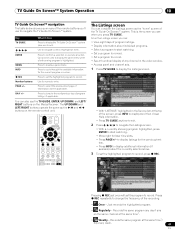
... to the next/previous day of information (where applicable). The Listings screen You can consider the Listings screen as the / and / buttons on the remote control unit. Just records the highlighted program. • Regularly - Press to set the program to navigate the TV Guide On Screen™ system. ... (if applicable). TV Guide On Screen™ System Operation 10 TV Guide On Screen™ navigation The table below shows a summary of the remote buttons you'll use the TV GUIDE, ENTER, UP/DOWN, and LEFT/ RIGHT buttons on the Media Receiver. Key TV GUIDE What it airs...
... to the next/previous day of information (where applicable). The Listings screen You can consider the Listings screen as the / and / buttons on the remote control unit. Just records the highlighted program. • Regularly - Press to set the program to navigate the TV Guide On Screen™ system. ... (if applicable). TV Guide On Screen™ System Operation 10 TV Guide On Screen™ navigation The table below shows a summary of the remote buttons you'll use the TV GUIDE, ENTER, UP/DOWN, and LEFT/ RIGHT buttons on the Media Receiver. Key TV GUIDE What it airs...
Owner's Manual
Page 48
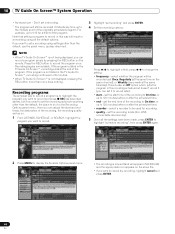
... change the setting. • frequency - Press the REC button to record in this way will appear in SCHEDULE) and the appropriate icon appears on the remote. There's also an Off option which puts the program in a recording using settings other than the default, the place to 9:30 program. If you want...
... change the setting. • frequency - Press the REC button to record in this way will appear in SCHEDULE) and the appropriate icon appears on the remote. There's also an Off option which puts the program in a recording using settings other than the default, the place to 9:30 program. If you want...
Owner's Manual
Page 58
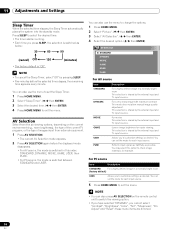
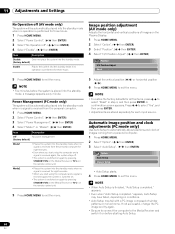
... a highly defined image in a normally bright room (factory default) USER Allows you cannot select "Contrast", "Brightness", "Color", "Tint", "Sharpness", "Pro Adjust" and "Reset"; Lowers image brightness for each input source. You may select this order; NOTE • You can also press AV SELECTION on ... brightness), the type of the current TV program, or the type of images input from the six viewing options, depending on the remote control unit to exit the menu. 11 Adjustments and Settings Adjustments and Settings Sleep Timer When the selected time elapses, the Sleep Timer...
... a highly defined image in a normally bright room (factory default) USER Allows you cannot select "Contrast", "Brightness", "Color", "Tint", "Sharpness", "Pro Adjust" and "Reset"; Lowers image brightness for each input source. You may select this order; NOTE • You can also press AV SELECTION on ... brightness), the type of the current TV program, or the type of images input from the six viewing options, depending on the remote control unit to exit the menu. 11 Adjustments and Settings Adjustments and Settings Sleep Timer When the selected time elapses, the Sleep Timer...
Owner's Manual
Page 64
appears. • Even when "Auto Setup completed." A confirmation screen appears. Press / to the Media Receiver and switch it on the remote control unit. 5 Press HOME MENU to exit the menu. 5 Adjust the vertical position ( / ) or horizontal position ( / ). 6 Press HOME MENU to exit the menu.... ENTER) 3 Select "No Operation off . • The system is switched on again by pressing STANDBY/ON on the Media Receiver or TV on the remote control unit. • Places the system into the standby mode when no signal is received for eight seconds. • When you start using the computer...
appears. • Even when "Auto Setup completed." A confirmation screen appears. Press / to the Media Receiver and switch it on the remote control unit. 5 Press HOME MENU to exit the menu. 5 Adjust the vertical position ( / ) or horizontal position ( / ). 6 Press HOME MENU to exit the menu.... ENTER) 3 Select "No Operation off . • The system is switched on again by pressing STANDBY/ON on the Media Receiver or TV on the remote control unit. • Places the system into the standby mode when no signal is received for eight seconds. • When you start using the computer...
Owner's Manual
Page 68
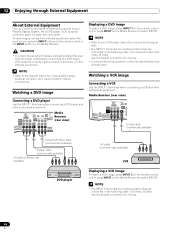
...INPUT 1 Y CB / PB COMPONENT VIDEO CR / PR INPUT 1 HD Displaying a DVD image To watch a VCR image, press INPUT 2 on the remote control unit or press INPUT on the Media Receiver to select INPUT2. Watching a VCR image Connecting a VCR Use the INPUT 2 terminals when connecting a ...cable (commercially available) AV cable (commercially available) VCR DVD player Displaying a VCR image To watch a DVD image, press INPUT 1 on the remote control unit or press INPUT on the Media Receiver. NOTE • The INPUT 2 terminals are checked whether they are connected in the following order...
...INPUT 1 Y CB / PB COMPONENT VIDEO CR / PR INPUT 1 HD Displaying a DVD image To watch a VCR image, press INPUT 2 on the remote control unit or press INPUT on the Media Receiver to select INPUT2. Watching a VCR image Connecting a VCR Use the INPUT 2 terminals when connecting a ...cable (commercially available) AV cable (commercially available) VCR DVD player Displaying a VCR image To watch a DVD image, press INPUT 1 on the remote control unit or press INPUT on the Media Receiver. NOTE • The INPUT 2 terminals are checked whether they are connected in the following order...
Owner's Manual
Page 69
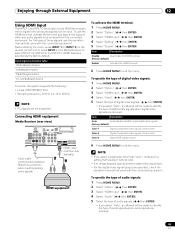
... terminals to which digital video and audio signals can be received from the connected equipment. Before starting the menu, press INPUT 1 (or INPUT 3) on the remote control unit or press INPUT on the Media Receiver to exit the menu. Item Description Auto Automatically identifies input digital video signals. (factory default) Color...
... terminals to which digital video and audio signals can be received from the connected equipment. Before starting the menu, press INPUT 1 (or INPUT 3) on the remote control unit or press INPUT on the Media Receiver to exit the menu. Item Description Auto Automatically identifies input digital video signals. (factory default) Color...
Owner's Manual
Page 70
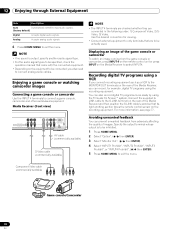
...audio signal type. • For the audio signal types to be specified, check the operation manual that its light emitting section faces the remote control sensor on the rear of the Media Receiver, you can record, for viewing. • Connect external equipment to only terminals that ... TV programs using the TV Guide On Screen™ system. You can prevent unwanted feedback from the game console or camcorder, press INPUT 4 on the remote control unit or press INPUT on the equipment to be inhibited. 1 Press HOME MENU. 2 Select "Option". ( / then ENTER) 3 Select "Monitor Out". ( / then...
...audio signal type. • For the audio signal types to be specified, check the operation manual that its light emitting section faces the remote control sensor on the rear of the Media Receiver, you can record, for viewing. • Connect external equipment to only terminals that ... TV programs using the TV Guide On Screen™ system. You can prevent unwanted feedback from the game console or camcorder, press INPUT 4 on the remote control unit or press INPUT on the equipment to be inhibited. 1 Press HOME MENU. 2 Select "Option". ( / then ENTER) 3 Select "Monitor Out". ( / then...


