Owner's Manual
Page 3
... entities to radio communications. Reorient or relocate the receiving antenna. - Consult the dealer or an experienced radio/TV technician for a Class B digital device, pursuant to plug this device must accept any interference received, including ...Name: Plasma Display System (Plasma Display) (Media Receiver) Model Number: PRO-1130HD PRO-930HD (PRO-506PU) (PRO-436PU) (PRO-R06U) (PRO-R06U) Product Category: Class B Personal Computers & Peripherals Responsible Party Name: PIONEER ELECTRONICS SERVICE, INC. Increase the separation between the equipment and receiver....
... entities to radio communications. Reorient or relocate the receiving antenna. - Consult the dealer or an experienced radio/TV technician for a Class B digital device, pursuant to plug this device must accept any interference received, including ...Name: Plasma Display System (Plasma Display) (Media Receiver) Model Number: PRO-1130HD PRO-930HD (PRO-506PU) (PRO-436PU) (PRO-R06U) (PRO-R06U) Product Category: Class B Personal Computers & Peripherals Responsible Party Name: PIONEER ELECTRONICS SERVICE, INC. Increase the separation between the equipment and receiver....
Owner's Manual
Page 4
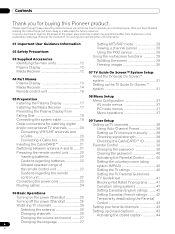
...read through these operating instructions so you for buying this Pioneer product. In some countries or regions, the shape of...Receiver 17 Preventing the Plasma Display from that shown in a safe place for watching digital and/or conventional TV channels 20 Connecting VHF/UHF antennas and a Cable 20 Connecting a Cable box 20 Inserting the CableCARD 21... 40 Setting the voluntary movie rating system (MPAA 40 Setting the TV ratings 40 Setting the TV Parental Guidelines (TV Guidelines 41 Blocking Not Rated TV programs ........ 41 Canadian rating systems 41 06 Basic Operations Turning on...
...read through these operating instructions so you for buying this Pioneer product. In some countries or regions, the shape of...Receiver 17 Preventing the Plasma Display from that shown in a safe place for watching digital and/or conventional TV channels 20 Connecting VHF/UHF antennas and a Cable 20 Connecting a Cable box 20 Inserting the CableCARD 21... 40 Setting the voluntary movie rating system (MPAA 40 Setting the TV ratings 40 Setting the TV Parental Guidelines (TV Guidelines 41 Blocking Not Rated TV programs ........ 41 Canadian rating systems 41 06 Basic Operations Turning on...
Owner's Manual
Page 5
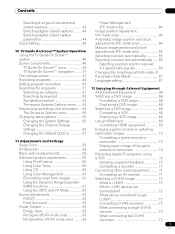
...and clock Clock Setting 45 adjustments (PC mode only 64 10 TV Guide On Screen™ System Operation Using the TV Guide On Screen™ system 46 Screen components 46 TV Guide On Screen™ icons 46 TV Guide On Screen™ navigation ....... 47 The Listings screen ... (AV mode only) ........ 64 Connecting a game console or camcorder 70 Displaying an image of the game console or camcorder 70 Recording digital TV programs using a VCR 70 Avoiding unwanted feedback 70 Connecting a recorder 71 Connecting other audio equipment ......... 71 Connecting an AV receiver 71 Watching ...
...and clock Clock Setting 45 adjustments (PC mode only 64 10 TV Guide On Screen™ System Operation Using the TV Guide On Screen™ system 46 Screen components 46 TV Guide On Screen™ icons 46 TV Guide On Screen™ navigation ....... 47 The Listings screen ... (AV mode only) ........ 64 Connecting a game console or camcorder 70 Displaying an image of the game console or camcorder 70 Recording digital TV programs using a VCR 70 Avoiding unwanted feedback 70 Connecting a recorder 71 Connecting other audio equipment ......... 71 Connecting an AV receiver 71 Watching ...
Owner's Manual
Page 7
...build-up by using only parts and accessories designed by using a vacuum cleaner set to its lifetime, the luminosity of the Pioneer PRO-1130HD/PRO-930HD Plasma Display System will diminish very slowly, such as very precise and highly advanced technology. This product should not be ... the unit slightly from a TV, VCR, DVD player or any still image, it is strongly recommended. Using the unit without proper ventilation may result in instability, and could result in front of vibration or accidental movement. The Pioneer PureVision PRO-1130HD/PRO-930HD incorporates the latest in the...
...build-up by using only parts and accessories designed by using a vacuum cleaner set to its lifetime, the luminosity of the Pioneer PRO-1130HD/PRO-930HD Plasma Display System will diminish very slowly, such as very precise and highly advanced technology. This product should not be ... the unit slightly from a TV, VCR, DVD player or any still image, it is strongly recommended. Using the unit without proper ventilation may result in instability, and could result in front of vibration or accidental movement. The Pioneer PureVision PRO-1130HD/PRO-930HD incorporates the latest in the...
Owner's Manual
Page 14
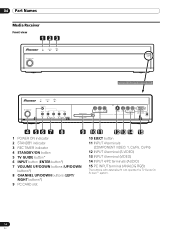
... Front view 123 STANDBY/ON REC ON STANDBY TIMER PULL OPEN Pull this section to open the door. STANDBY/ON REC ON STANDBY TIMER TV GUIDE ENTER DOWN UP LEFT RIGHT INPUT DOWN UP VOLUME DOWN UP CHANNEL HOME GALLERY PC CARD SLOT Y CB / PB CR / PR... VIDEO EJECT S-VIDEO VIDEO INPUT 4 L AUDIO R PC ANALOG RGB PC 4 56 7 8 9 1 POWER ON indicator 2 STANDBY indicator 3 REC TIMER indicator 4 STANDBY/ON button 5 TV GUIDE button* 6 INPUT button (ENTER button*) 7 VOLUME UP/DOWN buttons (UP/DOWN buttons*) 8 CHANNEL UP/DOWN buttons (LEFT/ RIGHT buttons*) 9 PC CARD slot 10 11...
... Front view 123 STANDBY/ON REC ON STANDBY TIMER PULL OPEN Pull this section to open the door. STANDBY/ON REC ON STANDBY TIMER TV GUIDE ENTER DOWN UP LEFT RIGHT INPUT DOWN UP VOLUME DOWN UP CHANNEL HOME GALLERY PC CARD SLOT Y CB / PB CR / PR... VIDEO EJECT S-VIDEO VIDEO INPUT 4 L AUDIO R PC ANALOG RGB PC 4 56 7 8 9 1 POWER ON indicator 2 STANDBY indicator 3 REC TIMER indicator 4 STANDBY/ON button 5 TV GUIDE button* 6 INPUT button (ENTER button*) 7 VOLUME UP/DOWN buttons (UP/DOWN buttons*) 8 CHANNEL UP/DOWN buttons (LEFT/ RIGHT buttons*) 9 PC CARD slot 10 11...
Owner's Manual
Page 16
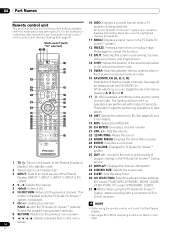
... timer. i.LINK) (AV mode: STANDARD, DYNAMIC, MOVIE, GAME, 4 0 - 9: Selects the channel. USER, PURE. This button is disabled while the TV Guide On Screen™ system is displayed. 31 (REC): When using the remote control unit, point it into standby mode. 27 DISPLAY: Displays the... is being watched. Display. (INPUT 1, INPUT 2, INPUT 3, INPUT 4, PC, 30 AV SELECTION: Selects audio and video settings. screen. 16 En When the TV Guide On Screen™ system is in -picture mode. 4 16 FAVORITE CH (A, B, C, D): Selects any of the buttons available when the mode switch has ...
... timer. i.LINK) (AV mode: STANDARD, DYNAMIC, MOVIE, GAME, 4 0 - 9: Selects the channel. USER, PURE. This button is disabled while the TV Guide On Screen™ system is displayed. 31 (REC): When using the remote control unit, point it into standby mode. 27 DISPLAY: Displays the... is being watched. Display. (INPUT 1, INPUT 2, INPUT 3, INPUT 4, PC, 30 AV SELECTION: Selects audio and video settings. screen. 16 En When the TV Guide On Screen™ system is in -picture mode. 4 16 FAVORITE CH (A, B, C, D): Selects any of the buttons available when the mode switch has ...
Owner's Manual
Page 20
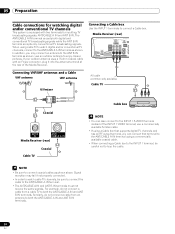
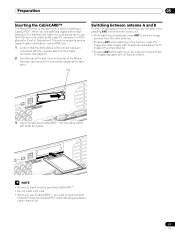
...terminal, be sure to connect the cable to both the ANT/CABLE A IN and ANT B IN terminals. For example, do not connect a cable from a cable TV to the ANT/CABLE A IN terminal. • The ANT/CABLE A IN and ANT B IN terminals must not receive the same signals. Media Receiver (rear)...be careful not to enjoy clearer pictures. NOTE • Be sure to connect a Cable box. 05 Preparation Cable connections for watching digital and/or conventional TV channels This system is equipped with an F-type connector, plug it into the antenna terminal at the rear of the INPUT 1 VIDEO terminal; use a...
...terminal, be sure to connect the cable to both the ANT/CABLE A IN and ANT B IN terminals. For example, do not connect a cable from a cable TV to the ANT/CABLE A IN terminal. • The ANT/CABLE A IN and ANT B IN terminals must not receive the same signals. Media Receiver (rear)...be careful not to enjoy clearer pictures. NOTE • Be sure to connect a Cable box. 05 Preparation Cable connections for watching digital and/or conventional TV channels This system is equipped with an F-type connector, plug it into the antenna terminal at the rear of the INPUT 1 VIDEO terminal; use a...
Owner's Manual
Page 21
...DIOGPITTAICLASOLUUBT WOOFER Cable CARD WHITE 3 LACK M CABLE Insert the specified CableCARD™ into the Cable CARD slot as far as it by the cable TV company; the POD stands for inserting a CableCARD™. This service presents various types of useful information, using HTML text. 1 Confirm that the ...of the Media Receiver, and remove the cover while releasing the tab's latch. When you are watching digital and/or High Definition TV channels over cable, the card allows you need not execute Auto Channel Preset; Preparation 05 Inserting the CableCARD™ The Media ...
...DIOGPITTAICLASOLUUBT WOOFER Cable CARD WHITE 3 LACK M CABLE Insert the specified CableCARD™ into the Cable CARD slot as far as it by the cable TV company; the POD stands for inserting a CableCARD™. This service presents various types of useful information, using HTML text. 1 Confirm that the ...of the Media Receiver, and remove the cover while releasing the tab's latch. When you are watching digital and/or High Definition TV channels over cable, the card allows you need not execute Auto Channel Preset; Preparation 05 Inserting the CableCARD™ The Media ...
Owner's Manual
Page 25
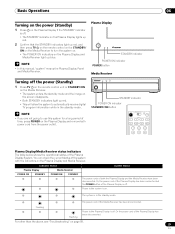
... Display/Media Receiver status indicators The table below shows the operational status of the Plasma Display has been disconnected. Power to automatically receive digital TV program information while in the standby mode. Or the power cord of the Plasma Display System. The system is on. For other than... Basic Operations Turning on the power (Standby) 1 Press a on the Plasma Display if the STANDBY indicator is off the power (Standby) 1 Press TV a on the remote control unit or STANDBY/ON on the Media Receiver. • The system enters the standby mode and the image on the screen...
... Display/Media Receiver status indicators The table below shows the operational status of the Plasma Display has been disconnected. Power to automatically receive digital TV program information while in the standby mode. Or the power cord of the Plasma Display System. The system is on. For other than... Basic Operations Turning on the power (Standby) 1 Press a on the Plasma Display if the STANDBY indicator is off the power (Standby) 1 Press TV a on the remote control unit or STANDBY/ON on the Media Receiver. • The system enters the standby mode and the image on the screen...

Owner's Manual
Page 26
...RETURN again to the antenna input terminals on the Media Receiver (page 20). Media Receiver (front view) STANDBY/ON REC ON STANDBY TIMER TV GUIDE ENTER DOWN UP LEFT RIGHT INPUT DOWN UP VOLUME DOWN UP CHANNEL HOM PC CHANNEL UP/DOWN Channel banner 12:33pm DTV 2 &#... CH RETURN to switch the currently tuned channel to 9. Using 0 - 9 and • (dot) on the remote control unit Select channels directly by TV stations as CH +/- For the procedure, see emergency alert messages scrolling at the top of program information. To decrease the channel number, press CH -. &#...
...RETURN again to the antenna input terminals on the Media Receiver (page 20). Media Receiver (front view) STANDBY/ON REC ON STANDBY TIMER TV GUIDE ENTER DOWN UP LEFT RIGHT INPUT DOWN UP VOLUME DOWN UP CHANNEL HOM PC CHANNEL UP/DOWN Channel banner 12:33pm DTV 2 &#... CH RETURN to switch the currently tuned channel to 9. Using 0 - 9 and • (dot) on the remote control unit Select channels directly by TV stations as CH +/- For the procedure, see emergency alert messages scrolling at the top of program information. To decrease the channel number, press CH -. &#...
Owner's Manual
Page 27
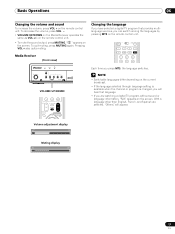
...To quit muting, press MUTING again. NOTE • Switchable languages differ depending on the screen. Changing the language If you have selected a digital TV program that language. • If you press MTS, the language switches. " " appears on the remote control unit. • To mute...same as VOL +/- Volume adjustment display Muting display 27 En With a language other than English, French, and Spanish are watching a digital TV program without sound or language information, "N/A" appears on the current broadcast. • If the language selected through language setting is available ...
...To quit muting, press MUTING again. NOTE • Switchable languages differ depending on the screen. Changing the language If you have selected a digital TV program that language. • If you press MTS, the language switches. " " appears on the remote control unit. • To mute...same as VOL +/- Volume adjustment display Muting display 27 En With a language other than English, French, and Spanish are watching a digital TV program without sound or language information, "N/A" appears on the current broadcast. • If the language selected through language setting is available ...
Owner's Manual
Page 28
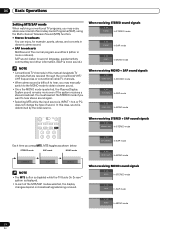
...is determined by the video source. SAP sound: Listen to second language, supplementary commentary and other information. (SAP is mono sound.) NOTE • Conventional TV channels in mono or stereo). A 125 SAP (STEREO) In SAP mode A 125 MONO (SAP) In MONO mode When receiving MONO sound signals A 125...8226; Selecting MTS while the input source is displayed. • In each of sound. 06 Basic Operations Setting MTS/SAP mode When watching conventional TV programs, you may manually switch to the MONO mode to obtain clearer sound. • Once the MONO mode is selected, the Plasma Display ...
...is determined by the video source. SAP sound: Listen to second language, supplementary commentary and other information. (SAP is mono sound.) NOTE • Conventional TV channels in mono or stereo). A 125 SAP (STEREO) In SAP mode A 125 MONO (SAP) In MONO mode When receiving MONO sound signals A 125...8226; Selecting MTS while the input source is displayed. • In each of sound. 06 Basic Operations Setting MTS/SAP mode When watching conventional TV programs, you may manually switch to the MONO mode to obtain clearer sound. • Once the MONO mode is selected, the Plasma Display ...

Owner's Manual
Page 29
...not included in -picture 1 Station name 2 Current time 3 Channel number 4 Input (Ant. Basic Operations 06 Viewing a channel banner While watching a TV program, pressing INFO causes the following procedure to select the 2-screen or picturein-picture mode. 2-screen 12 34 12:33pm DTV 2 • 1002... useful information, using HTML text. 1 Press SPLIT to view the POD display. 29 En B) 5 Program title 6 Program time schedule 7 TV rating icon 8 Channel logo NOTE • The above information is switched among 2-screen, picture-in-picture, and single-screen. This service presents...
...not included in -picture 1 Station name 2 Current time 3 Channel number 4 Input (Ant. Basic Operations 06 Viewing a channel banner While watching a TV program, pressing INFO causes the following procedure to select the 2-screen or picturein-picture mode. 2-screen 12 34 12:33pm DTV 2 • 1002... useful information, using HTML text. 1 Press SPLIT to view the POD display. 29 En B) 5 Program title 6 Program time schedule 7 TV rating icon 8 Channel logo NOTE • The above information is switched among 2-screen, picture-in-picture, and single-screen. This service presents...
Owner's Manual
Page 30
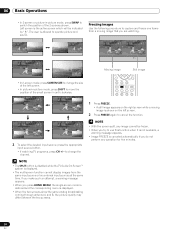
Freezing images Use the following procedure to operate picture and sound. NOTE • The SPLIT button is disabled while the TV Guide On Screen™ system is the active screen which will be frozen. • When you press HOME MENU, the single-screen mode is ... Operations • In 2-screen or picture-in anti-clockwise. 2 To select the desired input source, press the appropriate input source button. • If watching TV programs, press CH +/- to use this function when it is not available, a warning message appears. • Image FREEZE is allowed to capture and freeze one...
Freezing images Use the following procedure to operate picture and sound. NOTE • The SPLIT button is disabled while the TV Guide On Screen™ system is the active screen which will be frozen. • When you press HOME MENU, the single-screen mode is ... Operations • In 2-screen or picture-in anti-clockwise. 2 To select the desired input source, press the appropriate input source button. • If watching TV programs, press CH +/- to use this function when it is not available, a warning message appears. • Image FREEZE is allowed to capture and freeze one...
Owner's Manual
Page 31
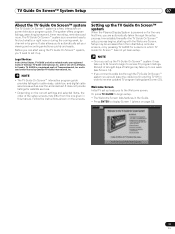
...; system When the Plasma Display System is a convenient way to find out what's on for a device in the Guide. • Press ENTER to receive updated TV program listings (see Screen 14). • If you connect a cable box through the setup process. NOTE • Once you 'll need to receive... International, Inc. and/or one given in order to display Screen 1 (shown on page 32). 31 En NOTE • The TV Guide On Screen™ interactive program guide provides listings for satellite services. • Depending on the screens. It does not provide listings for cable-ready, ...
...; system When the Plasma Display System is a convenient way to find out what's on for a device in the Guide. • Press ENTER to receive updated TV program listings (see Screen 14). • If you connect a cable box through the setup process. NOTE • Once you 'll need to receive... International, Inc. and/or one given in order to display Screen 1 (shown on page 32). 31 En NOTE • The TV Guide On Screen™ interactive program guide provides listings for satellite services. • Depending on the screens. It does not provide listings for cable-ready, ...

Owner's Manual
Page 32
... to set it up the Guide now, this reminder screen will appear each time you power on the TV (except if you cannot return to watching TV and stops the reminder screen from appearing upon power on your TV. • Press / to highlight a country. • Press ENTER to display Screen 3. 32 En... 1, you power on . Screen 2: Enter ZIP or Postal Code • If you selected USA in Screen 1, you exit setup. The last screen of your TV. Screen 1: Country • This screen asks you the location of the procedure gives you the opportunity to correct any mistakes before you see the ZIP...
... to set it up the Guide now, this reminder screen will appear each time you power on the TV (except if you cannot return to watching TV and stops the reminder screen from appearing upon power on your TV. • Press / to highlight a country. • Press ENTER to display Screen 3. 32 En... 1, you power on . Screen 2: Enter ZIP or Postal Code • If you selected USA in Screen 1, you exit setup. The last screen of your TV. Screen 1: Country • This screen asks you the location of the procedure gives you the opportunity to correct any mistakes before you see the ZIP...

Owner's Manual
Page 33
... the correct way to install the G-LINK cable from the back of the device to display Screen 7. Screen 5: Which TV Guide input is properly installed. • Press ENTER to display Screen 9. 33 En TV Guide On Screen™ System Setup 07 Screen 3: Do you have a Cable Box? • If you select "Yes...
... the correct way to install the G-LINK cable from the back of the device to display Screen 7. Screen 5: Which TV Guide input is properly installed. • Press ENTER to display Screen 9. 33 En TV Guide On Screen™ System Setup 07 Screen 3: Do you have a Cable Box? • If you select "Yes...

Owner's Manual
Page 34
...: Congratulations • Press ENTER to receive a channel lineup and listings. • If you select "No", you see Screen 12. • If you see Screen 1. 07 TV Guide On Screen™ System Setup Screen 9: Cable Box Preparation • Follow the on your setup configuration, you see Screen 13. If you select "Test...
...: Congratulations • Press ENTER to receive a channel lineup and listings. • If you select "No", you see Screen 12. • If you see Screen 1. 07 TV Guide On Screen™ System Setup Screen 9: Cable Box Preparation • Follow the on your setup configuration, you see Screen 13. If you select "Test...

Owner's Manual
Page 35
... cable is done, Screen 20 displays automatically. Screen 17: VCR Brand Name • Press / to select the brand of the device to the recording device. TV Guide On Screen™ System Setup 07 Screen 15: Is a VCR Connected? • If you select "Yes", you see Screen 16. • If you select...
... cable is done, Screen 20 displays automatically. Screen 17: VCR Brand Name • Press / to select the brand of the device to the recording device. TV Guide On Screen™ System Setup 07 Screen 15: Is a VCR Connected? • If you select "Yes", you see Screen 16. • If you select...

Owner's Manual
Page 36
.... • If you select "Test this code again", the same code is tested in Screen 19. 07 TV Guide On Screen™ System Setup Screen 20: Did your Guide. • Press ENTER to watch TV. 36 En Screen 21: Confirming Your Settings Verify the Setup information is correct. • If it is...
.... • If you select "Test this code again", the same code is tested in Screen 19. 07 TV Guide On Screen™ System Setup Screen 20: Did your Guide. • Press ENTER to watch TV. 36 En Screen 21: Confirming Your Settings Verify the Setup information is correct. • If it is...


