Operating Instructions
Page 5
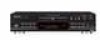
... Before You Start Automatically recording and finalizing a disc 21 Feature of the PDR-609 CD recorder 6 Manual recording 22 Checking what's in the box 6 Setting the digital recording level 23 Using this manual 6 Setting the analog recording level 24 Hints on installation 6 Setting the ...compatible components 10 Setting the fade length 34 Connecting up for analog playback & recording 11 Recording a fade in 34 Connecting other Pioneer Î components 11 Recording a fade out 34 3 Controls and Displays Recording blank sections 35 Front panel 12 Checking what's...
... Before You Start Automatically recording and finalizing a disc 21 Feature of the PDR-609 CD recorder 6 Manual recording 22 Checking what's in the box 6 Setting the digital recording level 23 Using this manual 6 Setting the analog recording level 24 Hints on installation 6 Setting the ...compatible components 10 Setting the fade length 34 Connecting up for analog playback & recording 11 Recording a fade in 34 Connecting other Pioneer Î components 11 Recording a fade out 34 3 Controls and Displays Recording blank sections 35 Front panel 12 Checking what's...
Operating Instructions
Page 6
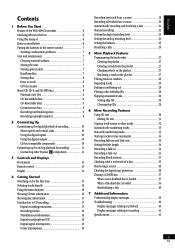
... over gives them ideal for many applications. Using this instruction manual. In the second section of the manual, starting on page16, you can accept digital input via optical or coaxial cable, meaning that came with your PDR-609 CD Recorder: 1 Two sets of audio cords 3 Two ...text feature of the manual provides reference information $ Use near radiators and other digital audio component. Make digital recordings from any ordinary CD player* make them the edge in mind the following supplied accessories with the player for the PDR-609 CD Recorder. second ...
... over gives them ideal for many applications. Using this instruction manual. In the second section of the manual, starting on page16, you can accept digital input via optical or coaxial cable, meaning that came with your PDR-609 CD Recorder: 1 Two sets of audio cords 3 Two ...text feature of the manual provides reference information $ Use near radiators and other digital audio component. Make digital recordings from any ordinary CD player* make them the edge in mind the following supplied accessories with the player for the PDR-609 CD Recorder. second ...
Operating Instructions
Page 11
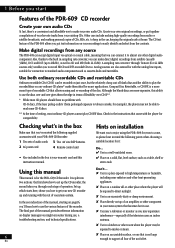
...this unit to operate several components. Never make a knot in the cord or tie it damaged, ask your nearest Pioneer authorized service center or your amplifier/receiver. Check the instruction manual that came with your amplifier if you can cause a fire or give you find an unused set of this unit...the plug part. On the rear panel of furniture, or other object on using its remote as this is connected to the amplifier when using a Pioneer amplifier or receiver that has this feature, you can control this unit. Using this set for playback, the other for a tape/md recorder (...
...this unit to operate several components. Never make a knot in the cord or tie it damaged, ask your nearest Pioneer authorized service center or your amplifier/receiver. Check the instruction manual that came with your amplifier if you can cause a fire or give you find an unused set of this unit...the plug part. On the rear panel of furniture, or other object on using its remote as this is connected to the amplifier when using a Pioneer amplifier or receiver that has this feature, you can control this unit. Using this set for playback, the other for a tape/md recorder (...
Operating Instructions
Page 12
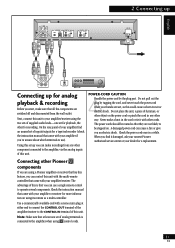
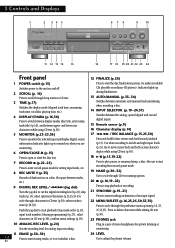
...4 DISPLAY/CHARA (p.16,30) Press to the unit on ordinary CD players). En 24 LEVEL Use to erase (p.38-39). WRITE AUTO MANUAL MONITOR INPUT SELECTOR COMPACT DISC DIGITAL RECORDER 6 78 9 10 DIGITAL REC LEVEL ANALOG REC LEVEL ANALOG L REC BALANCE R TEXT PUSH ENTER...¡ / REC BALANCE (p.15,25,30) Press and hold for analog-input recording. input track numbers (during finalization. 13 AUTO/MANUAL (p.33-34) Switches between automatic and manual track numbering when recording a disc. 14 INPUT SELECTOR (p.19-24,37) Switches between upper- 3 Controls and Displays 1 2 34 5...
...4 DISPLAY/CHARA (p.16,30) Press to the unit on ordinary CD players). En 24 LEVEL Use to erase (p.38-39). WRITE AUTO MANUAL MONITOR INPUT SELECTOR COMPACT DISC DIGITAL RECORDER 6 78 9 10 DIGITAL REC LEVEL ANALOG REC LEVEL ANALOG L REC BALANCE R TEXT PUSH ENTER...¡ / REC BALANCE (p.15,25,30) Press and hold for analog-input recording. input track numbers (during finalization. 13 AUTO/MANUAL (p.33-34) Switches between automatic and manual track numbering when recording a disc. 14 INPUT SELECTOR (p.19-24,37) Switches between upper- 3 Controls and Displays 1 2 34 5...
Operating Instructions
Page 13
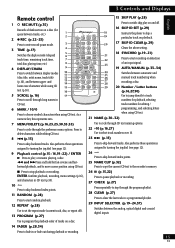
...;Press and hold for playback, selecting CD text. and 13 14 lower-case characters while using CD 15 text (p.30). 16 AUTO/ • REC SYNCHRO MANUAL TIME DISPLAY /CHARA 1 GHI 4 ABC 2 JKL 5 SCROLL MENU/ DELETE PQRS 7 MARK 10/0 TUV 8 >10 4 CURSOR 3 DEF 3 MNO 6 WXYZ 9 NAME ¢ 1 ...8 4 DISPLAY/CHARA 9 Press to switch between display modes 10 11 (disc title, artist name, track title) 12 (p.16), and between automatic and manual track numbering when recording a disc. 20 Number / Letter buttons (p.16,27,30) 5 SCROLL (p.16) 17 Use to jump directly to track Press to...
...;Press and hold for playback, selecting CD text. and 13 14 lower-case characters while using CD 15 text (p.30). 16 AUTO/ • REC SYNCHRO MANUAL TIME DISPLAY /CHARA 1 GHI 4 ABC 2 JKL 5 SCROLL MENU/ DELETE PQRS 7 MARK 10/0 TUV 8 >10 4 CURSOR 3 DEF 3 MNO 6 WXYZ 9 NAME ¢ 1 ...8 4 DISPLAY/CHARA 9 Press to switch between display modes 10 11 (disc title, artist name, track title) 12 (p.16), and between automatic and manual track numbering when recording a disc. 20 Number / Letter buttons (p.16,27,30) 5 SCROLL (p.16) 17 Use to jump directly to track Press to...
Operating Instructions
Page 14
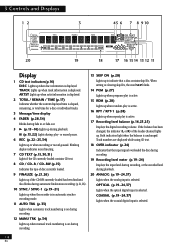
... artist information is displayed. 2 TOTAL / REMAIN / TIME (p.17) Indicates whether the current displayed time is on during recording. 12 MANU TRK (p.34) Lights up when manual track numbering is elapsed, remaining, or total time for a disc or individual tracks. 3 Message/time display 4 FADER (p.28,34) Blinks during fade in automatic synchro...
... artist information is displayed. 2 TOTAL / REMAIN / TIME (p.17) Indicates whether the current displayed time is on during recording. 12 MANU TRK (p.34) Lights up when manual track numbering is elapsed, remaining, or total time for a disc or individual tracks. 3 Message/time display 4 FADER (p.28,34) Blinks during fade in automatic synchro...
Operating Instructions
Page 15
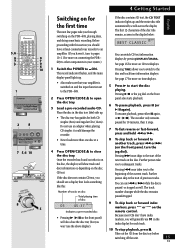
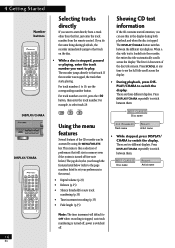
...don't have at a time. 4 Press OPEN/CLOSE 0 to close the disc tray (but you through switching on and the input function set to the PDR-609. 2 Press OPEN/CLOSE 0 to start of disc O3 45:37 CD Indicates a pre-recorded disc • Pressing 3 (6 on the front panel) will... you won't see 01 in the disc tray label-side up and the entire disc title automatically scrolls across the display. 5,6 8 7 9 AUTO/ • REC SYNCHRO MANUAL TIME DISPLAY /CHARA 1 GHI 4 ABC 2 JKL 5 SCROLL MENU/ DELETE PQRS 7 MARK 10/0 TUV 8 >10 4 CURSOR 3 DEF 3 MNO 6 WXYZ 9 NAME ¢ 1 ENTER &#...
...don't have at a time. 4 Press OPEN/CLOSE 0 to close the disc tray (but you through switching on and the input function set to the PDR-609. 2 Press OPEN/CLOSE 0 to start of disc O3 45:37 CD Indicates a pre-recorded disc • Pressing 3 (6 on the front panel) will... you won't see 01 in the disc tray label-side up and the entire disc title automatically scrolls across the display. 5,6 8 7 9 AUTO/ • REC SYNCHRO MANUAL TIME DISPLAY /CHARA 1 GHI 4 ABC 2 JKL 5 SCROLL MENU/ DELETE PQRS 7 MARK 10/0 TUV 8 >10 4 CURSOR 3 DEF 3 MNO 6 WXYZ 9 NAME ¢ 1 ENTER &#...
Operating Instructions
Page 16
... numbers over 10, press the >10 button, then enter the track number. There are three different displays. 4 Getting Started Number buttons AUTO/ • REC SYNCHRO MANUAL TIME DISPLAY /CHARA 1 GHI 4 ABC 2 JKL 5 SCROLL MENU/ DELETE PQRS 7 MARK 10/0 TUV 8 >10 4 CURSOR 3 DEF 3 MNO 6 WXYZ 9 NAME &#...FADER PROGRAM CHECK CLEAR SKIP PLAY SKIP ID INPUT SELECTER SET CLEAR Î DISPLAY/CHARA ◊ÛB->?/ SCROLL ERASE TIME FINALIZE AUTO MANUAL TRACK NO. auto track numbering is turned off . 16 En Press DISPLAY/CHARA repeatedly to OFF when: recording is turned off (...
... numbers over 10, press the >10 button, then enter the track number. There are three different displays. 4 Getting Started Number buttons AUTO/ • REC SYNCHRO MANUAL TIME DISPLAY /CHARA 1 GHI 4 ABC 2 JKL 5 SCROLL MENU/ DELETE PQRS 7 MARK 10/0 TUV 8 >10 4 CURSOR 3 DEF 3 MNO 6 WXYZ 9 NAME &#...FADER PROGRAM CHECK CLEAR SKIP PLAY SKIP ID INPUT SELECTER SET CLEAR Î DISPLAY/CHARA ◊ÛB->?/ SCROLL ERASE TIME FINALIZE AUTO MANUAL TRACK NO. auto track numbering is turned off . 16 En Press DISPLAY/CHARA repeatedly to OFF when: recording is turned off (...
Operating Instructions
Page 17
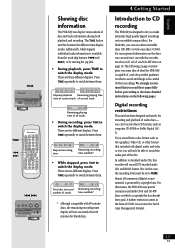
... TIME repeatedly to record the audio part of SCMS (an acronym for blank discs. 4 Getting Started Introduction to CD recording The PDR-609 is capable of, and also provides guidance on which a copyright fee has already been paid. There are two different displays. Press...CDs, this recorder will not accurately show 80 minutes for Serial Copy Management System). TIME ◊ÛB->?/ SCROLL ERASE TIME FINALIZE AUTO MANUAL TRACK NO. Additionally, while stopped, individual track information is protected by turning the jog dial. • During playback, press TIME...
... TIME repeatedly to record the audio part of SCMS (an acronym for blank discs. 4 Getting Started Introduction to CD recording The PDR-609 is capable of, and also provides guidance on which a copyright fee has already been paid. There are two different displays. Press...CDs, this recorder will not accurately show 80 minutes for Serial Copy Management System). TIME ◊ÛB->?/ SCROLL ERASE TIME FINALIZE AUTO MANUAL TRACK NO. Additionally, while stopped, individual track information is protected by turning the jog dial. • During playback, press TIME...
Operating Instructions
Page 18
... decide to switch off this could result in the right places. Note that was recorded using manual track numbering while recording to CD to input track markers as some of tracks on page 60... to do this is set of analog input terminals, as well as the digital output of the PDR-609. Refer to that of the track may also find that copy. You might also encounter problems if...are recorded onto the disc automatically when recording. This can be a blank section on the DAT manually, if possible. To avoid these cases, if the signal resumes within about five seconds, the result...
... decide to switch off this could result in the right places. Note that was recorded using manual track numbering while recording to CD to input track markers as some of tracks on page 60... to do this is set of analog input terminals, as well as the digital output of the PDR-609. Refer to that of the track may also find that copy. You might also encounter problems if...are recorded onto the disc automatically when recording. This can be a blank section on the DAT manually, if possible. To avoid these cases, if the signal resumes within about five seconds, the result...

Operating Instructions
Page 19
... track from a digital (CD, MD, DCC or DAT) or an analog source, the recorder can start to choose an input. WRITE AUTO MANUAL MONITOR INPUT SELECTOR 2 6 AUTO/ • REC SYNCHRO MANUAL TIME DISPLAY /CHARA 1 GHI 4 ABC 2 JKL 5 SCROLL MENU/ DELETE PQRS 7 MARK 10/0 TUV 8 >10 4 CURSOR 3 DEF 3 MNO 6 ...L REC BALANCE R TEXT PUSH ENTER MENU/ DELETE SYNCHRO CD TEXT Legato Link Conversion 63 ◊ÛB->?/ SCROLL ERASE TIME FINALIZE AUTO MANUAL TRACK NO. If you record an individual track. Check the display to make sure that the source is more than five seconds of ...
... track from a digital (CD, MD, DCC or DAT) or an analog source, the recorder can start to choose an input. WRITE AUTO MANUAL MONITOR INPUT SELECTOR 2 6 AUTO/ • REC SYNCHRO MANUAL TIME DISPLAY /CHARA 1 GHI 4 ABC 2 JKL 5 SCROLL MENU/ DELETE PQRS 7 MARK 10/0 TUV 8 >10 4 CURSOR 3 DEF 3 MNO 6 ...L REC BALANCE R TEXT PUSH ENTER MENU/ DELETE SYNCHRO CD TEXT Legato Link Conversion 63 ◊ÛB->?/ SCROLL ERASE TIME FINALIZE AUTO MANUAL TRACK NO. If you record an individual track. Check the display to make sure that the source is more than five seconds of ...

Operating Instructions
Page 20
...recording mode, the recorder starts and stops automatically. Coaxial The recorder's display indicates the current input. 3 Make sure that recording can still use manual track numbering (see Digital signal interruptions on pages 40-42 for more than 5 seconds-see page 33). 1 Load a CD-R or CD...L REC BALANCE R TEXT PUSH ENTER MENU/ DELETE SYNCHRO CD TEXT Legato Link Conversion 63 ◊ÛB->?/ SCROLL ERASE TIME FINALIZE AUTO MANUAL TRACK NO. If you want to show that the source is interrupted for possible remedies. Optical - Press SYNCHRO repeatedly to choose an ...
...recording mode, the recorder starts and stops automatically. Coaxial The recorder's display indicates the current input. 3 Make sure that recording can still use manual track numbering (see Digital signal interruptions on pages 40-42 for more than 5 seconds-see page 33). 1 Load a CD-R or CD...L REC BALANCE R TEXT PUSH ENTER MENU/ DELETE SYNCHRO CD TEXT Legato Link Conversion 63 ◊ÛB->?/ SCROLL ERASE TIME FINALIZE AUTO MANUAL TRACK NO. If you want to show that the source is interrupted for possible remedies. Optical - Press SYNCHRO repeatedly to choose an ...

Operating Instructions
Page 21
... INPUT SELECTOR 2 AUTO/ • REC SYNCHRO MANUAL TIME DISPLAY /CHARA 1 GHI 4 ABC 2 JKL 5 SCROLL MENU/ DELETE PQRS 7 MARK 10/0 TUV 8 >10 4 CURSOR 3 DEF 3 MNO 6 WXYZ 9 NAME ¢ 1 ENTER ¡ 7 REPEAT RANDOM NAMECLIP 8 ... LEVEL ANALOG REC LEVEL ANALOG L REC BALANCE R TEXT PUSH ENTER MENU/ DELETE SYNCHRO CD TEXT Legato Link Conversion 3 ◊ÛB->?/ SCROLL ERASE TIME FINALIZE AUTO MANUAL TRACK NO. Recording starts automatically. Pressing INPUT SELECTOR repeatedly switches the active input: Analog - Note: If You want to record. 2 Press INPUT SELECTOR to copy...
... INPUT SELECTOR 2 AUTO/ • REC SYNCHRO MANUAL TIME DISPLAY /CHARA 1 GHI 4 ABC 2 JKL 5 SCROLL MENU/ DELETE PQRS 7 MARK 10/0 TUV 8 >10 4 CURSOR 3 DEF 3 MNO 6 WXYZ 9 NAME ¢ 1 ENTER ¡ 7 REPEAT RANDOM NAMECLIP 8 ... LEVEL ANALOG REC LEVEL ANALOG L REC BALANCE R TEXT PUSH ENTER MENU/ DELETE SYNCHRO CD TEXT Legato Link Conversion 3 ◊ÛB->?/ SCROLL ERASE TIME FINALIZE AUTO MANUAL TRACK NO. Recording starts automatically. Pressing INPUT SELECTOR repeatedly switches the active input: Analog - Note: If You want to record. 2 Press INPUT SELECTOR to copy...

Operating Instructions
Page 22
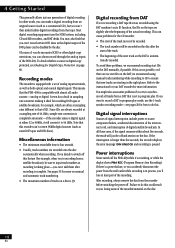
... syncho recording is copyprotected using SCMS, the message Can't COPY appears. After pressing 7, the display shows PMA REC while it 's recordable. Manual recording is also useful with a noisy analog source, such as a vinyl record, or from either case, you 'll need to press RECORD...162; 3 1 ENTER ¡ 7 REPEAT RANDOM NAMECLIP 8 FADER PROGRAM CHECK CLEAR SKIP PLAY SKIP ID INPUT SELECTER SET CLEAR 5 2 Manual recording Use the manual recording method with long quiet sections, where the recorder may not recognize the end of the recording. If necessary, set the recording level ...
... syncho recording is copyprotected using SCMS, the message Can't COPY appears. After pressing 7, the display shows PMA REC while it 's recordable. Manual recording is also useful with a noisy analog source, such as a vinyl record, or from either case, you 'll need to press RECORD...162; 3 1 ENTER ¡ 7 REPEAT RANDOM NAMECLIP 8 FADER PROGRAM CHECK CLEAR SKIP PLAY SKIP ID INPUT SELECTER SET CLEAR 5 2 Manual recording Use the manual recording method with long quiet sections, where the recorder may not recognize the end of the recording. If necessary, set the recording level ...
Operating Instructions
Page 23
...OdB. 6 Press the jog dial (ENTER) to boost the recording volume since the volume of distorting the copy. Optical - WRITE AUTO MANUAL MONITOR INPUT SELECTOR 1 4,5,6 DIGITAL REC LEVEL ANALOG REC LEVEL ANALOG L REC BALANCE R TEXT PUSH ENTER MENU/ DELETE SYNCHRO CD TEXT Legato... Link Conversion 3 3 5 4,6 AUTO/ • REC SYNCHRO MANUAL TIME DISPLAY /CHARA 1 GHI 4 ABC 2 JKL 5 SCROLL MENU/ DELETE PQRS 7 MARK 10/0 TUV 8 >10 4 CURSOR 3 DEF 3 MNO 6 WXYZ 9 ...
...OdB. 6 Press the jog dial (ENTER) to boost the recording volume since the volume of distorting the copy. Optical - WRITE AUTO MANUAL MONITOR INPUT SELECTOR 1 4,5,6 DIGITAL REC LEVEL ANALOG REC LEVEL ANALOG L REC BALANCE R TEXT PUSH ENTER MENU/ DELETE SYNCHRO CD TEXT Legato... Link Conversion 3 3 5 4,6 AUTO/ • REC SYNCHRO MANUAL TIME DISPLAY /CHARA 1 GHI 4 ABC 2 JKL 5 SCROLL MENU/ DELETE PQRS 7 MARK 10/0 TUV 8 >10 4 CURSOR 3 DEF 3 MNO 6 WXYZ 9 ...

Operating Instructions
Page 24
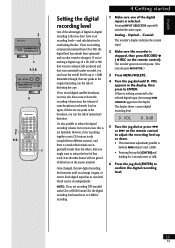
... 2 0 OVER The maximum recording level should be in this area. 4 Getting started 2 ◊ÛB->?/ SCROLL ERASE TIME FINALIZE AUTO MANUAL TRACK NO. Pressing INPUT SELECTOR repeatedly switches the active input: Analog - The recorder goes into record-pause. (You can also press MONITOR... LEVEL ANALOG REC LEVEL ANALOG L REC BALANCE R TEXT PUSH ENTER MENU/ DELETE SYNCHRO CD TEXT Legato Link Conversion ANALOG REC LEVEL 2 AUTO/ • REC SYNCHRO MANUAL TIME DISPLAY /CHARA 1 GHI 4 ABC 2 JKL 5 SCROLL MENU/ DELETE PQRS 7 MARK 10/0 TUV 8 >10 4 CURSOR 3 DEF 3 MNO 6 WXYZ ...
... 2 0 OVER The maximum recording level should be in this area. 4 Getting started 2 ◊ÛB->?/ SCROLL ERASE TIME FINALIZE AUTO MANUAL TRACK NO. Pressing INPUT SELECTOR repeatedly switches the active input: Analog - The recorder goes into record-pause. (You can also press MONITOR... LEVEL ANALOG REC LEVEL ANALOG L REC BALANCE R TEXT PUSH ENTER MENU/ DELETE SYNCHRO CD TEXT Legato Link Conversion ANALOG REC LEVEL 2 AUTO/ • REC SYNCHRO MANUAL TIME DISPLAY /CHARA 1 GHI 4 ABC 2 JKL 5 SCROLL MENU/ DELETE PQRS 7 MARK 10/0 TUV 8 >10 4 CURSOR 3 DEF 3 MNO 6 WXYZ ...

Operating Instructions
Page 25
...then press RECORD ¶ ( ¶ REC on the remote control). Pressing INPUT SELECTOR repeatedly switches the active input: Analog - WRITE AUTO MANUAL MONITOR INPUT SELECTOR 1 4,6 DIGITAL REC LEVEL ANALOG REC LEVEL ANALOG L REC BALANCE R TEXT PUSH ENTER MENU/ DELETE SYNCHRO CD TEXT Legato... Link Conversion 5 3 3 5 4,6 AUTO/ • REC SYNCHRO MANUAL TIME DISPLAY /CHARA 1 GHI 4 ABC 2 JKL 5 SCROLL MENU/ DELETE PQRS 7 MARK 10/0 TUV 8 >10 4 CURSOR 3 DEF 3 MNO 6 WXYZ 9 ...
...then press RECORD ¶ ( ¶ REC on the remote control). Pressing INPUT SELECTOR repeatedly switches the active input: Analog - WRITE AUTO MANUAL MONITOR INPUT SELECTOR 1 4,6 DIGITAL REC LEVEL ANALOG REC LEVEL ANALOG L REC BALANCE R TEXT PUSH ENTER MENU/ DELETE SYNCHRO CD TEXT Legato... Link Conversion 5 3 3 5 4,6 AUTO/ • REC SYNCHRO MANUAL TIME DISPLAY /CHARA 1 GHI 4 ABC 2 JKL 5 SCROLL MENU/ DELETE PQRS 7 MARK 10/0 TUV 8 >10 4 CURSOR 3 DEF 3 MNO 6 WXYZ 9 ...

Operating Instructions
Page 26
...way you want to go through a process called finalization. If, however, the recorder hasn't managed to set or clear skip IDs. WRITE AUTO MANUAL MONITOR INPUT SELECTOR 3 DIGITAL REC LEVEL ANALOG REC LEVEL ANALOG L REC BALANCE R TEXT PUSH ENTER MENU/ DELETE SYNCHRO CD TEXT Legato Link ...disc, following the guidelines on the front panel) to simply CD. 4 Getting started 2 ◊ÛB->?/ SCROLL ERASE TIME FINALIZE AUTO MANUAL TRACK NO. Check that is with CDRW discs (at present, these are very few). Finalization takes a couple of the controls on the disc.
...way you want to go through a process called finalization. If, however, the recorder hasn't managed to set or clear skip IDs. WRITE AUTO MANUAL MONITOR INPUT SELECTOR 3 DIGITAL REC LEVEL ANALOG REC LEVEL ANALOG L REC BALANCE R TEXT PUSH ENTER MENU/ DELETE SYNCHRO CD TEXT Legato Link ...disc, following the guidelines on the front panel) to simply CD. 4 Getting started 2 ◊ÛB->?/ SCROLL ERASE TIME FINALIZE AUTO MANUAL TRACK NO. Check that is with CDRW discs (at present, these are very few). Finalization takes a couple of the controls on the disc.

Operating Instructions
Page 27
... control. 2 DIGITAL REC LEVEL ANALOG REC LEVEL ANALOG L REC BALANCE R TEXT PUSH ENTER MENU/ DELETE SYNCHRO CD TEXT Legato Link Conversion 1 AUTO/ • REC SYNCHRO MANUAL TIME DISPLAY /CHARA 1 GHI 4 ABC 2 JKL 5 SCROLL MENU/ DELETE PQRS 7 MARK 10/0 TUV 8 >10 4 CURSOR 3 DEF 3 MNO 6 WXYZ 9 NAME ¢ 1 ENTER ¡ 7 REPEAT RANDOM NAMECLIP...
... control. 2 DIGITAL REC LEVEL ANALOG REC LEVEL ANALOG L REC BALANCE R TEXT PUSH ENTER MENU/ DELETE SYNCHRO CD TEXT Legato Link Conversion 1 AUTO/ • REC SYNCHRO MANUAL TIME DISPLAY /CHARA 1 GHI 4 ABC 2 JKL 5 SCROLL MENU/ DELETE PQRS 7 MARK 10/0 TUV 8 >10 4 CURSOR 3 DEF 3 MNO 6 WXYZ 9 NAME ¢ 1 ENTER ¡ 7 REPEAT RANDOM NAMECLIP...

Operating Instructions
Page 28
FADER AUTO/ • REC SYNCHRO MANUAL TIME DISPLAY /CHARA 1 GHI 4 ABC 2 JKL 5 SCROLL MENU/ DELETE PQRS 7 MARK 10/0 TUV 8 >10 4 CURSOR 3 DEF 3 MNO 6 WXYZ 9 NAME ¢ 1 ENTER ¡ 7 REPEAT RANDOM NAMECLIP 8 ... disc continues playing to fade in or fade out (See Setting the fade length on the front panel). 5 More playback features AUTO/ • REC SYNCHRO MANUAL TIME DISPLAY /CHARA 1 GHI 4 ABC 2 JKL 5 SCROLL MENU/ DELETE PQRS 7 MARK 10/0 TUV 8 >10 4 CURSOR 3 DEF 3 MNO 6 WXYZ 9 NAME ¢ 1 ENTER ¡ 7 REPEAT RANDOM NAMECLIP...
FADER AUTO/ • REC SYNCHRO MANUAL TIME DISPLAY /CHARA 1 GHI 4 ABC 2 JKL 5 SCROLL MENU/ DELETE PQRS 7 MARK 10/0 TUV 8 >10 4 CURSOR 3 DEF 3 MNO 6 WXYZ 9 NAME ¢ 1 ENTER ¡ 7 REPEAT RANDOM NAMECLIP 8 ... disc continues playing to fade in or fade out (See Setting the fade length on the front panel). 5 More playback features AUTO/ • REC SYNCHRO MANUAL TIME DISPLAY /CHARA 1 GHI 4 ABC 2 JKL 5 SCROLL MENU/ DELETE PQRS 7 MARK 10/0 TUV 8 >10 4 CURSOR 3 DEF 3 MNO 6 WXYZ 9 NAME ¢ 1 ENTER ¡ 7 REPEAT RANDOM NAMECLIP...


