Technical Manual
Page 1
...to the presence of our products only when they are subject to qualified personnel, or consult the nearest PIONEER dealer for assistance. ÷ We accept no responsibility for losses resulting from natural disasters. ABOUT MOUNTING/... from modifications made to read instructions indicated by experienced, qualified experts. TECHNICAL MANUAL (Ver. 1.0) HANDWRITING DEVICE: PDK-50HW3 Supported plasma displays: PDP-504CMX PDP-503CMX PDP-50MXE1 PDP-50MXE1-S PDP-503MXE This manual provides precautions and information for installation, preparation, and handling of construction, materials...
...to the presence of our products only when they are subject to qualified personnel, or consult the nearest PIONEER dealer for assistance. ÷ We accept no responsibility for losses resulting from natural disasters. ABOUT MOUNTING/... from modifications made to read instructions indicated by experienced, qualified experts. TECHNICAL MANUAL (Ver. 1.0) HANDWRITING DEVICE: PDK-50HW3 Supported plasma displays: PDP-504CMX PDP-503CMX PDP-50MXE1 PDP-50MXE1-S PDP-503MXE This manual provides precautions and information for installation, preparation, and handling of construction, materials...

Technical Manual
Page 2
... the previous model. 2 b) Instead of connectors on the rear panel makes it possible to PDK-50HW3 Scan device changes a) The Pioneer badge need no longer be removed during installation. ¶ In this manual, the frame of the handwriting device that houses the sensor is no longer provided. ¶ The absence of a 3 m RS...
... the previous model. 2 b) Instead of connectors on the rear panel makes it possible to PDK-50HW3 Scan device changes a) The Pioneer badge need no longer be removed during installation. ¶ In this manual, the frame of the handwriting device that houses the sensor is no longer provided. ¶ The absence of a 3 m RS...

Technical Manual
Page 7
... range: 20 to 90% Operating atmospheric pressure: 670 to 1500 hpa Separate plasma display (PDP-504CMX) specifications Refer to "Specifications" in the Technical Manual of the PDP-504CMX plasma display. External dimensions (excluding pen stand) 1258 (W) x 758 (H) x 115 (D) mm Weight Plasma display (PDP-504CMX) 41.0 kg Handwriting device (PDK-50HW3) 7.4 kg Dimensions of power consumption per plasma...
... range: 20 to 90% Operating atmospheric pressure: 670 to 1500 hpa Separate plasma display (PDP-504CMX) specifications Refer to "Specifications" in the Technical Manual of the PDP-504CMX plasma display. External dimensions (excluding pen stand) 1258 (W) x 758 (H) x 115 (D) mm Weight Plasma display (PDP-504CMX) 41.0 kg Handwriting device (PDK-50HW3) 7.4 kg Dimensions of power consumption per plasma...
Technical Manual
Page 11
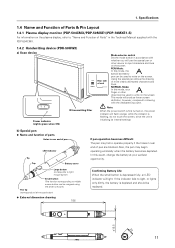
... will light. In this mode, the special accessory pen can be used to "Name and Function of Parts" in the Technical Manual supplied with the PDP-504CMX. 1.4.2 Handwriting device (PDK-50HW3) a) Scan device PEN NORMAL Rear side of unit Mode selector switch Set the mode switch in... fails to input characters and lines on the screen. Specifications 1.4 Name and Function of Parts & Pin Layout 1.4.1 Plasma display monitor (PDP-504CMX/PDP-50MXE1/PDP-50MXE1-S) For information on , the power indicator will use the special pen or other object can be used to drawing with whether you...
... will light. In this mode, the special accessory pen can be used to "Name and Function of Parts" in the Technical Manual supplied with the PDP-504CMX. 1.4.2 Handwriting device (PDK-50HW3) a) Scan device PEN NORMAL Rear side of unit Mode selector switch Set the mode switch in... fails to input characters and lines on the screen. Specifications 1.4 Name and Function of Parts & Pin Layout 1.4.1 Plasma display monitor (PDP-504CMX/PDP-50MXE1/PDP-50MXE1-S) For information on , the power indicator will use the special pen or other object can be used to drawing with whether you...
Technical Manual
Page 12
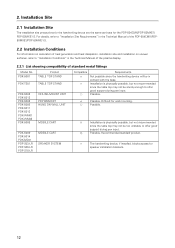
... with the base. The handwriting device, if installed, blocks access for the PDP-504CMX/PDP-50MXE1/ PDP-50MXE1-S. Possible. For details, refer to "Installation Site Requirements" in the Technical Manual of the plasma display. 2.2.1 List showing compatibility of standard metal fittings Model ... Not possible since the table top may not be sturdy enough to "Installation Conditions" in the Technical Manual of the PDP-504CMX/PDP50MXE1/PDP-50MXE1-S. 2.2 Installation Conditions For information on calculation of heat generation and heat dissipation, installation site and installation...
... with the base. The handwriting device, if installed, blocks access for the PDP-504CMX/PDP-50MXE1/ PDP-50MXE1-S. Possible. For details, refer to "Installation Site Requirements" in the Technical Manual of the plasma display. 2.2.1 List showing compatibility of standard metal fittings Model ... Not possible since the table top may not be sturdy enough to "Installation Conditions" in the Technical Manual of the PDP-504CMX/PDP50MXE1/PDP-50MXE1-S. 2.2 Installation Conditions For information on calculation of heat generation and heat dissipation, installation site and installation...

Technical Manual
Page 13
... that it is installed horizontally so that may tend to rest a hand on it, the hem of the user's necktie or shirt in the Technical Manual of a table. The following cautions are the same as for example include a liquid (juice, coffee, detergent, etc.) spilt on or lean against the handwriting device...
... that it is installed horizontally so that may tend to rest a hand on it, the hem of the user's necktie or shirt in the Technical Manual of a table. The following cautions are the same as for example include a liquid (juice, coffee, detergent, etc.) spilt on or lean against the handwriting device...
Technical Manual
Page 20
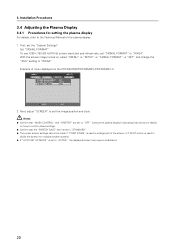
... x 768 (60 Hz/70 Hz) screen resolution and refresh rate, set the "System Settings". 3. With the screen image turned on the PDP-504CMX/PDP-50MXE1/PDP-50MXE1-S MENU INPUT1 PICTURE SCREEN SETUP OPTION POWER MANAGEMENT CLAMP POSITION SIGNAL FORMAT : OFF : AUTO : XGA SET ENTER MENU EXIT 2. Example of... to enlarge part of the plasma display. 1. Installation Procedures 3.4 Adjusting the Plasma Display 3.4.1 Procedures for details on how to the Technical Manual of the screen, or if SPLIT button is used to divide the screen into multiple smaller screens. ¶ If "AUTO SET UP MODE...
... x 768 (60 Hz/70 Hz) screen resolution and refresh rate, set the "System Settings". 3. With the screen image turned on the PDP-504CMX/PDP-50MXE1/PDP-50MXE1-S MENU INPUT1 PICTURE SCREEN SETUP OPTION POWER MANAGEMENT CLAMP POSITION SIGNAL FORMAT : OFF : AUTO : XGA SET ENTER MENU EXIT 2. Example of... to enlarge part of the plasma display. 1. Installation Procedures 3.4 Adjusting the Plasma Display 3.4.1 Procedures for details on how to the Technical Manual of the screen, or if SPLIT button is used to divide the screen into multiple smaller screens. ¶ If "AUTO SET UP MODE...

Technical Manual
Page 21
... screen while the indicator is connected, the accompanying screen message will appear: The power indicator will flash orange, and then flash alternately in the Technical Manual supplied with the capacity to "Installing the CBdrvU (Ver. 2.0) Driver" on /off operation. 21 Refer to provide 500mA current. Reboot the computer. 3.6 Connecting a Scan Device...
... screen while the indicator is connected, the accompanying screen message will appear: The power indicator will flash orange, and then flash alternately in the Technical Manual supplied with the capacity to "Installing the CBdrvU (Ver. 2.0) Driver" on /off operation. 21 Refer to provide 500mA current. Reboot the computer. 3.6 Connecting a Scan Device...

Technical Manual
Page 22
... for abnormal operation. b) Check in Service Mode 1. USB cable Cable clip 3.8 Sensor Operation Check a) Check in NORMAL mode 1. In the pop-up menu that this manual. Touch the plasma display to check that only "L" under "Hardware Information" to check that appears, select "Test Mode" under system information correctly recognizes the input. 4.
... for abnormal operation. b) Check in Service Mode 1. USB cable Cable clip 3.8 Sensor Operation Check a) Check in NORMAL mode 1. In the pop-up menu that this manual. Touch the plasma display to check that only "L" under "Hardware Information" to check that appears, select "Test Mode" under system information correctly recognizes the input. 4.
Technical Manual
Page 26
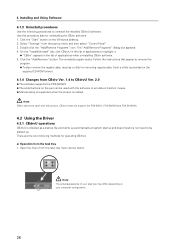
.... 4.2 Using the Driver 4.2.1 CBdrvU operations CBdrvU is rotated. Select "Settings" from the task tray 1. Open the menu from CBdrv Ver. 1.4 to emulate a 3-button mouse. ¶ Manual setup is supported when the screen is installed as a startup file and starts up . Click the "Add/Remove" button. Click the "Start" button on your...
.... 4.2 Using the Driver 4.2.1 CBdrvU operations CBdrvU is rotated. Select "Settings" from the task tray 1. Open the menu from CBdrv Ver. 1.4 to emulate a 3-button mouse. ¶ Manual setup is supported when the screen is installed as a startup file and starts up . Click the "Add/Remove" button. Click the "Start" button on your...

Technical Manual
Page 29
...4:3 mode 3) DOT BY DOT mode Notes: ¶ Check the screen mode before making settings. Move to the pen to perform manual calibration of the following modes are enabled. Note: The availability or otherwise of screen items depends on -screen calibration instructions and accurately ...following calibration methods. 1) Detail-1 (4-point calibration) 2) Detail-2 (vertical calibration) Notes: ¶ Detail-2 is available only in this Technical Manual.) ¶ Only modes with resolution. Be sure to check the "SIGNAL FORMAT" setting of the plasma display and video card may shift cursor...
...4:3 mode 3) DOT BY DOT mode Notes: ¶ Check the screen mode before making settings. Move to the pen to perform manual calibration of the following modes are enabled. Note: The availability or otherwise of screen items depends on -screen calibration instructions and accurately ...following calibration methods. 1) Detail-1 (4-point calibration) 2) Detail-2 (vertical calibration) Notes: ¶ Detail-2 is available only in this Technical Manual.) ¶ Only modes with resolution. Be sure to check the "SIGNAL FORMAT" setting of the plasma display and video card may shift cursor...

Technical Manual
Page 49
.... • Do not place any device near the unit that of pen tip on . • USB cable is disconnected. • USB port may not be manually corrected. • Set "MASK CONTROL", "ORBITER" to "OFF". • Check the LED indicator, and if it does not light brightly, replace battery. • Press the...
.... • Do not place any device near the unit that of pen tip on . • USB cable is disconnected. • USB port may not be manually corrected. • Set "MASK CONTROL", "ORBITER" to "OFF". • Check the LED indicator, and if it does not light brightly, replace battery. • Press the...


