
Owner's Manual
Page 5
... (AV source only 64 Selecting digital closed caption No Operation off (AV source only)........ 65 parameters 50 Power Management Clock Setting 50 (PC source only 65 10 TV Guide On Screen™ System Operation 51 Using the TV Guide On Screen™ system 51 Screen components 51 The Listings screen 52 Setting program reminders... 60 Basic picture adjustments 61 Advanced picture adjustments 61 Equipment 70 About External Equipment 70 Watching a DVD image 70 Watching a VCR image 70 Using HDMI Input 71 5 En
... (AV source only 64 Selecting digital closed caption No Operation off (AV source only)........ 65 parameters 50 Power Management Clock Setting 50 (PC source only 65 10 TV Guide On Screen™ System Operation 51 Using the TV Guide On Screen™ system 51 Screen components 51 The Listings screen 52 Setting program reminders... 60 Basic picture adjustments 61 Advanced picture adjustments 61 Equipment 70 About External Equipment 70 Watching a DVD image 70 Watching a VCR image 70 Using HDMI Input 71 5 En
Owner's Manual
Page 14
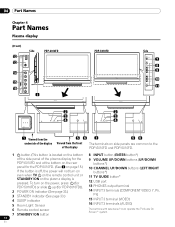
...the front of the display The terminals on side panels are common to the PDP-6010FD and PDP-5010FD. 1 a button (This button is located on the bottom 8 INPUT button (ENTER button*) of the side panel of the plasma display for the PDP-6010FD and at the bottom on page 15.) If the button is pressed.... En To turn on even when TV a on the remote control unit or STANDBY/ON on the plasma...
...the front of the display The terminals on side panels are common to the PDP-6010FD and PDP-5010FD. 1 a button (This button is located on the bottom 8 INPUT button (ENTER button*) of the side panel of the plasma display for the PDP-6010FD and at the bottom on page 15.) If the button is pressed.... En To turn on even when TV a on the remote control unit or STANDBY/ON on the plasma...
Owner's Manual
Page 15
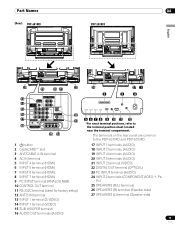
... 2 27 1 3 4 5 6 7 8 9 10 11 12 *For exact terminal positions, refer to the PDP-6010FD and PDP-5010FD. 17 INPUT 1 terminals (AUDIO) 18 INPUT 2 terminals (AUDIO) 19 INPUT 4 terminals (AUDIO) 20 INPUT 5 terminals (AUDIO) 21 INPUT 2 terminal (VIDEO) 22 DIGITAL OUT terminal (OPTICAL) 23 PC INPUT terminal (AUDIO) 24 INPUT 2 terminals (COMPONENT VIDEO: Y, PB, PR) 25 SPEAKERS (R/L) terminals 26 SPEAKERS (R) terminal (Speaker...
... 2 27 1 3 4 5 6 7 8 9 10 11 12 *For exact terminal positions, refer to the PDP-6010FD and PDP-5010FD. 17 INPUT 1 terminals (AUDIO) 18 INPUT 2 terminals (AUDIO) 19 INPUT 4 terminals (AUDIO) 20 INPUT 5 terminals (AUDIO) 21 INPUT 2 terminal (VIDEO) 22 DIGITAL OUT terminal (OPTICAL) 23 PC INPUT terminal (AUDIO) 24 INPUT 2 terminals (COMPONENT VIDEO: Y, PB, PR) 25 SPEAKERS (R/L) terminals 26 SPEAKERS (R) terminal (Speaker...
Owner's Manual
Page 16
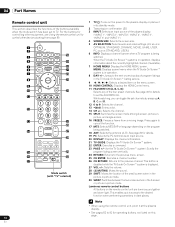
... unit, point it into standby mode. 2 Transmission confirmation LED 3 INPUT: Selects an input source of the plasma display. ("INPUT 1", "INPUT 2", "INPUT 3", "INPUT 4", "INPUT 5", "INPUT 6" and "INPUT 7") 4 SCREEN SIZE: Selects the screen size. 5 AV SELECTION:... Selects audio and video settings. (AV source: OPTIMUM, STANDARD, DYNAMIC, MOVIE, GAME, USER. PC source: STANDARD, USER.) 6 INFO: Displays a channel banner when a TV...
... unit, point it into standby mode. 2 Transmission confirmation LED 3 INPUT: Selects an input source of the plasma display. ("INPUT 1", "INPUT 2", "INPUT 3", "INPUT 4", "INPUT 5", "INPUT 6" and "INPUT 7") 4 SCREEN SIZE: Selects the screen size. 5 AV SELECTION:... Selects audio and video settings. (AV source: OPTIMUM, STANDARD, DYNAMIC, MOVIE, GAME, USER. PC source: STANDARD, USER.) 6 INFO: Displays a channel banner when a TV...
Owner's Manual
Page 18
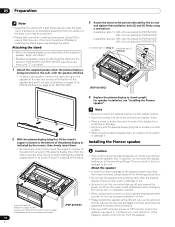
... sure to turn the connected devices off and remove the power cord from input overload, please observe the following precautions: • Do not use excessive amplifier volume. Insert the stand into the plasma display so that an arrow with "FRONT/FACE AVANT" mark inscribed at the... . Installing the Pioneer speaker • Be extremely careful not to insert the support columns of the plasma display other than the stand insertion slots. Installation bolt (1): M8 x 23 mm (black) for PDP-5010FD M6 x 20 mm (black) for PDP-6010FD Installation bolt (2): M8 x 40 mm (black) for PDP-5010FD M6 x 20...
... sure to turn the connected devices off and remove the power cord from input overload, please observe the following precautions: • Do not use excessive amplifier volume. Insert the stand into the plasma display so that an arrow with "FRONT/FACE AVANT" mark inscribed at the... . Installing the Pioneer speaker • Be extremely careful not to insert the support columns of the plasma display other than the stand insertion slots. Installation bolt (1): M8 x 23 mm (black) for PDP-5010FD M6 x 20 mm (black) for PDP-6010FD Installation bolt (2): M8 x 40 mm (black) for PDP-5010FD M6 x 20...
Owner's Manual
Page 30
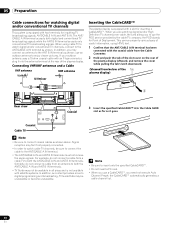
... may not be sure to connect the cable to the ANT B IN terminal as it into the antenna terminal at the rear of the Tab plasma display) U/Vmixer 1 2 4 5 Rear view Coaxial 3 Insert the specified CableCARD™ into the Cable CARD slot as far as shown; When using HTML ...the same signals. If your outdoor antenna uses a 75-ohm coaxial cable with a slot for inputting TV broadcasting signals: ANT/CABLE A IN and ANT B IN. For example, do not connect a cable from a cable TV to connect coaxial cables as shown. Connecting VHF/UHF antennas and a Cable VHF antenna UHF antenna...
... may not be sure to connect the cable to the ANT B IN terminal as it into the antenna terminal at the rear of the Tab plasma display) U/Vmixer 1 2 4 5 Rear view Coaxial 3 Insert the specified CableCARD™ into the Cable CARD slot as far as shown; When using HTML ...the same signals. If your outdoor antenna uses a 75-ohm coaxial cable with a slot for inputting TV broadcasting signals: ANT/CABLE A IN and ANT B IN. For example, do not connect a cable from a cable TV to connect coaxial cables as shown. Connecting VHF/UHF antennas and a Cable VHF antenna UHF antenna...
Owner's Manual
Page 34
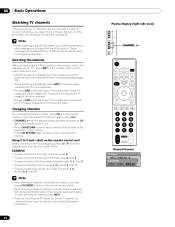
... the antenna After confirming that shows information about the currently selected channel. on the plasma display operates the same as necessary when in the multiscreen mode with TV selected will display the TV image of the plasma display (page 30). • While watching a broadcast, press ANT to view ...remote control unit has been set to "TV", press ANT on the remote control unit to select antenna A or B. • Make this selection depending on the connections to the antenna input terminals at the top of program information. 34 En Plasma display (right side view) CHANNEL +/- Note...
... the antenna After confirming that shows information about the currently selected channel. on the plasma display operates the same as necessary when in the multiscreen mode with TV selected will display the TV image of the plasma display (page 30). • While watching a broadcast, press ANT to view ...remote control unit has been set to "TV", press ANT on the remote control unit to select antenna A or B. • Make this selection depending on the connections to the antenna input terminals at the top of program information. 34 En Plasma display (right side view) CHANNEL +/- Note...
Owner's Manual
Page 36
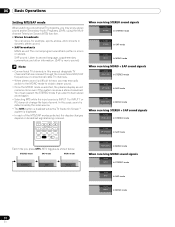
... information. (SAP is mono sound.) Note • Conventional TV channels in this case, sound is determined by the video source. • The MTS button is disabled while the TV Guide On Screen™ system is selected, the plasma display sound remains mono even if the system receives a stereo... broadcast. 06 Basic Operations Setting MTS/SAP mode When watching conventional TV programs, you may manually switch to the MONO mode to INPUT 7 or PC ...
... information. (SAP is mono sound.) Note • Conventional TV channels in this case, sound is determined by the video source. • The MTS button is disabled while the TV Guide On Screen™ system is selected, the plasma display sound remains mono even if the system receives a stereo... broadcast. 06 Basic Operations Setting MTS/SAP mode When watching conventional TV programs, you may manually switch to the MONO mode to INPUT 7 or PC ...

Owner's Manual
Page 37
...have watched digital and/or High Definition TV channels over cable, you do not setup the TV Guide On Screen™ system, the... information. B) 5 Program title 6 Program time schedule 7 Channel logo 8 TV rating name or icon Note • The above information is switched among 2-...signals. • If you can use the POD service provided by the cable TV company. Picture-in-picture Press HOME MENU, 9, 9, then 9 to view... En Basic Operations 06 English Viewing a channel banner While watching a TV program, pressing INFO causes the following procedure to select the 2-screen or ...
...have watched digital and/or High Definition TV channels over cable, you do not setup the TV Guide On Screen™ system, the... information. B) 5 Program title 6 Program time schedule 7 Channel logo 8 TV rating name or icon Note • The above information is switched among 2-...signals. • If you can use the POD service provided by the cable TV company. Picture-in-picture Press HOME MENU, 9, 9, then 9 to view... En Basic Operations 06 English Viewing a channel banner While watching a TV program, pressing INFO causes the following procedure to select the 2-screen or ...

Owner's Manual
Page 38
Moving image Still image 2 To select the desired input source, press the appropriate input source button. • If watching TV programs, press CH +/- Note • With the screen split, any operation for five minutes. • Displaying pictures in FREEZE mode for an ...1 Press FREEZE. • A still image appears on the left screen. 2 Press FREEZE again to capture and freeze one frame from the same input source or two external input sources at the same time. The user is displayed. • The multiscreen function cannot display images from a moving image is displayed. •...
Moving image Still image 2 To select the desired input source, press the appropriate input source button. • If watching TV programs, press CH +/- Note • With the screen split, any operation for five minutes. • Displaying pictures in FREEZE mode for an ...1 Press FREEZE. • A still image appears on the left screen. 2 Press FREEZE again to capture and freeze one frame from the same input source or two external input sources at the same time. The user is displayed. • The multiscreen function cannot display images from a moving image is displayed. •...
Owner's Manual
Page 40
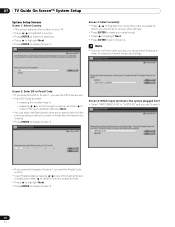
...numbers, and then to move to the next character field. • Press to highlight Next. • Press ENTER to display Screen 3. 40 En Screen 4: Which input terminal is the system plugged into? • Select "ANT/CABLE A IN" or "ANT B IN" and you see Screen 5. • If you selected Canada... select the Back button from any screen to return to the previous setup screens to correct or review the information you the location of your TV. • Press / to highlight a country. • Press ENTER to make your selection(s). • Press to highlight Next. • Press ENTER to go to ...
...numbers, and then to move to the next character field. • Press to highlight Next. • Press ENTER to display Screen 3. 40 En Screen 4: Which input terminal is the system plugged into? • Select "ANT/CABLE A IN" or "ANT B IN" and you see Screen 5. • If you selected Canada... select the Back button from any screen to return to the previous setup screens to correct or review the information you the location of your TV. • Press / to highlight a country. • Press ENTER to make your selection(s). • Press to highlight Next. • Press ENTER to go to ...
Owner's Manual
Page 42
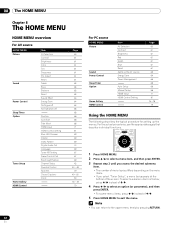
... Bass Balance Reset Sound Effect Energy Save No Signal off No Operation off Position Auto Size Side Mask HDMI Input HDMI Control Setting Blue LED Dimmer Orbiter Video Pattern Digital Audio Out Language Tuner NR Setting Game Control Pref...65 66 68 68 71 81 69 69 69 74 69 67 67 69 43 44 - 48 49 49 - 50 50 76 - 78 79 42 En For PC source HOME MENU Picture Sound Power Control Sleep Timer Option Home Gallery ... Brightness Red Green Blue Reset Same as the AV source Energy Save Power Management Auto Setup Manual Setup HDMI Input HDMI Control Setting Page 60 61 61 61 61 61 61 63 64 65 65 66 66 71 81 ...
... Bass Balance Reset Sound Effect Energy Save No Signal off No Operation off Position Auto Size Side Mask HDMI Input HDMI Control Setting Blue LED Dimmer Orbiter Video Pattern Digital Audio Out Language Tuner NR Setting Game Control Pref...65 66 68 68 71 81 69 69 69 74 69 67 67 69 43 44 - 48 49 49 - 50 50 76 - 78 79 42 En For PC source HOME MENU Picture Sound Power Control Sleep Timer Option Home Gallery ... Brightness Red Green Blue Reset Same as the AV source Energy Save Power Management Auto Setup Manual Setup HDMI Input HDMI Control Setting Page 60 61 61 61 61 61 61 63 64 65 65 66 66 71 81 ...
Owner's Manual
Page 48
...XX XX xxxxxxxxxxxxxxxxxxxxx xxxxxxxxxxxxxxxxxxxxx xxxxxxxxxxxxxxxxxxxxx Home Menu Exit • The menu is working and senses a blocked TV program (or content), the plasma display shows nothing but a message. Antenna A or antenna B: The following screen appears. Parental ...Disable Parental Control Enter your four-digit password. After the screen disappears, pressing ENTER causes it to INPUT 7. Parental Control Status Status COhfaf nge P_a_ss_w_ord Clear PaRsesswetoDxridxgixtaxlxrxexgxioxnxaxl xraxtxinxgxsx?xxxx xxxxxxxxxxxxxxxxxxxxx A Accept D Cancel xxxxxxxxxxxxxxxxxxxxx...
...XX XX xxxxxxxxxxxxxxxxxxxxx xxxxxxxxxxxxxxxxxxxxx xxxxxxxxxxxxxxxxxxxxx Home Menu Exit • The menu is working and senses a blocked TV program (or content), the plasma display shows nothing but a message. Antenna A or antenna B: The following screen appears. Parental ...Disable Parental Control Enter your four-digit password. After the screen disappears, pressing ENTER causes it to INPUT 7. Parental Control Status Status COhfaf nge P_a_ss_w_ord Clear PaRsesswetoDxridxgixtaxlxrxexgxioxnxaxl xraxtxinxgxsx?xxxx xxxxxxxxxxxxxxxxxxxxx A Accept D Cancel xxxxxxxxxxxxxxxxxxxxx...

Owner's Manual
Page 55
... you create are stored so you already entered any keywords, they are displayed. TV Guide On Screen™ System Operation 10 English Searching by pressing / / / , then pressing ENTER to input them. • The keyword you input is a program now being broadcast you can use it again whenever you need ...ALPHABETICAL". 55 En Just select one of the screen. 2 Press to move to the search category bar, then press / to select "KEYWORD". 7 Input the keyword for the search. • If you can press ENTER to search for example) then you'll only see programs in the future. 1 ...
... you create are stored so you already entered any keywords, they are displayed. TV Guide On Screen™ System Operation 10 English Searching by pressing / / / , then pressing ENTER to input them. • The keyword you input is a program now being broadcast you can use it again whenever you need ...ALPHABETICAL". 55 En Just select one of the screen. 2 Press to move to the search category bar, then press / to select "KEYWORD". 7 Input the keyword for the search. • If you can press ENTER to search for example) then you'll only see programs in the future. 1 ...
Owner's Manual
Page 56
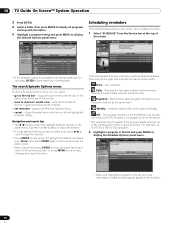
...(manual reminder only) • Regularly - only reminder • Daily - goes to the channel. • set reminder - Use the number buttons to input information. • If a highlighted field has arrows on either side, press / to the Service bar at the same time/day) • Off - ...8226; The / buttons move the highlight between options in the list you can select: • go to display the Episode Options panel menu. 10 TV Guide On Screen™ System Operation 3 Press ENTER. 4 Select a letter, then press ENTER to display all programs starting with that letter. 5 Highlight...
...(manual reminder only) • Regularly - only reminder • Daily - goes to the channel. • set reminder - Use the number buttons to input information. • If a highlighted field has arrows on either side, press / to the Service bar at the same time/day) • Off - ...8226; The / buttons move the highlight between options in the list you can select: • go to display the Episode Options panel menu. 10 TV Guide On Screen™ System Operation 3 Press ENTER. 4 Select a letter, then press ENTER to display all programs starting with that letter. 5 Highlight...
Owner's Manual
Page 60
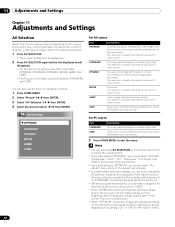
... AV SELECTION again before the displayed mode disappears. • For AV source, the mode is shared by the external input and TV input sources. You can set the mode for each input source. 5 Press HOME MENU to customize settings as well, regardless of the viewing area. these menu items are reproduced... Selection Select from the six viewing options, depending on the current environment (e.g., room brightness), the type of the current TV program, or the type of images input from damage, you can freely change the AV selection mode while enjoying the Home Gallery function. You can also use ...
... AV SELECTION again before the displayed mode disappears. • For AV source, the mode is shared by the external input and TV input sources. You can set the mode for each input source. 5 Press HOME MENU to customize settings as well, regardless of the viewing area. these menu items are reproduced... Selection Select from the six viewing options, depending on the current environment (e.g., room brightness), the type of the current TV program, or the type of images input from damage, you can freely change the AV selection mode while enjoying the Home Gallery function. You can also use ...
Owner's Manual
Page 62
... Low Moderate DRE Picture Black Level Emphasizes dark portion on the "Option" menu, the "PureCinema" setting is not selectable for the following input signals: 1080p@60 Hz. • "Advance" is disabled. CTI Provides images with reddish tone 7 Press HOME MENU to exit the menu...then ENTER). 11 Adjustments and Settings Note • "Standard" is not selectable for the following input signals: 480p, 720p@60 Hz, 1080p@60 Hz. • "Smooth" is not selectable for the following input signals: 1080p@60 Hz. • When you select "On" for Color Transient Improvement. ...
... Low Moderate DRE Picture Black Level Emphasizes dark portion on the "Option" menu, the "PureCinema" setting is not selectable for the following input signals: 1080p@60 Hz. • "Advance" is disabled. CTI Provides images with reddish tone 7 Press HOME MENU to exit the menu...then ENTER). 11 Adjustments and Settings Note • "Standard" is not selectable for the following input signals: 480p, 720p@60 Hz, 1080p@60 Hz. • "Smooth" is not selectable for the following input signals: 1080p@60 Hz. • When you select "On" for Color Transient Improvement. ...
Owner's Manual
Page 66
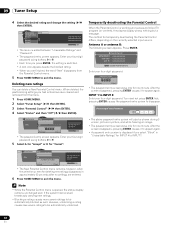
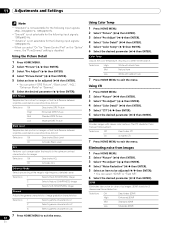
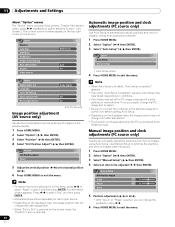
... using Auto Setup. Use Manual Setup to the HDMI terminal. 11 Adjustments and Settings About "Option" menus The "Option" menu consists of images on the plasma display. 1 Press HOME MENU. 2 Select "Option" ( / then ENTER). 3 Select "Position" ( / then ENTER). 4 Select "H/V Position Adjust" ( / then ENTER). ...4 Press HOME MENU to exit the menu. appears. • Even when "Auto Setup completed." Option Position Auto Size Side Mask HDMI Input HDMI Control Setting Blue LED Dimmer Orbiter Video Pattern 1/2 Wide-Zoom Auto On Automatic image position and clock adjustments (PC source only) Use ...
... using Auto Setup. Use Manual Setup to the HDMI terminal. 11 Adjustments and Settings About "Option" menus The "Option" menu consists of images on the plasma display. 1 Press HOME MENU. 2 Select "Option" ( / then ENTER). 3 Select "Position" ( / then ENTER). 4 Select "H/V Position Adjust" ( / then ENTER). ...4 Press HOME MENU to exit the menu. appears. • Even when "Auto Setup completed." Option Position Auto Size Side Mask HDMI Input HDMI Control Setting Blue LED Dimmer Orbiter Video Pattern 1/2 Wide-Zoom Auto On Automatic image position and clock adjustments (PC source only) Use ...
Owner's Manual
Page 67
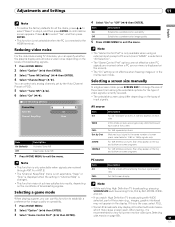
... broadcasting signals. Bars may appear on the top and bottom on the levels of input signals. Selecting a game mode Note • While watching High Definition TV broadcasting, pressing SCREEN SIZE switches among the selectable options for the type of video ...Tuner NR Setting" ( / then ENTER). 4 Select "Channel Map" ( / ). A confirmation screen appears. When playing a game, you can specify whether the plasma display should reduce video noise depending on some programs 7 Press HOME MENU to establish a preference for image quality or operability. 1 Press HOME MENU. 2 Select "Option...
... broadcasting signals. Bars may appear on the top and bottom on the levels of input signals. Selecting a game mode Note • While watching High Definition TV broadcasting, pressing SCREEN SIZE switches among the selectable options for the type of video ...Tuner NR Setting" ( / then ENTER). 4 Select "Channel Map" ( / ). A confirmation screen appears. When playing a game, you can specify whether the plasma display should reduce video noise depending on some programs 7 Press HOME MENU to establish a preference for image quality or operability. 1 Press HOME MENU. 2 Select "Option...
Owner's Manual
Page 68
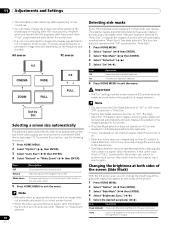
...On Activates the Side Mask detection 6 Press HOME MENU to exit the menu. Dot by Dot Selecting a screen size automatically The plasma display automatically selects an appropriate screen size when video signals are received from a connected HDMI device (see page 71). Item Off ... Select "Option" ( / then ENTER). Note • Manually select an appropriate screen size if an image does not automatically switch to the original input source again. This may display 4:3 content with side masks. AV source PC source 4:3 4:3 CINEMA WIDE Detecting side masks Some HD broadcasts may cause ...
...On Activates the Side Mask detection 6 Press HOME MENU to exit the menu. Dot by Dot Selecting a screen size automatically The plasma display automatically selects an appropriate screen size when video signals are received from a connected HDMI device (see page 71). Item Off ... Select "Option" ( / then ENTER). Note • Manually select an appropriate screen size if an image does not automatically switch to the original input source again. This may display 4:3 content with side masks. AV source PC source 4:3 4:3 CINEMA WIDE Detecting side masks Some HD broadcasts may cause ...

