
Owner's Manual
Page 3
... the instructions, may invalidate the user's right to operate the equipment. [For Canadian model] This Class B digital apparatus complies with Canadian ICES-003. These limits are used in a residential installation. Consult the dealer or an experienced radio/TV technician for the unit, you to chemicals listed on proposition 65 known to shut down all power. PLEASE WRITE THIS SERIAL NUMBER ON...
... the instructions, may invalidate the user's right to operate the equipment. [For Canadian model] This Class B digital apparatus complies with Canadian ICES-003. These limits are used in a residential installation. Consult the dealer or an experienced radio/TV technician for the unit, you to chemicals listed on proposition 65 known to shut down all power. PLEASE WRITE THIS SERIAL NUMBER ON...
Owner's Manual
Page 4
... the plasma display 17 Attaching the Pioneer stand 17 Installing the Pioneer speaker 18 When using the hung on wall unit (PDP-6010FD 22 When using the hung on the power 33 Turning off the power 33 Watching TV channels 34 Selecting the antenna 34 4 En Changing channels 34 Changing the volume and sound ......... 35 Changing the language 35 Setting MTS/SAP mode 36 Viewing a channel banner 37 Using the POD service 37 Using the multiscreen functions 37 Splitting the screen...
... the plasma display 17 Attaching the Pioneer stand 17 Installing the Pioneer speaker 18 When using the hung on wall unit (PDP-6010FD 22 When using the hung on the power 33 Turning off the power 33 Watching TV channels 34 Selecting the antenna 34 4 En Changing channels 34 Changing the volume and sound ......... 35 Changing the language 35 Setting MTS/SAP mode 36 Viewing a channel banner 37 Using the POD service 37 Using the multiscreen functions 37 Splitting the screen...
Owner's Manual
Page 5
... images 62 Setting your favorite channels 49 Comparing picture adjustments on the Setting up closed captions 49 screen 63 Activating the closed caption 49 Sound adjustments 63 Selecting the type of conventional Power Control 64 closed captions 49 Energy Save 64 Selecting digital closed captions ......... 49 No Signal off (AV source only 64 Selecting digital closed caption No Operation off (AV source only)........ 65 parameters 50 Power Management Clock Setting 50 (PC source only 65 10 TV Guide On Screen™ System Operation 51 Using...
... images 62 Setting your favorite channels 49 Comparing picture adjustments on the Setting up closed captions 49 screen 63 Activating the closed caption 49 Sound adjustments 63 Selecting the type of conventional Power Control 64 closed captions 49 Energy Save 64 Selecting digital closed captions ......... 49 No Signal off (AV source only 64 Selecting digital closed caption No Operation off (AV source only)........ 65 parameters 50 Power Management Clock Setting 50 (PC source only 65 10 TV Guide On Screen™ System Operation 51 Using...
Owner's Manual
Page 6
... Show Setup screen 78 Starting the Slide Show screen 78 13 Using the HDMI Control 79 Using the HDMI Control functions............79 Making the HDMI Control connections ....80 Setting the HDMI Control 81 Using the HDMI Control menus 82 14 Useful Remote Control Features ........ 83 Presetting manufacturer codes to control other devices 83 Presetting manufacturer codes 83 Library Search 83 Manufacturing Reset 83 Programming codes 84 Using the remote control unit to control other devices 89 15 Appendix 93 Troubleshooting 93 Specifications 103...
... Show Setup screen 78 Starting the Slide Show screen 78 13 Using the HDMI Control 79 Using the HDMI Control functions............79 Making the HDMI Control connections ....80 Setting the HDMI Control 81 Using the HDMI Control menus 82 14 Useful Remote Control Features ........ 83 Presetting manufacturer codes to control other devices 83 Presetting manufacturer codes 83 Library Search 83 Manufacturing Reset 83 Programming codes 84 Using the remote control unit to control other devices 89 15 Appendix 93 Troubleshooting 93 Specifications 103...
Owner's Manual
Page 7
... and high reliability. Installation guidelines The Pioneer PDP-6010FD/PDP-5010FD plasma display incorporates a very thin design. Usage guidelines All phosphor-based screens (including conventional tube-type televisions) can be avoided by many years to come, please carefully read this product. This product should not be installed by using the plasma display, always switch the display to "STANDBY" mode. • Extensive viewing of inactive light cells. • Panel generated sounds, examples: Fan motor...
... and high reliability. Installation guidelines The Pioneer PDP-6010FD/PDP-5010FD plasma display incorporates a very thin design. Usage guidelines All phosphor-based screens (including conventional tube-type televisions) can be avoided by many years to come, please carefully read this product. This product should not be installed by using the plasma display, always switch the display to "STANDBY" mode. • Extensive viewing of inactive light cells. • Panel generated sounds, examples: Fan motor...
Owner's Manual
Page 9
... MANUFACTURER'S INSTRUCTIONS WHEN INSTALLING THE PRODUCT AND USE MOUNTING ACCESSORIES RECOMMENDED BY THE MANUFACTURER. Note • When a program menu, TV Guide screen or frozen image is displayed for public viewing may result in full screen. • We recommend that you display still images on page 69). Minimizing damage from PC or TV game equipment, and/or fixed images such as permanent image retention or burn-in all display technologies, including plasma and LCD. If...
... MANUFACTURER'S INSTRUCTIONS WHEN INSTALLING THE PRODUCT AND USE MOUNTING ACCESSORIES RECOMMENDED BY THE MANUFACTURER. Note • When a program menu, TV Guide screen or frozen image is displayed for public viewing may result in full screen. • We recommend that you display still images on page 69). Minimizing damage from PC or TV game equipment, and/or fixed images such as permanent image retention or burn-in all display technologies, including plasma and LCD. If...
Owner's Manual
Page 10
... for the PDP-5010FD (including the stand and speaker). In order to perform servicing. 17. Overloading can expose you are followed. 11. Cleaning-Unplug the power cord from resting on a wall or ceiling, be read the following instructions when installing, operating and cleaning the product. Do not use the supplied cleaning cloth or other dangerous conditions. a. Use of time. Wall or ceiling mounting-When mounting the product...
... for the PDP-5010FD (including the stand and speaker). In order to perform servicing. 17. Overloading can expose you are followed. 11. Cleaning-Unplug the power cord from resting on a wall or ceiling, be read the following instructions when installing, operating and cleaning the product. Do not use the supplied cleaning cloth or other dangerous conditions. a. Use of time. Wall or ceiling mounting-When mounting the product...
Owner's Manual
Page 16
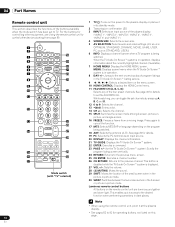
... the remote control unit are luminous and gather and store light. Luminous remote control buttons All buttons on this page. 16 En This enables quick access to TV. When the TV Guide On Screen™ system is displayed. 27 VOL +/-: Sets the volume. 28 M MUTING: Mutes the sound. 29 SHIFT: Moves the location of the plasma display. ("INPUT 1", "INPUT 2", "INPUT 3", "INPUT 4", "INPUT 5", "INPUT 6" and "INPUT 7") 4 SCREEN SIZE: Selects the screen size. 5 AV SELECTION: Selects audio and video settings. (AV source: OPTIMUM, STANDARD, DYNAMIC, MOVIE, GAME, USER.
... the remote control unit are luminous and gather and store light. Luminous remote control buttons All buttons on this page. 16 En This enables quick access to TV. When the TV Guide On Screen™ system is displayed. 27 VOL +/-: Sets the volume. 28 M MUTING: Mutes the sound. 29 SHIFT: Moves the location of the plasma display. ("INPUT 1", "INPUT 2", "INPUT 3", "INPUT 4", "INPUT 5", "INPUT 6" and "INPUT 7") 4 SCREEN SIZE: Selects the screen size. 5 AV SELECTION: Selects audio and video settings. (AV source: OPTIMUM, STANDARD, DYNAMIC, MOVIE, GAME, USER.
Owner's Manual
Page 18
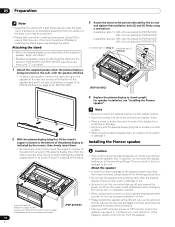
... injury or damage to stand upright. Attaching the stand • When the plasma display is being mounted on the wall, with the plasma display lying flat on to turn the connected devices off and remove the power cord from the speaker. 18 En In addition, do not use the speaker with a soft sheet placed under the base cover. Doing so might damage the plasma display panel or its ports or result in...
... injury or damage to stand upright. Attaching the stand • When the plasma display is being mounted on the wall, with the plasma display lying flat on to turn the connected devices off and remove the power cord from the speaker. 18 En In addition, do not use the speaker with a soft sheet placed under the base cover. Doing so might damage the plasma display panel or its ports or result in...

Owner's Manual
Page 21
... speaker cables are included with respect to the polarity may result in insufficient stereo sound effects, delivering poor bass sounds or unstable sound image. • Bundle the cord without pulling the cord. 7 Bundle the cables. • Bead bands are securely connected to any sound. Caution Lever • Be sure to turn the connected devices off and remove the power cord from the wall outlet beforehand when changing the connection...
... speaker cables are included with respect to the polarity may result in insufficient stereo sound effects, delivering poor bass sounds or unstable sound image. • Bundle the cord without pulling the cord. 7 Bundle the cables. • Bead bands are securely connected to any sound. Caution Lever • Be sure to turn the connected devices off and remove the power cord from the wall outlet beforehand when changing the connection...
Owner's Manual
Page 29
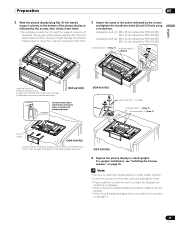
... and tighten the installation bolts (2) and (1) firmly using a screwdriver. Preparation 05 English 2 With the plasma display lying flat, fit the stand's support columns to the bottom of the plasma display as indicated in the accompanying diagram. (PDP-6010FD) Screw hole with "T" inscribed Installation bolts (1) (Step 2) Installation bolts (2) (Step 1) Plasma display (PDP-5010FD) Insert the stand into any part of the stand. 3 Attach the stand at the bottom of the stand indicates downward. (PDP-5010FD) 4 Replace the plasma display to scratch or...
... and tighten the installation bolts (2) and (1) firmly using a screwdriver. Preparation 05 English 2 With the plasma display lying flat, fit the stand's support columns to the bottom of the plasma display as indicated in the accompanying diagram. (PDP-6010FD) Screw hole with "T" inscribed Installation bolts (1) (Step 2) Installation bolts (2) (Step 1) Plasma display (PDP-5010FD) Insert the stand into any part of the stand. 3 Attach the stand at the bottom of the stand indicates downward. (PDP-5010FD) 4 Replace the plasma display to scratch or...
Owner's Manual
Page 33
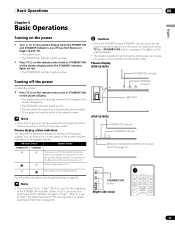
.... Plasma display (PDP-6010FD) POWER ON indicator Turning off (see Blue LED Dimmer on the plasma display. • The plasma display will allow the system to match the brightness level of the indicator changes to "High", "Mid" or "Low" to automatically receive digital TV program information while in the standby mode. Indicator Status System Status POWER ON STANDBY The power cord of the system with the indicators on mode even when TV a or STANDBY/ON button...
.... Plasma display (PDP-6010FD) POWER ON indicator Turning off (see Blue LED Dimmer on the plasma display. • The plasma display will allow the system to match the brightness level of the indicator changes to "High", "Mid" or "Low" to automatically receive digital TV program information while in the standby mode. Indicator Status System Status POWER ON STANDBY The power cord of the system with the indicators on mode even when TV a or STANDBY/ON button...
Owner's Manual
Page 44
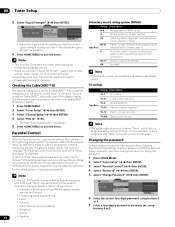
... plasma display has a slot for a CableCARD™ that the current signal strength reaches as close to the maximum signal strength as EAS messages, weather warning and others) • Locally originated programming • News • Political • Public Service Announcements • Religious • Sports • Weather 44 Parental Control Password Password Change Password Clear Password xxxxxxxxxxxxxxxxxxxxx xxxxxxxxxxxxxxxxxxxxx xxxxxxxxxxxxxxxxxxxxx Home Menu Exit 6 Enter the current four-digit password, using buttons...
... plasma display has a slot for a CableCARD™ that the current signal strength reaches as close to the maximum signal strength as EAS messages, weather warning and others) • Locally originated programming • News • Political • Public Service Announcements • Religious • Sports • Weather 44 Parental Control Password Password Change Password Clear Password xxxxxxxxxxxxxxxxxxxxx xxxxxxxxxxxxxxxxxxxxx xxxxxxxxxxxxxxxxxxxxx Home Menu Exit 6 Enter the current four-digit password, using buttons...

Owner's Manual
Page 51
... panel menu). 51 En It does not provide listings for satellite services. • Once you 'll need to set up the TV Guide On Screen™ system it may take up to display. • Progress Bar - As content providers move to receive TV program listings. Screen components Many of Gemstar-TV Guide International, Inc. Indicates an active file, from which you can start using the Guide or to TV Guide On Screen...
... panel menu). 51 En It does not provide listings for satellite services. • Once you 'll need to set up the TV Guide On Screen™ system it may take up to display. • Progress Bar - As content providers move to receive TV program listings. Screen components Many of Gemstar-TV Guide International, Inc. Indicates an active file, from which you can start using the Guide or to TV Guide On Screen...
Owner's Manual
Page 71
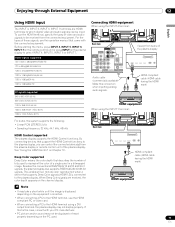
... in a bitmapped image. Besides the conventional RGB/YCbCr16 bit/20 bit/24 bit signals, the plasma display also supports RGB/YCbCr30 bit/36 bit signals. HDMI compliant cable (HDMI cable having the HDMI mark) HDMI equipment When using the INPUT 4 terminal: 4 5 Rear view 4 5 Viewed from the connected equipment. Enjoying through External Equipment 12 English Using HDMI Input The INPUT 4, INPUT 5, INPUT 6, INPUT 7 terminals are received, the color depth appears on the channel display. HDMI compliant cable (HDMI cable having the HDMI mark) HDMI equipment 71 En...
... in a bitmapped image. Besides the conventional RGB/YCbCr16 bit/20 bit/24 bit signals, the plasma display also supports RGB/YCbCr30 bit/36 bit signals. HDMI compliant cable (HDMI cable having the HDMI mark) HDMI equipment When using the INPUT 4 terminal: 4 5 Rear view 4 5 Viewed from the connected equipment. Enjoying through External Equipment 12 English Using HDMI Input The INPUT 4, INPUT 5, INPUT 6, INPUT 7 terminals are received, the color depth appears on the channel display. HDMI compliant cable (HDMI cable having the HDMI mark) HDMI equipment 71 En...
Owner's Manual
Page 79
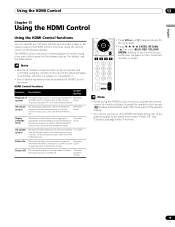
... the remote control sensor (t) located at the bottom right of the front panel of the plasma display. • You cannot use functions such as the disc navigator on the display menu language is as you press PLAY on the connected device On-screen control Recorder/player operation can be available for the AV system. • Press , , , , ENTER, RETURN ( ) or color (BLUE, RED, YELLOW, GREEN) buttons to use two or more HDMI...
... the remote control sensor (t) located at the bottom right of the front panel of the plasma display. • You cannot use functions such as the disc navigator on the display menu language is as you press PLAY on the connected device On-screen control Recorder/player operation can be available for the AV system. • Press , , , , ENTER, RETURN ( ) or color (BLUE, RED, YELLOW, GREEN) buttons to use two or more HDMI...
Owner's Manual
Page 80
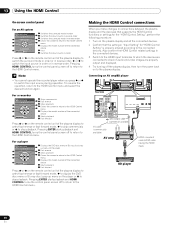
... video images are properly output and displayed. 4 Try turning off to return to the HDMI Control menu. 13 Using the HDMI Control On-screen control panel For an AV system HDMI Control 1 SURROUND+ 2 INPUT3 INPUT+ SURROUND4 HDMI CONTROL Exit 1 Switches the surround mode in order 5 2 Switches the input source in reverse order 3 Switches the surround mode in reverse order 6 4 Closes the screen to return to the HDMI Control 7 menu 5 Displays the model number of the connected device 6 Void 7 Switches the input source in order Press or on the remote control...
... video images are properly output and displayed. 4 Try turning off to return to the HDMI Control menu. 13 Using the HDMI Control On-screen control panel For an AV system HDMI Control 1 SURROUND+ 2 INPUT3 INPUT+ SURROUND4 HDMI CONTROL Exit 1 Switches the surround mode in order 5 2 Switches the input source in reverse order 3 Switches the surround mode in reverse order 6 4 Closes the screen to return to the HDMI Control 7 menu 5 Displays the model number of the connected device 6 Void 7 Switches the input source in order Press or on the remote control...
Owner's Manual
Page 82
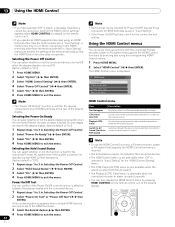
... CTRL Panel Switch to AV Sound Note HDMI Control menu • The "Power Off Control" function is valid for the connected Pioneer AV system even if the system is placed into standby during HDMI Control operations. (factory default is output 3 Select "On" ( / then ENTER). 4 Press HOME MENU to 3 in "Input Setting", make sure to enter the settings of the plasma display. Confirm the HDMI control settings." appears when HDMI CONTROL is turned On and images are connected to the HDMI terminals...
... CTRL Panel Switch to AV Sound Note HDMI Control menu • The "Power Off Control" function is valid for the connected Pioneer AV system even if the system is placed into standby during HDMI Control operations. (factory default is output 3 Select "On" ( / then ENTER). 4 Press HOME MENU to 3 in "Input Setting", make sure to enter the settings of the plasma display. Confirm the HDMI control settings." appears when HDMI CONTROL is turned On and images are connected to the HDMI terminals...
Owner's Manual
Page 93
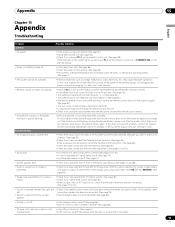
... light illuminating the remote control sensor? • Check if any button other components correct? (See pages 70 to two minutes. • Remote control unit does not operate. • Check if TV is still flashing, unplug the plasma display's power cord from only a single • Has the balance been correctly adjusted? (See page 63.) speaker. • Picture is suddenly turned off. • Is the sleep timer set correctly...
... light illuminating the remote control sensor? • Check if any button other components correct? (See pages 70 to two minutes. • Remote control unit does not operate. • Check if TV is still flashing, unplug the plasma display's power cord from only a single • Has the balance been correctly adjusted? (See page 63.) speaker. • Picture is suddenly turned off. • Is the sleep timer set correctly...
Owner's Manual
Page 94
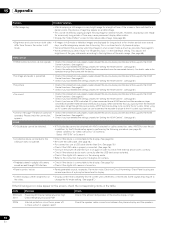
... minimized. Check the speaker cable connections between the plasma display and the device that supports the HDMI Control functions. (See page 80.) • Check if you enjoy watching images in speaker cable? 15 Appendix Problem Possible Solution • After-image lag. • After displaying a still image or a very bright image for a length of time, if the screen is then switched to the AV system input terminal. • An error message "The...
... minimized. Check the speaker cable connections between the plasma display and the device that supports the HDMI Control functions. (See page 80.) • Check if you enjoy watching images in speaker cable? 15 Appendix Problem Possible Solution • After-image lag. • After displaying a still image or a very bright image for a length of time, if the screen is then switched to the AV system input terminal. • An error message "The...


