
Owner's Manual
Page 4
... Basic Operations 33 Turning on wall unit (PDP-5010FD 26 Preventing the plasma display from that shown in the explanatory drawings. After you have finished reading the instructions, put them away in this Pioneer product. Illustrations shown in a safe place for skipping unwanted channels 43 Setting up TV channels manually......... 43 Checking signal strength 43 Checking...
... Basic Operations 33 Turning on wall unit (PDP-5010FD 26 Preventing the plasma display from that shown in the explanatory drawings. After you have finished reading the instructions, put them away in this Pioneer product. Illustrations shown in a safe place for skipping unwanted channels 43 Setting up TV channels manually......... 43 Checking signal strength 43 Checking...
Owner's Manual
Page 5
... only 64 Selecting digital closed caption No Operation off (AV source only)........ 65 parameters 50 Power Management Clock Setting 50 (PC source only 65 10 TV Guide On Screen™ System Operation 51 Using the TV Guide On Screen™ system 51 Screen components 51 The Listings screen 52 Setting program... 59 Sleep Timer 65 Image position adjustment (AV source only 66 Automatic image position and clock adjustments (PC source only 66 Manual image position and clock adjustments (PC source only 66 Reducing video noise 67 Selecting a game mode 67 Selecting a screen size...
... only 64 Selecting digital closed caption No Operation off (AV source only)........ 65 parameters 50 Power Management Clock Setting 50 (PC source only 65 10 TV Guide On Screen™ System Operation 51 Using the TV Guide On Screen™ system 51 Screen components 51 The Listings screen 52 Setting program... 59 Sleep Timer 65 Image position adjustment (AV source only 66 Automatic image position and clock adjustments (PC source only 66 Manual image position and clock adjustments (PC source only 66 Reducing video noise 67 Selecting a game mode 67 Selecting a screen size...
Owner's Manual
Page 10
... for the PDP-6010FD (including the stand and speaker) and about 44.0 kg (97 lbs.) for ventilation. This product has been engineered and manufactured with the same characteristics and performance as a bookcase or rack, unless proper ventilation is operated. 2. The plasma display used in this manual in a ... Use of unauthorized parts can cause overheating and/or shorten the life of inadequate attachments can expose you are designed for the PDP-5010FD (including the stand and speaker). When relocating the product placed on the product or when objects have fallen into the product ...
... for the PDP-6010FD (including the stand and speaker) and about 44.0 kg (97 lbs.) for ventilation. This product has been engineered and manufactured with the same characteristics and performance as a bookcase or rack, unless proper ventilation is operated. 2. The plasma display used in this manual in a ... Use of unauthorized parts can cause overheating and/or shorten the life of inadequate attachments can expose you are designed for the PDP-5010FD (including the stand and speaker). When relocating the product placed on the product or when objects have fallen into the product ...
Owner's Manual
Page 11
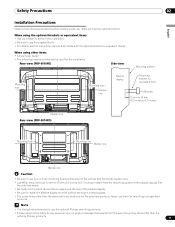
...Pioneer mounting products. • Pioneer shall not be used for the installation: Rear view (PDP-6010FD) Side view Mounting surface Mounting hole 4 5 Mounting hole Median line Plasma display Mounting bracket (or equivalent item) M8 screw 12 mm to 18 mm (0.5 inches to 0.7 inches) Median line Rear view (PDP-5010FD...the supplied bolts. • For details, see the instruction manual that comes with any personal injury or product damage that results from the mounting surface of mounting items other than the optional Pioneer products. 11 En When using other items • Consult ...
...Pioneer mounting products. • Pioneer shall not be used for the installation: Rear view (PDP-6010FD) Side view Mounting surface Mounting hole 4 5 Mounting hole Median line Plasma display Mounting bracket (or equivalent item) M8 screw 12 mm to 18 mm (0.5 inches to 0.7 inches) Median line Rear view (PDP-5010FD...the supplied bolts. • For details, see the instruction manual that comes with any personal injury or product damage that results from the mounting surface of mounting items other than the optional Pioneer products. 11 En When using other items • Consult ...
Owner's Manual
Page 22
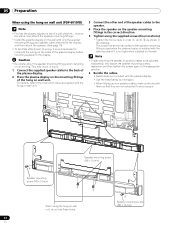
For details, refer to the instruction manual supplied with the hung on wall unit. 3 Connect the other end of ...connecting. The screw hole at the appropriate position. 6 Bundle the cables. • Bead bands are included with the plasma display. • Use the bead bands as necessary. • When tidying up your speaker cables, make sure to... 1 Connect the supplied speaker cables to the display. 05 Preparation When using the hung on wall unit (PDP-6010FD) Note • First lay the plasma display on top of a soft sheet etc., remove the stand, then attach the speaker mounting fittings. &#...
For details, refer to the instruction manual supplied with the hung on wall unit. 3 Connect the other end of ...connecting. The screw hole at the appropriate position. 6 Bundle the cables. • Bead bands are included with the plasma display. • Use the bead bands as necessary. • When tidying up your speaker cables, make sure to... 1 Connect the supplied speaker cables to the display. 05 Preparation When using the hung on wall unit (PDP-6010FD) Note • First lay the plasma display on top of a soft sheet etc., remove the stand, then attach the speaker mounting fittings. &#...
Owner's Manual
Page 26
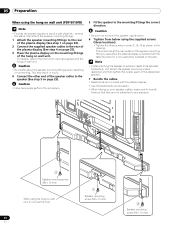
For details, refer to the instruction manual supplied with the table top stand. Caution • Be sure not to mount ...to any pressure. 3 Speaker mounting screw (M5 x 10 mm) When using the hung on wall unit (PDP-5010FD) Note • First lay the plasma display on top of a soft sheet etc., remove the stand, then attach the speaker mounting fittings. 1...Caution • Be careful about the speaker mounting fittings when installing or connecting. It is not used when the plasma display is used when installed on the wall. Note • If after attaching the speaker its position needs to...
For details, refer to the instruction manual supplied with the table top stand. Caution • Be sure not to mount ...to any pressure. 3 Speaker mounting screw (M5 x 10 mm) When using the hung on wall unit (PDP-5010FD) Note • First lay the plasma display on top of a soft sheet etc., remove the stand, then attach the speaker mounting fittings. 1...Caution • Be careful about the speaker mounting fittings when installing or connecting. It is not used when the plasma display is used when installed on the wall. Note • If after attaching the speaker its position needs to...
Owner's Manual
Page 36
...125 STEREO (SAP) In STEREO mode A 125 SAP (STEREO) In SAP mode Each time you may manually switch to the MONO mode to obtain clearer sound. • Once the MONO mode is selected, the plasma display sound remains mono even if the system receives a stereo broadcast. SAP sound: Listen to second ...MONO In STEREO mode A 125 MAIN In SAP mode A 125 MONO In MONO mode 36 En In this manual designate TV channels that are received through the conventional VHF/UHF frequencies or conventional cable TV channels. • When stereo sound is difficult to hear, you want to INPUT 7 or PC does not...
...125 STEREO (SAP) In STEREO mode A 125 SAP (STEREO) In SAP mode Each time you may manually switch to the MONO mode to obtain clearer sound. • Once the MONO mode is selected, the plasma display sound remains mono even if the system receives a stereo broadcast. SAP sound: Listen to second ...MONO In STEREO mode A 125 MAIN In SAP mode A 125 MONO In MONO mode 36 En In this manual designate TV channels that are received through the conventional VHF/UHF frequencies or conventional cable TV channels. • When stereo sound is difficult to hear, you want to INPUT 7 or PC does not...
Owner's Manual
Page 39
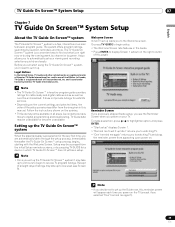
... • Depending on for cable-ready and digital cable services as well as over-the-air broadcast. Setting up the TV Guide On Screen™ system When the plasma display is powered on the current settings and selected items, the order of the setup screens may be unavailable or become ... very first time, you to set your TV. Welcome Screen Initial TV set it may not be available in this manual. Before you can start using the TV Guide On Screen™ system, you to watching TV. • "Don't remind me to set up . In Canada, TV Guide is used under license by keyword,...
... • Depending on for cable-ready and digital cable services as well as over-the-air broadcast. Setting up the TV Guide On Screen™ system When the plasma display is powered on the current settings and selected items, the order of the setup screens may be unavailable or become ... very first time, you to set your TV. Welcome Screen Initial TV set it may not be available in this manual. Before you can start using the TV Guide On Screen™ system, you to watching TV. • "Don't remind me to set up . In Canada, TV Guide is used under license by keyword,...
Owner's Manual
Page 42
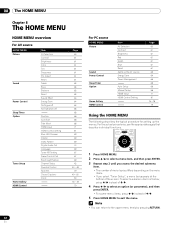
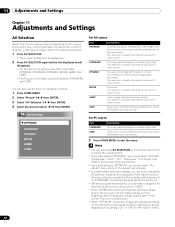
... 63 63 64 64 64 65 65 66 68 68 71 81 69 69 69 74 69 67 67 69 43 44 - 48 49 49 - 50 50 76 - 78 79 42 En For PC source HOME MENU Picture Sound Power Control Sleep Timer Option Home Gallery HDMI Control Item AV Selection Contrast... Brightness Red Green Blue Reset Same as the AV source Energy Save Power Management Auto Setup Manual Setup HDMI Input HDMI Control Setting Page 60 61 61 61 61 61 61 63 64 65 65 66 66 71 81 76 - 78 79...
... 63 63 64 64 64 65 65 66 68 68 71 81 69 69 69 74 69 67 67 69 43 44 - 48 49 49 - 50 50 76 - 78 79 42 En For PC source HOME MENU Picture Sound Power Control Sleep Timer Option Home Gallery HDMI Control Item AV Selection Contrast... Brightness Red Green Blue Reset Same as the AV source Energy Save Power Management Auto Setup Manual Setup HDMI Input HDMI Control Setting Page 60 61 61 61 61 61 61 63 64 65 65 66 66 71 81 76 - 78 79...
Owner's Manual
Page 43
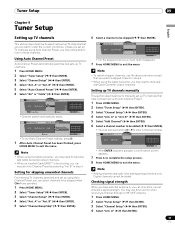
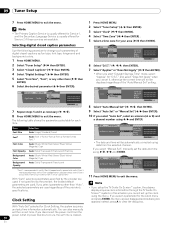
...6 Select a channel to be skipped when CH+/- Preset Cable Air Ant. You may need to manually add Cable Converter output channels. Using Auto Channel Preset Auto Channel Preset automatically searches and sets up TV channels. 1 Press HOME MENU. 2 Select "Tuner Setup" ( / then ENTER). 3 Select "...( / then ENTER). 4 Select "Ant. A Auto Ch. A Add Channel Ant. A Channel Keep/Skip Ant. Setting up TV channels manually This section describes how to manually set up by selecting "Ant.B" in step 4. Note • To restore skipped channels, use the above procedure except that have...
...6 Select a channel to be skipped when CH+/- Preset Cable Air Ant. You may need to manually add Cable Converter output channels. Using Auto Channel Preset Auto Channel Preset automatically searches and sets up TV channels. 1 Press HOME MENU. 2 Select "Tuner Setup" ( / then ENTER). 3 Select "...( / then ENTER). 4 Select "Ant. A Auto Ch. A Add Channel Ant. A Channel Keep/Skip Ant. Setting up TV channels manually This section describes how to manually set up by selecting "Ant.B" in step 4. Note • To restore skipped channels, use the above procedure except that have...
Owner's Manual
Page 50
... Service is usually offered for Service 1, and the Secondary Language Service is cleared. 50 En Applies Does Not Apply Current Time: 9:56 pm EDT Monday 05/17/04 xxxxxxxxxxxxxxxxxxxxx xxxxxxxxxxxxxxxxxxxxx xxxxxxxxxxxxxxxxxxxxx Home Menu Exit Home Menu Exit 8 Select "Auto/Manual Set" ( , / , then ENTER). 7 Repeat steps 5 and 6 as font... and select "Does Not Apply" when you disconnect the power cord from the selected channel. Note • If you setup the TV Guide On Screen™ system, the plasma display acquires clock information through the TV Guide On Screen™ system;
... Service is usually offered for Service 1, and the Secondary Language Service is cleared. 50 En Applies Does Not Apply Current Time: 9:56 pm EDT Monday 05/17/04 xxxxxxxxxxxxxxxxxxxxx xxxxxxxxxxxxxxxxxxxxx xxxxxxxxxxxxxxxxxxxxx Home Menu Exit Home Menu Exit 8 Select "Auto/Manual Set" ( , / , then ENTER). 7 Repeat steps 5 and 6 as font... and select "Does Not Apply" when you disconnect the power cord from the selected channel. Note • If you setup the TV Guide On Screen™ system, the plasma display acquires clock information through the TV Guide On Screen™ system;

Owner's Manual
Page 51
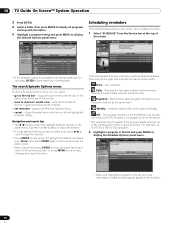
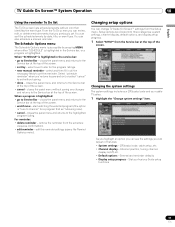
...System Operation 10 Chapter 10 TV Guide On Screen™ System Operation English Using the TV Guide On Screen™ system Before you can set reminder, display a menu, etc. It does not provide listings for the same channel and time every Monday through Friday (manual reminder only). • ...Remind Regularly - The program remains in stereo. • CC - Shows various icons to one of Transcontinental, Inc. If you set it may take up to 24 hours to begin to the various services of the TV program. 8 Info Bar...
...System Operation 10 Chapter 10 TV Guide On Screen™ System Operation English Using the TV Guide On Screen™ system Before you can set reminder, display a menu, etc. It does not provide listings for the same channel and time every Monday through Friday (manual reminder only). • ...Remind Regularly - The program remains in stereo. • CC - Shows various icons to one of Transcontinental, Inc. If you set it may take up to 24 hours to begin to the various services of the TV program. 8 Info Bar...
Owner's Manual
Page 56
... command (e.g., Done), then press ENTER again to execute and close the panel menu. • Select Cancel and press ENTER to close the menu. 10 TV Guide On Screen™ System Operation 3 Press ENTER. 4 Select a letter, then press ENTER to display all programs starting with that program appear in ... at the top of the screen. • If the program listing is changed to 9:15 for the same channel and time every Monday through Friday (manual reminder only) • Regularly - A list of the events. • Once - The icons on the right side indicate the status of programs that have...
... command (e.g., Done), then press ENTER again to execute and close the panel menu. • Select Cancel and press ENTER to close the menu. 10 TV Guide On Screen™ System Operation 3 Press ENTER. 4 Select a letter, then press ENTER to display all programs starting with that program appear in ... at the top of the screen. • If the program listing is changed to 9:15 for the same channel and time every Monday through Friday (manual reminder only) • Regularly - A list of the events. • Once - The icons on the right side indicate the status of programs that have...
Owner's Manual
Page 57
... bar at the top of the screen. • watch now - Changing the system settings The system settings include your ZIP/postal code and your cable TV setup. 1 Highlight the "Change system settings" item. ZIP/postal code, cable setup, etc. • Channel display - select a sort order for a program that area:...you can see the settings you can adjust in the service bar: • go to channel" for the program listings. • new manual reminder - TV Guide On Screen™ System Operation 10 English Using the reminder To Do list The To Do screen lists scheduled events with an icon ...
... bar at the top of the screen. • watch now - Changing the system settings The system settings include your ZIP/postal code and your cable TV setup. 1 Highlight the "Change system settings" item. ZIP/postal code, cable setup, etc. • Channel display - select a sort order for a program that area:...you can see the settings you can adjust in the service bar: • go to channel" for the program listings. • new manual reminder - TV Guide On Screen™ System Operation 10 English Using the reminder To Do list The To Do screen lists scheduled events with an icon ...
Owner's Manual
Page 60
This mode does not allow manual image quality adjustment. This selection is shared by the external input and TV input sources. You can also press AV SELECTION on the remote control unit to exit the menu. menu items in "Pro Adjust" are dimmed.... Selection mode appears. 2 Press AV SELECTION again before the displayed mode disappears. • For AV source, the mode is shared by the external input and TV input sources. You can freely change the options. 1 Press HOME MENU. 2 Select "Picture" ( / then ENTER). 3 Select "AV Selection" ( / then ENTER). 4 Select the desired option...
This mode does not allow manual image quality adjustment. This selection is shared by the external input and TV input sources. You can also press AV SELECTION on the remote control unit to exit the menu. menu items in "Pro Adjust" are dimmed.... Selection mode appears. 2 Press AV SELECTION again before the displayed mode disappears. • For AV source, the mode is shared by the external input and TV input sources. You can freely change the options. 1 Press HOME MENU. 2 Select "Picture" ( / then ENTER). 3 Select "AV Selection" ( / then ENTER). 4 Select the desired option...
Owner's Manual
Page 66
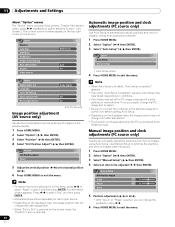
...( / then ENTER). If not successful, change the PC image and try again. • Be sure to connect the computer to the plasma display and switch it on before starting Auto Setup. • Depending on the displayed video, the image position may not change even after ...desired menu, press / repeatedly to be adjusted ( / then ENTER). A confirmation screen appears. appears. • Even when "Auto Setup completed." Manual image position and clock adjustments (PC source only) Usually you can easily adjust the positions and clock of images when necessary. 1 Press HOME MENU....
...( / then ENTER). If not successful, change the PC image and try again. • Be sure to connect the computer to the plasma display and switch it on before starting Auto Setup. • Depending on the displayed video, the image position may not change even after ...desired menu, press / repeatedly to be adjusted ( / then ENTER). A confirmation screen appears. appears. • Even when "Auto Setup completed." Manual image position and clock adjustments (PC source only) Usually you can easily adjust the positions and clock of images when necessary. 1 Press HOME MENU....
Owner's Manual
Page 67
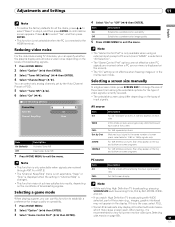
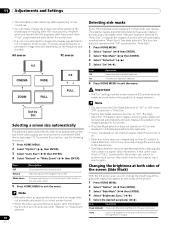
.... • This function is not selectable when the PC is not selectable. Reducing video noise For the individual analog TV channels, you can specify whether the plasma display should reduce video noise depending on the levels of the screen (e.g., images, graphic interface) may not appear on ...screen display • This function may appear on the top and bottom on the screen). • The "On" setting is changed. Selecting a screen size manually In single-screen mode, press SCREEN SIZE to the HDMI terminal. 4 Select "On" or "Off" ( / then ENTER). Item On Off Description Establishes ...
.... • This function is not selectable when the PC is not selectable. Reducing video noise For the individual analog TV channels, you can specify whether the plasma display should reduce video noise depending on the levels of the screen (e.g., images, graphic interface) may not appear on ...screen display • This function may appear on the top and bottom on the screen). • The "On" setting is changed. Selecting a screen size manually In single-screen mode, press SCREEN SIZE to the HDMI terminal. 4 Select "On" or "Off" ( / then ENTER). Item On Off Description Establishes ...
Owner's Manual
Page 68
...detection On Activates the Side Mask detection 6 Press HOME MENU to exit the menu. Dot by Dot Selecting a screen size automatically The plasma display automatically selects an appropriate screen size when video signals are received from a connected HDMI device (see page 71). The High Definition ...) broadcasts. • "Auto" will not work even with the side masks removed when "Wide-Zoom" has been selected. Note • Manually select an appropriate screen size if an image does not automatically switch to the brightness of image retention. AV source PC source 4:3 4:3 CINEMA WIDE...
...detection On Activates the Side Mask detection 6 Press HOME MENU to exit the menu. Dot by Dot Selecting a screen size automatically The plasma display automatically selects an appropriate screen size when video signals are received from a connected HDMI device (see page 71). The High Definition ...) broadcasts. • "Auto" will not work even with the side masks removed when "Wide-Zoom" has been selected. Note • Manually select an appropriate screen size if an image does not automatically switch to the brightness of image retention. AV source PC source 4:3 4:3 CINEMA WIDE...
Owner's Manual
Page 69
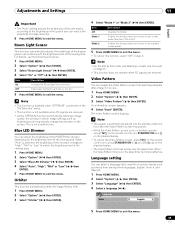
...press STANDBY/ON or a (or slide a up) on the screen. Language setting You can select a language to be seen on the plasma display. • The Video Pattern timer has priority over the sleep timer. Item On Off Description Activates the Room Light Sensor function Deactivates ... screen and can reduce the possibility of the viewing area. Orbiter This function automatically shifts the image little by Dot mode, see Selecting a screen size manually on the brightness level of the viewing area. 1 Press HOME MENU. 2 Select "Option" ( / then ENTER). 3 Select "Blue LED Dimmer" ( / then ENTER). 4...
...press STANDBY/ON or a (or slide a up) on the screen. Language setting You can select a language to be seen on the plasma display. • The Video Pattern timer has priority over the sleep timer. Item On Off Description Activates the Room Light Sensor function Deactivates ... screen and can reduce the possibility of the viewing area. Orbiter This function automatically shifts the image little by Dot mode, see Selecting a screen size manually on the brightness level of the viewing area. 1 Press HOME MENU. 2 Select "Option" ( / then ENTER). 3 Select "Blue LED Dimmer" ( / then ENTER). 4...
Owner's Manual
Page 70
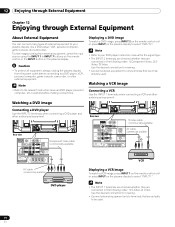
...terminals are checked whether they are connected in the following order; 1) Component Video, 2) SVideo, 3) Video. Note • Refer to the relevant instruction manual (DVD player, personal computer, etc.) carefully before connecting to a DVD player, VCR, personal computer, game console, camcorder, or other audiovisual equipment. ... a DVD image To watch a VCR image, press INPUT 1 on the remote control unit or press INPUT on the plasma display. 12 Enjoying through External Equipment Chapter 12 Enjoying through External Equipment About External Equipment You can connect many types of ...
...terminals are checked whether they are connected in the following order; 1) Component Video, 2) SVideo, 3) Video. Note • Refer to the relevant instruction manual (DVD player, personal computer, etc.) carefully before connecting to a DVD player, VCR, personal computer, game console, camcorder, or other audiovisual equipment. ... a DVD image To watch a VCR image, press INPUT 1 on the remote control unit or press INPUT on the plasma display. 12 Enjoying through External Equipment Chapter 12 Enjoying through External Equipment About External Equipment You can connect many types of ...


