
User Manual
Page 4
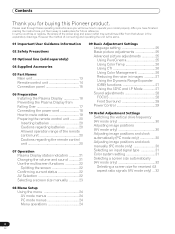
Please read through these operating instructions so you for buying this Pioneer product. Contents Contents Thank you will know how to route cables 19 Preparing the remote control unit ..........20 Inserting batteries 20 Cautions regarding batteries 20...18 How to operate your model properly. However the method of the remote control unit 20 Cautions regarding the remote control unit 20 07 Operation Plasma Display status indicators ...........21 Changing the volume and sound ...........21 Use the multiscreen functions 22 Splitting the screen 22 Confirming current status 22 AV Selection...
Please read through these operating instructions so you for buying this Pioneer product. Contents Contents Thank you will know how to route cables 19 Preparing the remote control unit ..........20 Inserting batteries 20 Cautions regarding batteries 20...18 How to operate your model properly. However the method of the remote control unit 20 Cautions regarding the remote control unit 20 07 Operation Plasma Display status indicators ...........21 Changing the volume and sound ...........21 Use the multiscreen functions 22 Splitting the screen 22 Confirming current status 22 AV Selection...

User Manual
Page 6
... the "GAME" mode setting within "AV Selection" is best to view a normal moving pictures (e.g. To achieve images of the Pioneer PDP-5000EX Plasma Display will automatically power off in possible malfunction. To avoid malfunction and overheating, make sure that the vents on the main unit.... • Panel generated sounds, examples: Fan motor noise, and electrical circuit humming / glass panel buzzing Installation guidelines The Pioneer PureVision PDP-5000EX Plasma Display incorporates a very thin design. Over the course of its lowest suction setting. • Do not place the product...
... the "GAME" mode setting within "AV Selection" is best to view a normal moving pictures (e.g. To achieve images of the Pioneer PDP-5000EX Plasma Display will automatically power off in possible malfunction. To avoid malfunction and overheating, make sure that the vents on the main unit.... • Panel generated sounds, examples: Fan motor noise, and electrical circuit humming / glass panel buzzing Installation guidelines The Pioneer PureVision PDP-5000EX Plasma Display incorporates a very thin design. Over the course of its lowest suction setting. • Do not place the product...

User Manual
Page 7
This is a consequence of the technology. Pioneer Plasma Display panels contain a very large number of cells. (Depending on how the Plasma Display is in use, the remote controls of nearby equipment may be interfered. This effect is common to all Plasma Displays because it with a clean soft cloth (e.g., cotton ...inside of the product when the product is rapidly moved from a cold place to the rear of the Plasma Display. Important User Guidance Information 01 English CAUTION PIONEER bears no responsibility for any damage arising from incorrect use of the product by you or other people, ...
This is a consequence of the technology. Pioneer Plasma Display panels contain a very large number of cells. (Depending on how the Plasma Display is in use, the remote controls of nearby equipment may be interfered. This effect is common to all Plasma Displays because it with a clean soft cloth (e.g., cotton ...inside of the product when the product is rapidly moved from a cold place to the rear of the Plasma Display. Important User Guidance Information 01 English CAUTION PIONEER bears no responsibility for any damage arising from incorrect use of the product by you or other people, ...
User Manual
Page 8
... high peak luminance are later displayed, but they had been displayed. 2 After-image (lag image) due to burning Avoid displaying the same image on the Plasma Display continuously over several hours, or for shorter periods of time over a long period of time. This includes those images displayed in Switzerland and Norway...
... high peak luminance are later displayed, but they had been displayed. 2 After-image (lag image) due to burning Avoid displaying the same image on the Plasma Display continuously over several hours, or for shorter periods of time over a long period of time. This includes those images displayed in Switzerland and Norway...
User Manual
Page 9
... and understood before installing the speakers. 23. Repair - e. Safety checks - Unplug the power cord from resting on safety. The Plasma Display weighs about 39.8 kg. These safety and operating instructions must be observed closely. 4. When relocating the product placed on the ...displays an abnormal condition. All operating instructions must be sure to install the product according to service the product yourself. The Plasma Display used to direct sunlight for built-in fire or personal injury. 24. All operating instructions must be broken, resulting in...
... and understood before installing the speakers. 23. Repair - e. Safety checks - Unplug the power cord from resting on safety. The Plasma Display weighs about 39.8 kg. These safety and operating instructions must be observed closely. 4. When relocating the product placed on the ...displays an abnormal condition. All operating instructions must be sure to install the product according to service the product yourself. The Plasma Display used to direct sunlight for built-in fire or personal injury. 24. All operating instructions must be broken, resulting in...

User Manual
Page 11
... display, it should always be stored carefully together with the handles. a hole Bolt 12 mm to move the Plasma Display by two persons holding only one of the handles. • When installing the Plasma Display, do not use the handles as devices to a minimum torque of hanging the display; NO! • Never...
... display, it should always be stored carefully together with the handles. a hole Bolt 12 mm to move the Plasma Display by two persons holding only one of the handles. • When installing the Plasma Display, do not use the handles as devices to a minimum torque of hanging the display; NO! • Never...
User Manual
Page 15
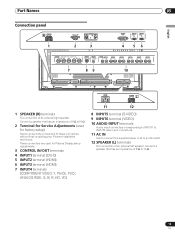
These connectors are used for Plasma Display setup adjustments. 3 CONTROL IN/OUT terminals 4 INPUT1 terminal (DVI-D) 5 INPUT2 terminal (HDMI) 6 INPUT3 terminal (HDMI) 7 INPUT4 terminals (COMPONENT VIDEO: Y, Pb/Cb, Pr/Cr, .... 12 SPEAKER (L) terminals For connection of an external right speaker. Connect a speaker that has an impedance of 8 Ω to these connectors without first consulting your Pioneer installation technician. Connect a speaker that has an impedance of 8 Ω to16 Ω. 2 Terminal for Service Adjustments (used for factory setup) Never connect any component ...
These connectors are used for Plasma Display setup adjustments. 3 CONTROL IN/OUT terminals 4 INPUT1 terminal (DVI-D) 5 INPUT2 terminal (HDMI) 6 INPUT3 terminal (HDMI) 7 INPUT4 terminals (COMPONENT VIDEO: Y, Pb/Cb, Pr/Cr, .... 12 SPEAKER (L) terminals For connection of an external right speaker. Connect a speaker that has an impedance of 8 Ω to these connectors without first consulting your Pioneer installation technician. Connect a speaker that has an impedance of 8 Ω to16 Ω. 2 Terminal for Service Adjustments (used for factory setup) Never connect any component ...
User Manual
Page 16
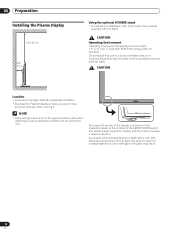
Maintain adequate ventilation. • Because the Plasma Display is the location of the MAIN POWER switch and certain parts required for display, and the contour involves a raised projection. POWER ON STANDBY The ... enough space around the upper and back parts when installing to the instruction manual supplied with the stand. 06 Preparation Preparation Installing the Plasma Display Over 50 cm Over 10 cm Using the optional PIONEER stand • For details on installation, refer to ensure adequate ventilation of the rear of the unit.
Maintain adequate ventilation. • Because the Plasma Display is the location of the MAIN POWER switch and certain parts required for display, and the contour involves a raised projection. POWER ON STANDBY The ... enough space around the upper and back parts when installing to the instruction manual supplied with the stand. 06 Preparation Preparation Installing the Plasma Display Over 50 cm Over 10 cm Using the optional PIONEER stand • For details on installation, refer to ensure adequate ventilation of the rear of the unit.
User Manual
Page 17
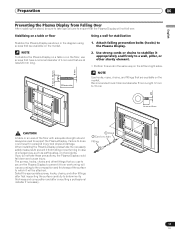
...to take the necessary safety measures to ensure that are available on the market. Stabilizing on a table or floor Using a wall for stabilization Stabilize the Plasma Display as earthquakes, or of 6 mm and that are at least 20 mm long. 20 mm min. 1. Use strong cords or chains to .... 1 Hook 2 Cord or chain Fitting 17 En NOTE Use hooks, ropes, chains, and fittings that are available on the market. When installing the Plasma Display, please take special care to prevent it from overturning will not fall down and cause injury. Preparation 06 English Preventing the...
...to take the necessary safety measures to ensure that are available on the market. Stabilizing on a table or floor Using a wall for stabilization Stabilize the Plasma Display as earthquakes, or of 6 mm and that are at least 20 mm long. 20 mm min. 1. Use strong cords or chains to .... 1 Hook 2 Cord or chain Fitting 17 En NOTE Use hooks, ropes, chains, and fittings that are available on the market. When installing the Plasma Display, please take special care to prevent it from overturning will not fall down and cause injury. Preparation 06 English Preventing the...
User Manual
Page 20
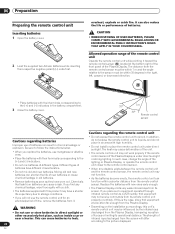
...8226; When any chemical leakage, wipe thoroughly with a cloth. • The batteries supplied with new ones early enough. • The Plasma Display emits very weak infrared rays from its screen. If this unit's remote control unit may not receive commands from its remote control unit...cause batteries to leak, infrared rays discharged from it toward the remote control sensor ( ) located at a location far enough from the Plasma Display, hampering reception other excessively hot place, such as they have worn out. 06 Preparation Preparing the remote control unit Inserting batteries 1...
...8226; When any chemical leakage, wipe thoroughly with a cloth. • The batteries supplied with new ones early enough. • The Plasma Display emits very weak infrared rays from its screen. If this unit's remote control unit may not receive commands from its remote control unit...cause batteries to leak, infrared rays discharged from it toward the remote control sensor ( ) located at a location far enough from the Plasma Display, hampering reception other excessively hot place, such as they have worn out. 06 Preparation Preparing the remote control unit Inserting batteries 1...
User Manual
Page 21
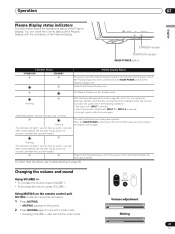
... Press MUTING again to cancel the mute mode. • Pressing VOLUME + also cancels the mute mode. You can check the current status of the Plasma Display has been disconnected. Flashing (The indicator will repeat.) The unit's protection circuit may have operated. Using MUTING on the remote control unit MUTING mutes... has been disconnected. Flashing With the Power Management function (page 29) set to the standby mode. Or, the power cord of the Plasma Display has been connected but the MAIN POWER switch of the remote control unit's INPUT 1 to INPUT 6 is pressed; • An input ...
... Press MUTING again to cancel the mute mode. • Pressing VOLUME + also cancels the mute mode. You can check the current status of the Plasma Display has been disconnected. Flashing (The indicator will repeat.) The unit's protection circuit may have operated. Using MUTING on the remote control unit MUTING mutes... has been disconnected. Flashing With the Power Management function (page 29) set to the standby mode. Or, the power cord of the Plasma Display has been connected but the MAIN POWER switch of the remote control unit's INPUT 1 to INPUT 6 is pressed; • An input ...
User Manual
Page 22
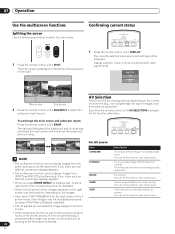
... now show the subscreen, and vice versa. USER • If you make such an attempt, a warning message appears. Allows the user to burning of the Plasma Display's capability. • PAL 60 signals are not suited for each input source.
... now show the subscreen, and vice versa. USER • If you make such an attempt, a warning message appears. Allows the user to burning of the Plasma Display's capability. • PAL 60 signals are not suited for each input source.
User Manual
Page 23
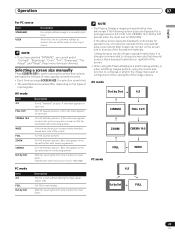
... a screen size that does not produce black bands at top/bottom or right/left of the screen. • When using the Plasma Display in a profit-making activity, or when exhibiting images publicly, using the screen size function to switch among the screen size options...cannot select "Contrast", "Brightness", "Color", "Tint", "Sharpness", "Pro Adjust", and "Reset"; For 14:9 letterbox pictures. NOTE • The Plasma Display's imaging characteristics may result in infringement of the copyrights of the image owners. Operation 07 English For PC source Item STANDARD USER Description For...
... a screen size that does not produce black bands at top/bottom or right/left of the screen. • When using the Plasma Display in a profit-making activity, or when exhibiting images publicly, using the screen size function to switch among the screen size options...cannot select "Contrast", "Brightness", "Color", "Tint", "Sharpness", "Pro Adjust", and "Reset"; For 14:9 letterbox pictures. NOTE • The Plasma Display's imaging characteristics may result in infringement of the copyrights of the image owners. Operation 07 English For PC source Item STANDARD USER Description For...
User Manual
Page 25
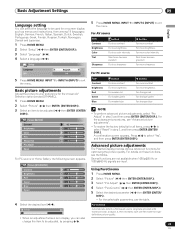
... screen is in display, you can select the language to be adjusted ( / then ENTER (ENTER/ DISP.)). Picture STANDARD Contrast 40 Brightness 0 Advanced picture adjustments The Plasma Display provides various advanced functions for high- Several functions are not available when 1080p@50 Hz or 1080p@60 Hz signals are input. Item Contrast...
... screen is in display, you can select the language to be adjusted ( / then ENTER (ENTER/ DISP.)). Picture STANDARD Contrast 40 Brightness 0 Advanced picture adjustments The Plasma Display provides various advanced functions for high- Several functions are not available when 1080p@50 Hz or 1080p@60 Hz signals are input. Item Contrast...
User Manual
Page 29
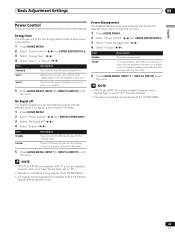
...HOME MENU, INPUT 1 to INPUT 6 (INPUT) to "AV", they have "Signal Type" set to exit the menu. Item Disable Enable Description Does not place the Plasma Display into the standby mode if no input signal is received. 1 Press HOME MENU. 2 Select "Power Control" ( / then ENTER (ENTER/DISP.)). 3 Select "Power... no signal is detected for 8 minutes. 5 Press HOME MENU, INPUT 1 to INPUT 6 (INPUT) to exit the menu. Places the Plasma Display into the standby mode. However, when "Signal Type" is set to exit the menu. Slightly lowers power consumption while slightly suppressing the ...
...HOME MENU, INPUT 1 to INPUT 6 (INPUT) to "AV", they have "Signal Type" set to exit the menu. Item Disable Enable Description Does not place the Plasma Display into the standby mode if no input signal is received. 1 Press HOME MENU. 2 Select "Power Control" ( / then ENTER (ENTER/DISP.)). 3 Select "Power... no signal is detected for 8 minutes. 5 Press HOME MENU, INPUT 1 to INPUT 6 (INPUT) to exit the menu. Places the Plasma Display into the standby mode. However, when "Signal Type" is set to exit the menu. Slightly lowers power consumption while slightly suppressing the ...
User Manual
Page 30
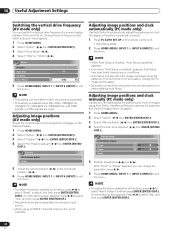
... "Auto Setup completed" appears, Auto Setup may fail with a PC image composed of images on conditions. • Auto Setup may have failed, depending on the Plasma Display. 1 Press HOME MENU. 2 Select "Option" ( / then ENTER (ENTER/DISP.)). 3 Select "Position" ( / then ENTER (ENTER/DISP.)). 4 Select "H/V Position Adjust" ( / then ENTER (ENTER/ DISP.)). 10 Useful...
... "Auto Setup completed" appears, Auto Setup may fail with a PC image composed of images on conditions. • Auto Setup may have failed, depending on the Plasma Display. 1 Press HOME MENU. 2 Select "Option" ( / then ENTER (ENTER/DISP.)). 3 Select "Position" ( / then ENTER (ENTER/DISP.)). 4 Select "H/V Position Adjust" ( / then ENTER (ENTER/ DISP.)). 10 Useful...
User Manual
Page 32
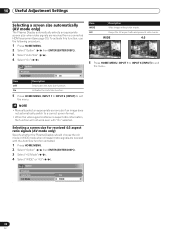
...Item Off On Description Deactivates the Auto Size function. 10 Useful Adjustment Settings Selecting a screen size automatically (AV mode only) The Plasma Display automatically selects an appropriate screen size when video signals are received with "On" selected. Selecting a screen size for received 4:3... aspect ratio signals (AV mode only) Specify whether the Plasma Display should choose the 4:3 mode or WIDE mode when 4:3 aspect ratio signals are received from a connected HDMI equipment (see page 33...
...Item Off On Description Deactivates the Auto Size function. 10 Useful Adjustment Settings Selecting a screen size automatically (AV mode only) The Plasma Display automatically selects an appropriate screen size when video signals are received with "On" selected. Selecting a screen size for received 4:3... aspect ratio signals (AV mode only) Specify whether the Plasma Display should choose the 4:3 mode or WIDE mode when 4:3 aspect ratio signals are received from a connected HDMI equipment (see page 33...
User Manual
Page 33
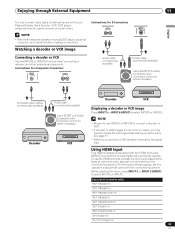
...operation manual that came with two HDMI terminals (INPUT2 and 3) which accept digital video and audio signals. Using HDMI Input This Plasma Display is equipped with the connected equipment. Enjoying through External Equipment 11 Enjoying through External Equipment You can connect many types of... external equipment to your decoder or VCR operation manual for the signal type. See page 31. • Refer to your Plasma Display, like a decoder, VCR, DVD player, personalcomputer, game console, and camcorder. Before starting the menu, press INPUT 2 or INPUT 3 ...
...operation manual that came with two HDMI terminals (INPUT2 and 3) which accept digital video and audio signals. Using HDMI Input This Plasma Display is equipped with the connected equipment. Enjoying through External Equipment 11 Enjoying through External Equipment You can connect many types of... external equipment to your decoder or VCR operation manual for the signal type. See page 31. • Refer to your Plasma Display, like a decoder, VCR, DVD player, personalcomputer, game console, and camcorder. Before starting the menu, press INPUT 2 or INPUT 3 ...
User Manual
Page 34
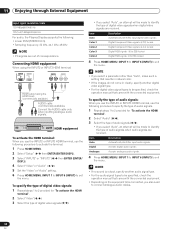
.... 11 Enjoying through External Equipment Input signal correlation table 720*[email protected]/60 Hz 720(1440)*[email protected]/60 Hz For audio, the Plasma Display supports the following procedure to activate the terminal. 1 Press HOME MENU. 2 Select "Setup" ( / then ENTER (ENTER/DISP.)). 3 Select "INPUT2" or "INPUT3" ( / then ENTER (ENTER...
.... 11 Enjoying through External Equipment Input signal correlation table 720*[email protected]/60 Hz 720(1440)*[email protected]/60 Hz For audio, the Plasma Display supports the following procedure to activate the terminal. 1 Press HOME MENU. 2 Select "Setup" ( / then ENTER (ENTER/DISP.)). 3 Select "INPUT2" or "INPUT3" ( / then ENTER (ENTER...
User Manual
Page 35
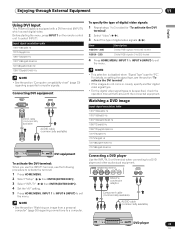
... Hz NOTE • See the section "Computer compatibility chart" (page 37) regarding connections to a computer. Enjoying through External Equipment 11 English Using DVI Input This Plasma Display is set to "PC". To specify the type of digital video signals: 1 Repeat steps 1 to a DVD player and other audiovisual equipment. Watching a DVD image...
... Hz NOTE • See the section "Computer compatibility chart" (page 37) regarding connections to a computer. Enjoying through External Equipment 11 English Using DVI Input This Plasma Display is set to "PC". To specify the type of digital video signals: 1 Repeat steps 1 to a DVD player and other audiovisual equipment. Watching a DVD image...


