
User Manual
Page 4
... the unit is the same. 01 Important User Guidance Information 02 Safety Precautions 03 Optional line (sold separately) 04 Supplied Accessories 05 Part Names Main unit 13 Remote control unit 14 Connection panel 15 06 Preparation Installing the Plasma Display 16 Preventing the Plasma Display from that... Using PureCinema 25 Using Color Temp 26 Using CTI 26 Using Color Management 26 Reducing the noise in a safe place for buying this Pioneer product. Contents Contents Thank you for future reference. After you have finished reading the instructions, put them away in images 27 Using the...
... the unit is the same. 01 Important User Guidance Information 02 Safety Precautions 03 Optional line (sold separately) 04 Supplied Accessories 05 Part Names Main unit 13 Remote control unit 14 Connection panel 15 06 Preparation Installing the Plasma Display 16 Preventing the Plasma Display from that... Using PureCinema 25 Using Color Temp 26 Using CTI 26 Using Color Management 26 Reducing the noise in a safe place for buying this Pioneer product. Contents Contents Thank you for future reference. After you have finished reading the instructions, put them away in images 27 Using the...

User Manual
Page 6
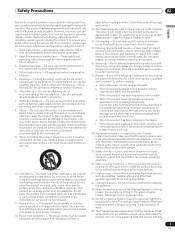
...) can be affected by side should be installed by using only parts and accessories designed by using the still picture mode from tipping over a long period of time, when using a vacuum cleaner set to its lifetime, the luminosity of the Pioneer PDP-5000EX Plasma Display will automatically power off in the event of vibration...
...) can be affected by side should be installed by using only parts and accessories designed by using the still picture mode from tipping over a long period of time, when using a vacuum cleaner set to its lifetime, the luminosity of the Pioneer PDP-5000EX Plasma Display will automatically power off in the event of vibration...
User Manual
Page 9
... which often requires extensive adjustment work , request the service technician to perform safety checks to ensure that the service person uses replacement parts specified by a qualified technician. When a liquid was spilled on a bed, sofa, rug or other openings in electric shock and... fall , resulting in a wet basement. 8. e. Any noticeable abnormality in a safe place for ventilation. In case the product needs replacement parts, make sure that the product is in accidents. 7. Upon completion of inadequate attachments can result in a safe place - The Plasma Display ...
... which often requires extensive adjustment work , request the service technician to perform safety checks to ensure that the service person uses replacement parts specified by a qualified technician. When a liquid was spilled on a bed, sofa, rug or other openings in electric shock and... fall , resulting in a wet basement. 8. e. Any noticeable abnormality in a safe place for ventilation. In case the product needs replacement parts, make sure that the product is in accidents. 7. Upon completion of inadequate attachments can result in a safe place - The Plasma Display ...
User Manual
Page 10
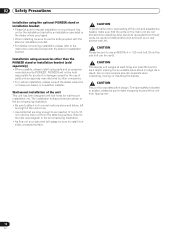
...been designed with bolt holes for accident or damage caused by the use of parts and accessories manufactured by other than the PIONEER stand or installation bracket (sold separately) • When possible, please install using parts and accessories manufactured by an installation specialist or the dealer where purchased. •... and dirt build up on the main unit are not blocked when installing. 02 Safety Precautions Installation using the optional PIONEER stand or installation bracket • Please be sure to request installation or mounting of this unit or the installation bracket by...
...been designed with bolt holes for accident or damage caused by the use of parts and accessories manufactured by other than the PIONEER stand or installation bracket (sold separately) • When possible, please install using parts and accessories manufactured by an installation specialist or the dealer where purchased. •... and dirt build up on the main unit are not blocked when installing. 02 Safety Precautions Installation using the optional PIONEER stand or installation bracket • Please be sure to request installation or mounting of this unit or the installation bracket by...
User Manual
Page 13
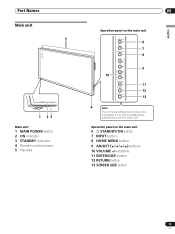
Operation panel on the main unit 6 7 8 9 10 11 12 13 4 Note The unit's operating panel will become inoperable if connected speakers are installed too near the main unit. button 12 RETURN button 13 SCREEN SIZE button 13 En buttons 11 ENTER/DISP. Part Names Part Names Main unit 5 POWER ON STANDBY 1 23 Main unit 1 MAIN POWER switch 2 ON indicator 3 STANDBY indicator 4 Remote control sensor 5 Handles 05 English Operation panel on the main unit 6 STANDBY/ON button 7 INPUT button 8 HOME MENU button 9 ADJUST ( / / / ) buttons 10 VOLUME +/-
Operation panel on the main unit 6 7 8 9 10 11 12 13 4 Note The unit's operating panel will become inoperable if connected speakers are installed too near the main unit. button 12 RETURN button 13 SCREEN SIZE button 13 En buttons 11 ENTER/DISP. Part Names Part Names Main unit 5 POWER ON STANDBY 1 23 Main unit 1 MAIN POWER switch 2 ON indicator 3 STANDBY indicator 4 Remote control sensor 5 Handles 05 English Operation panel on the main unit 6 STANDBY/ON button 7 INPUT button 8 HOME MENU button 9 ADJUST ( / / / ) buttons 10 VOLUME +/-
User Manual
Page 14
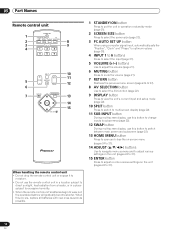
05 Part Names Remote control unit STANDBY/ON 1 SCREEN AUTO AV SIZE SETUP DISPLAY SELECTION 2 PC 8 3 INPUT 9 4 1 2 3 4 5 6 SPLIT SUB INPUT 5 VOLUME MUTING SWAP 6 10 11 12 RETURN 7 ...
05 Part Names Remote control unit STANDBY/ON 1 SCREEN AUTO AV SIZE SETUP DISPLAY SELECTION 2 PC 8 3 INPUT 9 4 1 2 3 4 5 6 SPLIT SUB INPUT 5 VOLUME MUTING SWAP 6 10 11 12 RETURN 7 ...
User Manual
Page 15
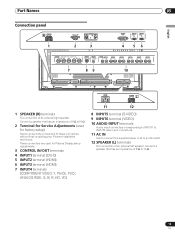
...power cord to an AC outlet. 12 SPEAKER (L) terminals For connection of 8 Ω to these connectors without first consulting your Pioneer installation technician. Connect a speaker that has an impedance of an external left speaker. Connect a speaker that has an impedance of...connection of 8 Ω to16 Ω. 2 Terminal for Service Adjustments (used for factory setup) Never connect any component to 16 Ω. 15 En Part Names Connection panel R SPEAKER 8+Ω ~16Ω- 1 SERVICE ONLY CONTROL IN OUT 2 3 INPUT1 DVI-D INPUT2 HDMI INPUT3 HDMI 4 56 INPUT4 ...
...power cord to an AC outlet. 12 SPEAKER (L) terminals For connection of 8 Ω to these connectors without first consulting your Pioneer installation technician. Connect a speaker that has an impedance of an external left speaker. Connect a speaker that has an impedance of...connection of 8 Ω to16 Ω. 2 Terminal for Service Adjustments (used for factory setup) Never connect any component to 16 Ω. 15 En Part Names Connection panel R SPEAKER 8+Ω ~16Ω- 1 SERVICE ONLY CONTROL IN OUT 2 3 INPUT1 DVI-D INPUT2 HDMI INPUT3 HDMI 4 56 INPUT4 ...
User Manual
Page 16
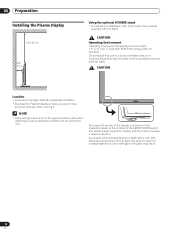
... installing to the parts may result. 16 En Maintain adequate ventilation. • Because the Plasma Display is the location of the unit. 06 Preparation Preparation Installing the Plasma Display Over 50 cm Over 10 cm Using the optional PIONEER stand • For details on installation, refer to +40 ˚C; less than 85...
... installing to the parts may result. 16 En Maintain adequate ventilation. • Because the Plasma Display is the location of the unit. 06 Preparation Preparation Installing the Plasma Display Over 50 cm Over 10 cm Using the optional PIONEER stand • For details on installation, refer to +40 ˚C; less than 85...


