
User Manual
Page 2
...GREEN or GREEN-AND-YELLOW. WARNING : THIS APPARATUS MUST BE EARTHED. The wire which is coloured BLUE must be connected to the terminal which is fitted in any 13 amp socket. Replacement and mounting of an AC plug on the body of the fuse. Check for the ASTA mark or the BSI mark on the power supply cord...or BSI to be connected to the terminal which is to BS1362. Should the fuse need to be used until a replacement cover is replaced. If the plug contains a removable fuse cover, you lose the fuse cover the plug must be fitted, please observe the wiring code as follows ; ...
...GREEN or GREEN-AND-YELLOW. WARNING : THIS APPARATUS MUST BE EARTHED. The wire which is coloured BLUE must be connected to the terminal which is fitted in any 13 amp socket. Replacement and mounting of an AC plug on the body of the fuse. Check for the ASTA mark or the BSI mark on the power supply cord...or BSI to be connected to the terminal which is to BS1362. Should the fuse need to be used until a replacement cover is replaced. If the plug contains a removable fuse cover, you lose the fuse cover the plug must be fitted, please observe the wiring code as follows ; ...
User Manual
Page 4
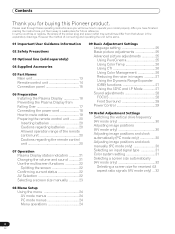
... 28 Power Control 29 10 Useful Adjustment Settings Switching the vertical drive frequency (AV mode only 30 Adjusting image positions (AV mode only 30 Adjusting image positions and clock automatically (PC mode only 30 Adjusting image positions and clock manually (PC mode only 30 Selecting an input signal type 31 Color system setting 31 Selecting a screen size automatically (AV mode only 32 Selecting a screen size for future reference. Please read through these operating instructions so you for buying this Pioneer...
... 28 Power Control 29 10 Useful Adjustment Settings Switching the vertical drive frequency (AV mode only 30 Adjusting image positions (AV mode only 30 Adjusting image positions and clock automatically (PC mode only 30 Adjusting image positions and clock manually (PC mode only 30 Selecting an input signal type 31 Color system setting 31 Selecting a screen size automatically (AV mode only 32 Selecting a screen size for future reference. Please read through these operating instructions so you for buying this Pioneer...

User Manual
Page 6
... also eliminates the need for a physical glass panel to "STANDBY" mode. After-image and permanent effects on a carpet or blanket. • Do not reverse the product. closed-captioned images or video game images which have static portions). • Avoid viewing the On Screen Display for accident or damage caused by using the still picture mode from a decoder, DVD player, VCR and all phosphor-based screens (for more than 3 times the length of...
... also eliminates the need for a physical glass panel to "STANDBY" mode. After-image and permanent effects on a carpet or blanket. • Do not reverse the product. closed-captioned images or video game images which have static portions). • Avoid viewing the On Screen Display for accident or damage caused by using the still picture mode from a decoder, DVD player, VCR and all phosphor-based screens (for more than 3 times the length of...

User Manual
Page 7
... either a black or colored cell permanently fixed on the panel size; Handles at a normal viewing distance of time. The screen is dimmed when a still image is because the protection function of its remote control sensor is in cases where the company must be interfered. Infrared rays The Plasma Display releases infrared rays because of the Plasma Display automatically adjusts the brightness to the rear of time, the screen will...
... either a black or colored cell permanently fixed on the panel size; Handles at a normal viewing distance of time. The screen is dimmed when a still image is because the protection function of its remote control sensor is in cases where the company must be interfered. Infrared rays The Plasma Display releases infrared rays because of the Plasma Display automatically adjusts the brightness to the rear of time, the screen will...
User Manual
Page 9
... can cause electric shock and/or short internal parts. Request a qualified service person to rain or water. When the power cord or plug is not designed for a long period of the following instructions when installing, operating and cleaning the product. Upon completion of power supply used in this manual in installation; Never expose the screen of the product. Because it must be kept...
... can cause electric shock and/or short internal parts. Request a qualified service person to rain or water. When the power cord or plug is not designed for a long period of the following instructions when installing, operating and cleaning the product. Upon completion of power supply used in this manual in installation; Never expose the screen of the product. Because it must be kept...
User Manual
Page 14
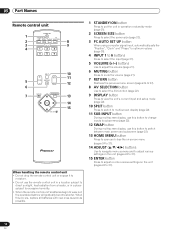
... it to moisture. • Do not use this button to change inputs to subscreens (page 22). 12 SWAP button During multi-screen display, use the remote control unit in a location subject to direct sunlight, heat radiation from a heater, or in operation or standby mode (page 21). 2 SCREEN SIZE button Press to select the screen size (page 23). 3 PC AUTO SET UP button When using computer signal input, automatically sets the "Position", "Clock" and "Phase" to...
... it to moisture. • Do not use this button to change inputs to subscreens (page 22). 12 SWAP button During multi-screen display, use the remote control unit in a location subject to direct sunlight, heat radiation from a heater, or in operation or standby mode (page 21). 2 SCREEN SIZE button Press to select the screen size (page 23). 3 PC AUTO SET UP button When using computer signal input, automatically sets the "Position", "Clock" and "Phase" to...
User Manual
Page 15
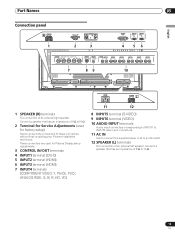
... used for Plasma Display setup adjustments. 3 CONTROL IN/OUT terminals 4 INPUT1 terminal (DVI-D) 5 INPUT2 terminal (HDMI) 6 INPUT3 terminal (HDMI) 7 INPUT4 terminals (COMPONENT VIDEO: Y, Pb/Cb, Pr/Cr, ANALOG RGB : G, B, R ,HD, VD) 11 12 8 INPUT5 terminal (S-VIDEO) 9 INPUT6 terminal (VIDEO) 10 AUDIO INPUT terminals Audio input connectors corresponding to INPUT1 to INPUT6 video input connectors. 11 AC IN Use to connect the supplied power cord to these connectors without first consulting your Pioneer installation technician. Part Names Connection panel R SPEAKER...
... used for Plasma Display setup adjustments. 3 CONTROL IN/OUT terminals 4 INPUT1 terminal (DVI-D) 5 INPUT2 terminal (HDMI) 6 INPUT3 terminal (HDMI) 7 INPUT4 terminals (COMPONENT VIDEO: Y, Pb/Cb, Pr/Cr, ANALOG RGB : G, B, R ,HD, VD) 11 12 8 INPUT5 terminal (S-VIDEO) 9 INPUT6 terminal (VIDEO) 10 AUDIO INPUT terminals Audio input connectors corresponding to INPUT1 to INPUT6 video input connectors. 11 AC IN Use to connect the supplied power cord to these connectors without first consulting your Pioneer installation technician. Part Names Connection panel R SPEAKER...
User Manual
Page 21
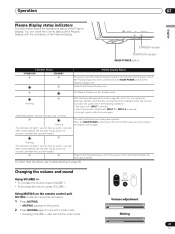
...; One of the remote control unit's INPUT 1 to the standby mode. Changing the volume and sound Using VOLUME +/- • To increase the volume, press VOLUME +. • To decrease the volume, press VOLUME -. SPLIT VOLUME MUTING SUB INPUT Volume adjustment Muting 21 En Operation Operation Plasma Display status indicators The table below shows the operational status of the Plasma Display has been disconnected. Flashing With the Power Management function (page 29) set to "On", no signal was detected...
...; One of the remote control unit's INPUT 1 to the standby mode. Changing the volume and sound Using VOLUME +/- • To increase the volume, press VOLUME +. • To decrease the volume, press VOLUME -. SPLIT VOLUME MUTING SUB INPUT Volume adjustment Muting 21 En Operation Operation Plasma Display status indicators The table below shows the operational status of the Plasma Display has been disconnected. Flashing With the Power Management function (page 29) set to "On", no signal was detected...
User Manual
Page 22
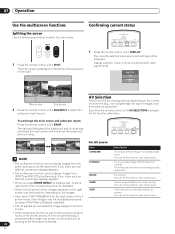
... can set the mode for each input source. Lowers image brightness for easier viewing You can set the mode for shorter periods of images input from the five viewing options, depending on the right. 07 Operation Use the multiscreen functions Confirming current status Splitting the screen Use the following procedure to customize settings as desired. STANDBY/ON SCREEN AUTO SIZE SETUP PC AV DISPLAY SELECTION 1 Press the remote control unit's DISPLAY. Each time the remote control unit...
... can set the mode for each input source. Lowers image brightness for easier viewing You can set the mode for shorter periods of images input from the five viewing options, depending on the right. 07 Operation Use the multiscreen functions Confirming current status Splitting the screen Use the following procedure to customize settings as desired. STANDBY/ON SCREEN AUTO SIZE SETUP PC AV DISPLAY SELECTION 1 Press the remote control unit's DISPLAY. Each time the remote control unit...
User Manual
Page 25
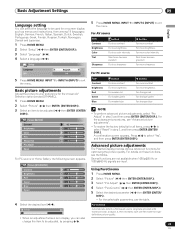
...@60 Hz signals are input. Using PureCinema 1 Press HOME MENU. Press / to exit the menu. Red Green Blue Reset 0 2 Select "Picture" ( / then ENTER (ENTER/DISP.)). 0 3 Select "Pro Adjust" ( / then ENTER (ENTER/DISP.)). 0 4 Select "PureCinema" ( / then ENTER (ENTER/DISP.)). 5 Select the desired parameter ( / then ENTER (ENTER/ DISP.)). • For the selectable parameters, see the tables. Picture STANDARD Contrast 40 Brightness 0 Advanced picture adjustments The Plasma Display provides various...
...@60 Hz signals are input. Using PureCinema 1 Press HOME MENU. Press / to exit the menu. Red Green Blue Reset 0 2 Select "Picture" ( / then ENTER (ENTER/DISP.)). 0 3 Select "Pro Adjust" ( / then ENTER (ENTER/DISP.)). 0 4 Select "PureCinema" ( / then ENTER (ENTER/DISP.)). 5 Select the desired parameter ( / then ENTER (ENTER/ DISP.)). • For the selectable parameters, see the tables. Picture STANDARD Contrast 40 Brightness 0 Advanced picture adjustments The Plasma Display provides various...
User Manual
Page 28
... sound. However, this function differs depending on signals. 28 En left speaker. 5 Press HOME MENU, INPUT 1 to INPUT 6 (INPUT) to select "Yes", and then press ENTER (ENTER/DISP.). Press / to exit the menu. Item Off SRS TruBass TruBass + SRS Description Deactivates both video and still images. This works for still images 7 Press HOME MENU, INPUT 1 to INPUT 6 (INPUT) to be set only when a video signal is input. NOTE Can be adjusted...
... sound. However, this function differs depending on signals. 28 En left speaker. 5 Press HOME MENU, INPUT 1 to INPUT 6 (INPUT) to select "Yes", and then press ENTER (ENTER/DISP.). Press / to exit the menu. Item Off SRS TruBass TruBass + SRS Description Deactivates both video and still images. This works for still images 7 Press HOME MENU, INPUT 1 to INPUT 6 (INPUT) to be set only when a video signal is input. NOTE Can be adjusted...
User Manual
Page 30
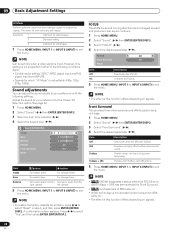
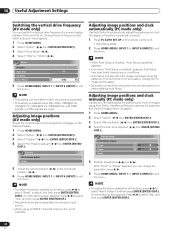
... and 100 Hz. A confirmation screen appears. Adjusting image positions (AV mode only) Adjust the horizontal and vertical positions of images coming from a personal computer. 1 Press PC AUTO SET UP on conditions. • Auto Setup may have failed, depending on the remote control unit. • Auto Setup starts. 2 Press HOME MENU, INPUT 1 to INPUT 6 (INPUT) to exit the menu. If not successful, change the parameter using Auto Setup. Adjusting image positions and clock manually (PC mode only) Usually you can...
... and 100 Hz. A confirmation screen appears. Adjusting image positions (AV mode only) Adjust the horizontal and vertical positions of images coming from a personal computer. 1 Press PC AUTO SET UP on conditions. • Auto Setup may have failed, depending on the remote control unit. • Auto Setup starts. 2 Press HOME MENU, INPUT 1 to INPUT 6 (INPUT) to exit the menu. If not successful, change the parameter using Auto Setup. Adjusting image positions and clock manually (PC mode only) Usually you can...
User Manual
Page 31
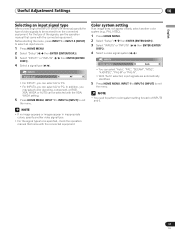
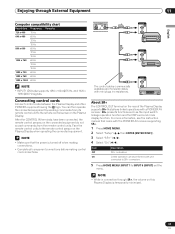
... a video signal system ( / ). INPUT5 Color system Auto • You can select AV or PC. Before starting the menu, press INPUT 1 or INPUT 4 (INPUT) to exit the menu. XGA, WXGA or AUTO can be received from the connected equipment. In addition, you can select "Auto", "PAL", "SECAM", "NTSC", "4.43NTSC", "PAL-M" or "PAL-N". • With "Auto" selected, input signals are automatically identified. 5 Press HOME MENU, INPUT 1 to INPUT 6 (INPUT) to exit the menu. Useful Adjustment Settings...
... a video signal system ( / ). INPUT5 Color system Auto • You can select AV or PC. Before starting the menu, press INPUT 1 or INPUT 4 (INPUT) to exit the menu. XGA, WXGA or AUTO can be received from the connected equipment. In addition, you can select "Auto", "PAL", "SECAM", "NTSC", "4.43NTSC", "PAL-M" or "PAL-N". • With "Auto" selected, input signals are automatically identified. 5 Press HOME MENU, INPUT 1 to INPUT 6 (INPUT) to exit the menu. Useful Adjustment Settings...
User Manual
Page 33
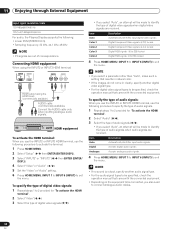
.... NOTE • Be sure to use the HDMI terminal, activate the terminal and specify the types of video and audio signals to be received from the connected equipment. To use INPUT5 or INPUT6 to connect a decoder or VCR. • If decoder or VCR images do not come in clearly, you may need to change the input signal type setting using the menu. Input signal correlation table 1920*1080p@24 Hz 1920...
.... NOTE • Be sure to use the HDMI terminal, activate the terminal and specify the types of video and audio signals to be received from the connected equipment. To use INPUT5 or INPUT6 to connect a decoder or VCR. • If decoder or VCR images do not come in clearly, you may need to change the input signal type setting using the menu. Input signal correlation table 1920*1080p@24 Hz 1920...
User Manual
Page 34
... External Equipment Input signal correlation table 720*[email protected]/60 Hz 720(1440)*[email protected]/60 Hz For audio, the Plasma Display supports the following: • Linear PCM (STEREO 2ch) • Sampling frequency: 32 kHz, 44.1 kHz, 48 kHz NOTE • PC signals are out of digital video signals when digital video signals are received. Connecting HDMI equipment When using the INPUT2 or INPUT3 HDMI terminal: INPUT2 HDMI INPUT3 HDMI...
... External Equipment Input signal correlation table 720*[email protected]/60 Hz 720(1440)*[email protected]/60 Hz For audio, the Plasma Display supports the following: • Linear PCM (STEREO 2ch) • Sampling frequency: 32 kHz, 44.1 kHz, 48 kHz NOTE • PC signals are out of digital video signals when digital video signals are received. Connecting HDMI equipment When using the INPUT2 or INPUT3 HDMI terminal: INPUT2 HDMI INPUT3 HDMI...
User Manual
Page 35
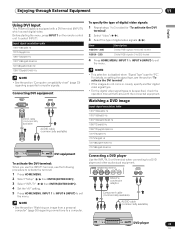
....94/60 Hz Connecting a DVD player Use the INPUT4, 5 or 6 terminal when connecting to select INPUT1. Enjoying through External Equipment 11 English Using DVI Input This Plasma Display is set to "PC". Connecting DVI equipment INPUT1 DVI-D INPUT1 R L DVI-D cable (commercially available) AUDIO cable (commercially available) DVI equipment To activate the DVI terminal: When you use the INPUT1 terminal, use the following procedure to activate the terminal. 1 Press HOME MENU. 2 Select "Setup" ( / then ENTER (ENTER...
....94/60 Hz Connecting a DVD player Use the INPUT4, 5 or 6 terminal when connecting to select INPUT1. Enjoying through External Equipment 11 English Using DVI Input This Plasma Display is set to "PC". Connecting DVI equipment INPUT1 DVI-D INPUT1 R L DVI-D cable (commercially available) AUDIO cable (commercially available) DVI equipment To activate the DVI terminal: When you use the INPUT1 terminal, use the following procedure to activate the terminal. 1 Press HOME MENU. 2 Select "Setup" ( / then ENTER (ENTER...
User Manual
Page 36
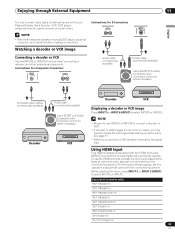
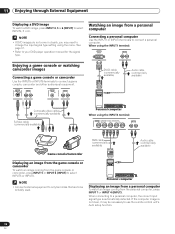
... may need to change the input signal type setting using the INPUT1 terminal: INPUT1 DVI-D INPUT1 R L Enjoying a game console or watching camcorder images Connecting a game console or camcorder Use the INPUT5 or INPUT6 terminals to use the remote control unit's Auto setup function. 36 En Watching an image from a personal computer Connecting a personal computer Use the INPUT1 or INPUT4 terminals to select INPUT4, 5 or 6. NOTE • If DVD images do not come in...
... may need to change the input signal type setting using the INPUT1 terminal: INPUT1 DVI-D INPUT1 R L Enjoying a game console or watching camcorder images Connecting a game console or camcorder Use the INPUT5 or INPUT6 terminals to use the remote control unit's Auto setup function. 36 En Watching an image from a personal computer Connecting a personal computer Use the INPUT1 or INPUT4 terminals to select INPUT4, 5 or 6. NOTE • If DVD images do not come in...
User Manual
Page 37
...+ connectors. 5 Press HOME MENU, INPUT 1 to the remote control sensor on the Plasma Display when operating the connected equipment. CONTROL IN OUT CONTROL IN OUT CONTROL IN OUT The control cables (commercially available) are monaural cables with the PIONEER AV receiver supporting SR+. 1 Press HOME MENU. 2 Select "Setup" ( / then ENTER (ENTER/DISP.)). 3 Select "SR+" ( / ). 4 Select "On" ( / ). For more information, see the instruction manual that came with mini plugs (no resistance). NOTE...
...+ connectors. 5 Press HOME MENU, INPUT 1 to the remote control sensor on the Plasma Display when operating the connected equipment. CONTROL IN OUT CONTROL IN OUT CONTROL IN OUT The control cables (commercially available) are monaural cables with the PIONEER AV receiver supporting SR+. 1 Press HOME MENU. 2 Select "Setup" ( / then ENTER (ENTER/DISP.)). 3 Select "SR+" ( / ). 4 Select "On" ( / ). For more information, see the instruction manual that came with mini plugs (no resistance). NOTE...
User Manual
Page 38
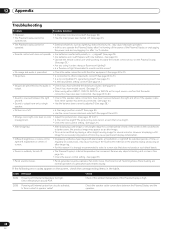
... the power control setting. (See page 29.) • Panel sounds /noises • Panel generated sounds,examples: Fan motor noise, Electrical Circuit Humming/Glass Panel buzzing are presented but no audio is output. • Check if you have been reversed between the Plasma Display and the speakers. 38 En The picture may look dark in a room that does not produce such black bands. • Power is suddenly turned...
... the power control setting. (See page 29.) • Panel sounds /noises • Panel generated sounds,examples: Fan motor noise, Electrical Circuit Humming/Glass Panel buzzing are presented but no audio is output. • Check if you have been reversed between the Plasma Display and the speakers. 38 En The picture may look dark in a room that does not produce such black bands. • Power is suddenly turned...
Brochure
Page 2
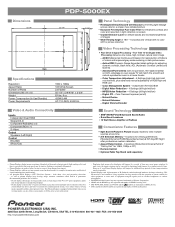
....pioneerelectronics.com Full Time 10-bit Digital Video Processing delivers a low noise, high contrast, natural color image - Natural Enhancer - Do not display content in a movie theater - Advanced Pure Cinema with content. - Video & Audio Connectivity Inputs Independent Dual HDMI Single DVI-D Component-RGB (BNC x 5) Composite (RCA x 1) S-Video Output Speakers (Left/Right) Control RS-232C SR (In/Out) Panel Technology • Redesigned Deep Encased Cell Structure preventing light leakage across...
....pioneerelectronics.com Full Time 10-bit Digital Video Processing delivers a low noise, high contrast, natural color image - Natural Enhancer - Do not display content in a movie theater - Advanced Pure Cinema with content. - Video & Audio Connectivity Inputs Independent Dual HDMI Single DVI-D Component-RGB (BNC x 5) Composite (RCA x 1) S-Video Output Speakers (Left/Right) Control RS-232C SR (In/Out) Panel Technology • Redesigned Deep Encased Cell Structure preventing light leakage across...


