
Operating Instructions
Page 1
... au Canada ou aux États-Unis, reportezvous aux instructions en français ou en anglais. For customers living in the U.S.A. Plasma Display Écran à plasma PDP-504CMX PDP-504CMX-S PDP-434CMX Operating Instructions Mode d'emploi Contents related to system specifications, power requirements, accessories, and other information differ with respect to the instructions written in...
... au Canada ou aux États-Unis, reportezvous aux instructions en français ou en anglais. For customers living in the U.S.A. Plasma Display Écran à plasma PDP-504CMX PDP-504CMX-S PDP-434CMX Operating Instructions Mode d'emploi Contents related to system specifications, power requirements, accessories, and other information differ with respect to the instructions written in...

Operating Instructions
Page 3
..., misuse, modification or a natural disaster. Note for Dealers: After installation, be sure to deliver this PIONEER product. Always have an installation specialist or your Plasma Display, please read the "Safety Precautions" and these "Operating Instructions" carefully so you very much for damage ...caused by qualified personnel with enough skill and competence. PIONEER cannot assume liabilities for purchasing this manual to the customer and explain to the customer how to operate the Plasma Display properly. You will know how to handle the product.
..., misuse, modification or a natural disaster. Note for Dealers: After installation, be sure to deliver this PIONEER product. Always have an installation specialist or your Plasma Display, please read the "Safety Precautions" and these "Operating Instructions" carefully so you very much for damage ...caused by qualified personnel with enough skill and competence. PIONEER cannot assume liabilities for purchasing this manual to the customer and explain to the customer how to operate the Plasma Display properly. You will know how to handle the product.
Operating Instructions
Page 6
..., please contact the Customer Satisfaction Department at the above listed number for assistance. Product Name: Plasma Display with Video Card Model Number: PDP-504CMX / PDP-434CMX (Plasma Display) PDA-5003/PDA-5004 (Video Card) Product Category: Class B Personal Computers & Peripherals Responsible Party Name: PIONEER ELECTRONICS (USA) INC. Phone: (800)421-1625 URL: http://www.pioneerelectronics.com Should this...
..., please contact the Customer Satisfaction Department at the above listed number for assistance. Product Name: Plasma Display with Video Card Model Number: PDP-504CMX / PDP-434CMX (Plasma Display) PDA-5003/PDA-5004 (Video Card) Product Category: Class B Personal Computers & Peripherals Responsible Party Name: PIONEER ELECTRONICS (USA) INC. Phone: (800)421-1625 URL: http://www.pioneerelectronics.com Should this...
Operating Instructions
Page 7
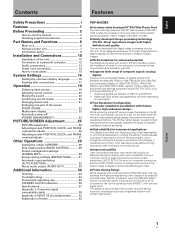
...Connection to a personal computer 12 Audio connections 13 Power cord connection 14 How to route cables 15 System Settings 16 Setting the onscreen display language 16 Settings after connections 17 Operation 19 Selecting input source 19 Adjusting sound volume 20 Muting the sound 20 Confirming current status ...20 Changing screen size 21 Enlarging one part of the screen (POINT ZOOM 22 Multiscreen display 23 Automatic power-off (POWER MANAGEMENT 24 PICTURE/SCREEN Adjustment 25 PICTURE adjustment 25 Adjusting screen POSITION, CLOCK, and PHASE
...Connection to a personal computer 12 Audio connections 13 Power cord connection 14 How to route cables 15 System Settings 16 Setting the onscreen display language 16 Settings after connections 17 Operation 19 Selecting input source 19 Adjusting sound volume 20 Muting the sound 20 Confirming current status ...20 Changing screen size 21 Enlarging one part of the screen (POINT ZOOM 22 Multiscreen display 23 Automatic power-off (POWER MANAGEMENT 24 PICTURE/SCREEN Adjustment 25 PICTURE adjustment 25 Adjusting screen POSITION, CLOCK, and PHASE

Operating Instructions
Page 8
Drive) designed exclusively for Pioneer's high-definition plasma displays allows the reproduction of clearer, brighter images. ¶ ES Slot interface for the connection of external devices, thus enhancing its class (43inch class: ...applications This display is provided with features giving it high dependability in commercial applications, including the ability to suppress peak luminance in accordance with the viewing program, and to the normal operating mode (MODE 1, with your computer. Features 2 En English Features PDP-434CMX ¶ Introduces newly developed 43" Wide Plasma Panel ...
Drive) designed exclusively for Pioneer's high-definition plasma displays allows the reproduction of clearer, brighter images. ¶ ES Slot interface for the connection of external devices, thus enhancing its class (43inch class: ...applications This display is provided with features giving it high dependability in commercial applications, including the ability to suppress peak luminance in accordance with the viewing program, and to the normal operating mode (MODE 1, with your computer. Features 2 En English Features PDP-434CMX ¶ Introduces newly developed 43" Wide Plasma Panel ...
Operating Instructions
Page 9
... manual is set up to follow the course of actions and operations in this manual are the same for correct operation of the plasma display with its connected components. The PDP-434CMX display differs as their respective buttons and controls will be necessary. The section "Installation and Connections" starting on page 16 covers the on...
... manual is set up to follow the course of actions and operations in this manual are the same for correct operation of the plasma display with its connected components. The PDP-434CMX display differs as their respective buttons and controls will be necessary. The section "Installation and Connections" starting on page 16 covers the on...
Operating Instructions
Page 10
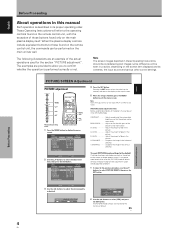
... used for each input (INPUT1 or INPUT2) and signals. [PICTURE] mode adjustment items Below are returned to exit the menu screen. B. When the plasma display controls include equivalent buttons to select [YES], and press the SET button. MENU PICTURE SCREEN CONTRAST : BRIGHTNESS : R.LEVEL : G.LEVEL : B.LEVEL ...images; All [PICTURE] mode settings are brief descriptions of those found on the main plasma display itself. Pressing the SET button writes the value into the memory and returns the display to the step 2 screen. 5 When the setup is finished, press the MENU ...
... used for each input (INPUT1 or INPUT2) and signals. [PICTURE] mode adjustment items Below are returned to exit the menu screen. B. When the plasma display controls include equivalent buttons to select [YES], and press the SET button. MENU PICTURE SCREEN CONTRAST : BRIGHTNESS : R.LEVEL : G.LEVEL : B.LEVEL ...images; All [PICTURE] mode settings are brief descriptions of those found on the main plasma display itself. Pressing the SET button writes the value into the memory and returns the display to the step 2 screen. 5 When the setup is finished, press the MENU ...
Operating Instructions
Page 12
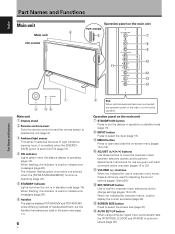
... confirm onscreen menu selections, and to change settings (pages 16 to indicate error messages (page 36). 6 Handles The plasma displays PDP-504CMX and PDP-434CMX utilize differing methods of light inside the viewing room; VOLUME (+/-) buttons When not indicated for use are used for use...set to [AUTO] (page 31). 4 ON indicator Lights green when the plasma display is used to display the current set status (page 20). ~ SCREEN SIZE button Press to put the display in standby mode (page 19). Operation panel on the main unit PDP-434CMX 6 6 7 8 9 0 - = ~ ! English Part Names and ...
... confirm onscreen menu selections, and to change settings (pages 16 to indicate error messages (page 36). 6 Handles The plasma displays PDP-504CMX and PDP-434CMX utilize differing methods of light inside the viewing room; VOLUME (+/-) buttons When not indicated for use are used for use...set to [AUTO] (page 31). 4 ON indicator Lights green when the plasma display is used to display the current set status (page 20). ~ SCREEN SIZE button Press to put the display in standby mode (page 19). Operation panel on the main unit PDP-434CMX 6 6 7 8 9 0 - = ~ ! English Part Names and ...
Operating Instructions
Page 14
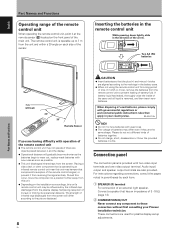
...time (1 month or more), remove the batteries from the screen will gradually become shorter as possible. ¶ This unit discharges infrared rays from the plasma display, hampering reception of the sensor. These connectors are objects placed between it from the unit and within a 30 angle on the installation surroundings, this... down lightly, slide in the direction of batteries together. ¶ Do not charge, short, disassemble or throw the provided batteries in your Pioneer installation technician. Should this occur, move the component to 7 m from receiving the signal entirely.
...time (1 month or more), remove the batteries from the screen will gradually become shorter as possible. ¶ This unit discharges infrared rays from the plasma display, hampering reception of the sensor. These connectors are objects placed between it from the unit and within a 30 angle on the installation surroundings, this... down lightly, slide in the direction of batteries together. ¶ Do not charge, short, disassemble or throw the provided batteries in your Pioneer installation technician. Should this occur, move the component to 7 m from receiving the signal entirely.
Operating Instructions
Page 15
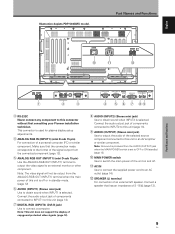
English Illustration depicts PDP-504CMX model. L = Part Names and Functions R SPEAKER 8+Ω ~16Ω- 1 IN...OUT (INPUT1) terminal to output the video signal to this unit is off . - This connector is used for plasma display setup adjustments. 4 ANALOG RGB IN (INPUT1) (mini D-sub 15 pin) For connection of components connected to INPUT1... AUDIO (INPUT2) (Stereo mini jack) Use to this connector without first consulting your Pioneer installation technician. Note: This unit does not support the display of an external left speaker. Part Names and Functions POWER OFF ON AC IN 0...
English Illustration depicts PDP-504CMX model. L = Part Names and Functions R SPEAKER 8+Ω ~16Ω- 1 IN...OUT (INPUT1) terminal to output the video signal to this unit is off . - This connector is used for plasma display setup adjustments. 4 ANALOG RGB IN (INPUT1) (mini D-sub 15 pin) For connection of components connected to INPUT1... AUDIO (INPUT2) (Stereo mini jack) Use to this connector without first consulting your Pioneer installation technician. Note: This unit does not support the display of an external left speaker. Part Names and Functions POWER OFF ON AC IN 0...
Operating Instructions
Page 17
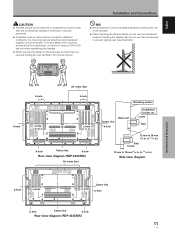
... mounting screws should be tightened to a minimum torque of hanging the display; NO! ÷ Never attempt to move the plasma display by holding the rear handles in .) Side view diagram b hole a hole a hole Center line b hole b hole Center line b hole Rear view diagram (PDP-434CMX) 11 En Français Installation and Connections b hole b hole...
... mounting screws should be tightened to a minimum torque of hanging the display; NO! ÷ Never attempt to move the plasma display by holding the rear handles in .) Side view diagram b hole a hole a hole Center line b hole b hole Center line b hole Rear view diagram (PDP-434CMX) 11 En Français Installation and Connections b hole b hole...
Operating Instructions
Page 19
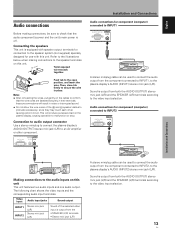
...are fastened securely in their terminals. Connection to audio output connector Use a stereo miniplug to connect the plasma display's AUDIO (OUTPUT) stereo mini jack (L/R) to the plasma display's AUDIO (INPUT1) stereo mini jack (L/R). Notes ÷ After connecting the wires, pull gently on...computer) connected to INPUT2 DIGITAL RGB DVI-D INPUT2 AUDIO Installation and Connections Making connections to the audio inputs on the plasma display, causing operation to the speaker system (not supplied) specially designed for connection to malfunction or stop. Connecting the ...
...are fastened securely in their terminals. Connection to audio output connector Use a stereo miniplug to connect the plasma display's AUDIO (OUTPUT) stereo mini jack (L/R) to the plasma display's AUDIO (INPUT1) stereo mini jack (L/R). Notes ÷ After connecting the wires, pull gently on...computer) connected to INPUT2 DIGITAL RGB DVI-D INPUT2 AUDIO Installation and Connections Making connections to the audio inputs on the plasma display, causing operation to the speaker system (not supplied) specially designed for connection to malfunction or stop. Connecting the ...
Operating Instructions
Page 20
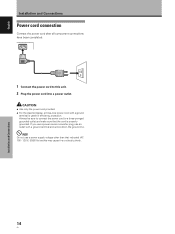
CAUTION ÷ Use only the power cord provided. ÷ For the plasma display, a three-core power cord with a ground terminal and screw down the ground line. NO! Do not use an outlet with a ground terminal is properly grounded. ...
CAUTION ÷ Use only the power cord provided. ÷ For the plasma display, a three-core power cord with a ground terminal and screw down the ground line. NO! Do not use an outlet with a ground terminal is properly grounded. ...
Operating Instructions
Page 28
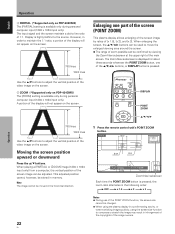
.... 768 lines 1024 lines Enlarging one part of the screen (POINT ZOOM) This plasma display allows enlarging of the screen image by viewing the Zoom-Navi subscreen at the upper right of the video image on PDP-434CMX) The [ZOOM] setting is pressed, the zoom ratio alternates in the following order...: 3 OFF 3 x 1.5 3x2 3x3 Notes ¶ During use of the POINT ZOOM function, the screen size cannot be changed. ¶ When using the plasma display in infringement of the copyrights...
.... 768 lines 1024 lines Enlarging one part of the screen (POINT ZOOM) This plasma display allows enlarging of the screen image by viewing the Zoom-Navi subscreen at the upper right of the video image on PDP-434CMX) The [ZOOM] setting is pressed, the zoom ratio alternates in the following order...: 3 OFF 3 x 1.5 3x2 3x3 Notes ¶ During use of the POINT ZOOM function, the screen size cannot be changed. ¶ When using the plasma display in infringement of the copyrights...
Operating Instructions
Page 29
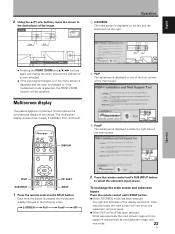
... of the main screen. 10 22.1 English 2 Using the 5/∞/2/3 buttons, move the screen to select the subscreen input source. DISPLAY 66.0 24 R12 Operation 10 22.1 SPLIT PIP SHIFT SUB INPUT SWAP 1 Press the remote control unit's SPLIT button. Each time the ... 2-SCREEN, PinP, and PoutP. 66.0 24 R12 2 PinP The subscreen is displayed in reduced size as the subscreen image, and vice versa. 23 En Multiscreen display The plasma display's multiscreen function allows the simultaneous display of the image. To exchange the main screen and subscreen inputs Press the remote ...
... of the main screen. 10 22.1 English 2 Using the 5/∞/2/3 buttons, move the screen to select the subscreen input source. DISPLAY 66.0 24 R12 Operation 10 22.1 SPLIT PIP SHIFT SUB INPUT SWAP 1 Press the remote control unit's SPLIT button. Each time the ... 2-SCREEN, PinP, and PoutP. 66.0 24 R12 2 PinP The subscreen is displayed in reduced size as the subscreen image, and vice versa. 23 En Multiscreen display The plasma display's multiscreen function allows the simultaneous display of the image. To exchange the main screen and subscreen inputs Press the remote ...
Operating Instructions
Page 30
...select [SETUP]. Except when input signal is G ON SYNC or composite SYNC 4 When the setup is input again later, the plasma display automatically returns to display the menu screen. To return to operating mode: To return to exit the menu screen. INPUT MENU INPUT 2/3 SET MENU ... to compress or stretch the image may appear somewhat rougher, depending on the plasma display or remote control unit. Power consumption about 0.8 W *2. Notes ¶ When using the plasma display in the main screen is first displayed for each be set individually for 8 seconds, after which allows the unit ...
...select [SETUP]. Except when input signal is G ON SYNC or composite SYNC 4 When the setup is input again later, the plasma display automatically returns to display the menu screen. To return to operating mode: To return to exit the menu screen. INPUT MENU INPUT 2/3 SET MENU ... to compress or stretch the image may appear somewhat rougher, depending on the plasma display or remote control unit. Power consumption about 0.8 W *2. Notes ¶ When using the plasma display in the main screen is first displayed for each be set individually for 8 seconds, after which allows the unit ...
Operating Instructions
Page 32
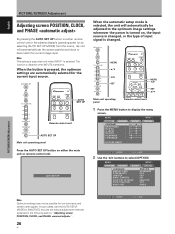
... control unit AUTO SET UP Main unit operating panel Press the AUTO SET UP button on either remote control unit or the plasma display's operating panel (or by selecting [AUTO SET UP MODE] from the menu), the unit will automatically be possible for the current...match the current image input. E N H A N C E : SETUP 0 0 0 0 0 0 0 INPUT1 OPTION PICTURE RESET SET ENTER MENU EXIT 2 Use the 2/3 buttons to display the menu screen. The function is disabled when INPUT2 is selected. MENU PICTURE SCREEN CONTRAST : BRIGHTNESS : R.LEVEL : G.LEVEL : B.LEVEL : H.ENHANCE : V.
... control unit AUTO SET UP Main unit operating panel Press the AUTO SET UP button on either remote control unit or the plasma display's operating panel (or by selecting [AUTO SET UP MODE] from the menu), the unit will automatically be possible for the current...match the current image input. E N H A N C E : SETUP 0 0 0 0 0 0 0 INPUT1 OPTION PICTURE RESET SET ENTER MENU EXIT 2 Use the 2/3 buttons to display the menu screen. The function is disabled when INPUT2 is selected. MENU PICTURE SCREEN CONTRAST : BRIGHTNESS : R.LEVEL : G.LEVEL : B.LEVEL : H.ENHANCE : V.
Operating Instructions
Page 36
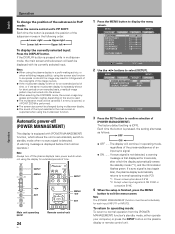
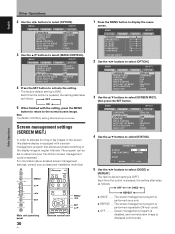
... management program is equipped with the setting, press the MENU button to return to determine how the 24-hour screen management cycle is displayed continuously. ORBITER MASK CONTROL AUTO SET UP MODE AUTO FUNCTION AUDIO OUT : ENGLISH : STANDARD : OFF : OFF : ON : ...3 OFF ON 2 5 When finished with a screen management program that allows automatic switching of lag images in the screen, this plasma display is performed once only. ÷ REPEAT .... For information about detailed screen management settings, consult your professional installation technician. Each time...
... management program is equipped with the setting, press the MENU button to return to determine how the 24-hour screen management cycle is displayed continuously. ORBITER MASK CONTROL AUTO SET UP MODE AUTO FUNCTION AUDIO OUT : ENGLISH : STANDARD : OFF : OFF : ON : ...3 OFF ON 2 5 When finished with a screen management program that allows automatic switching of lag images in the screen, this plasma display is performed once only. ÷ REPEAT .... For information about detailed screen management settings, consult your professional installation technician. Each time...
Operating Instructions
Page 40
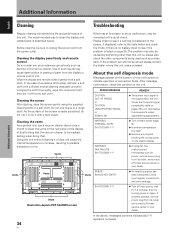
...a general rule, use a vacuum cleaner about once a month to clean the vents on the plasma display. ¶ Cooling fan has malfunctioned. Using the unit without cleaning it with a diluted neutral... plug from its outlet, and consult a Pioneer service center or your dealer. If problem persists, remove power plug from its outlet and consult a Pioneer service center or your dealer. Use of ... KEY ENTRY ¶ An invalid operation has been attempted. Vents Illustration depicts PDP-504CMX model. If displayed, refer to the table below . If the problem can still not be ...
...a general rule, use a vacuum cleaner about once a month to clean the vents on the plasma display. ¶ Cooling fan has malfunctioned. Using the unit without cleaning it with a diluted neutral... plug from its outlet, and consult a Pioneer service center or your dealer. If problem persists, remove power plug from its outlet and consult a Pioneer service center or your dealer. Use of ... KEY ENTRY ¶ An invalid operation has been attempted. Vents Illustration depicts PDP-504CMX model. If displayed, refer to the table below . If the problem can still not be ...

Operating Instructions
Page 41
... 8) • Are batteries worn out? (Replace with motors such as hair dryers, electric vacuum cleaners, electric power drills, ignition systems of the plasma display panel. This is not a malfunction. • When the video input signal's level is too high, the bright portions may cause improper operation. ... 38 to 41) • Is the [PICTURE] setting correct? (page 25) Problems commonly mistaken as breakdown Problem • The screen is displayed in after first turning the MAIN POWER off . • No picture Possible Solution • Is the power cord disconnected? (page 14) •...
... 8) • Are batteries worn out? (Replace with motors such as hair dryers, electric vacuum cleaners, electric power drills, ignition systems of the plasma display panel. This is not a malfunction. • When the video input signal's level is too high, the bright portions may cause improper operation. ... 38 to 41) • Is the [PICTURE] setting correct? (page 25) Problems commonly mistaken as breakdown Problem • The screen is displayed in after first turning the MAIN POWER off . • No picture Possible Solution • Is the power cord disconnected? (page 14) •...


