
Operating Instructions
Page 3
... or your Plasma Display, please read the "Safety Precautions" and these "Operating Instructions" carefully so you very much for purchasing this manual to the customer and explain to the customer how to operate the Plasma Display properly. i En Note for Dealers: After installation, ...dealer install and set up the product. Notes on Installation Work: This product is installed by mistake in a safe place. PIONEER cannot assume liabilities for damage caused by qualified personnel with enough skill and competence. English Français Safety Precautions Operating ...
... or your Plasma Display, please read the "Safety Precautions" and these "Operating Instructions" carefully so you very much for purchasing this manual to the customer and explain to the customer how to operate the Plasma Display properly. i En Note for Dealers: After installation, ...dealer install and set up the product. Notes on Installation Work: This product is installed by mistake in a safe place. PIONEER cannot assume liabilities for damage caused by qualified personnel with enough skill and competence. English Français Safety Precautions Operating ...
Operating Instructions
Page 6
... interference, and (2) this product require service in Canada. and you wish to locate the nearest Pioneer Authorized Independent Service Company, or if you wish to purchase replacement parts, operating instructions, service manuals, or accessories, please call the number shown below. 8 0 0 - 8 7 2 -... the Limited Warranty sheet included with Video Card Model Number: PDP-504CMX / PDP-434CMX (Plasma Display) PDA-5003/PDA-5004 (Video Card) Product Category: Class B Personal Computers & Peripherals Responsible Party Name: PIONEER ELECTRONICS (USA) INC. S021_EF iivi En Safety Precautions
... interference, and (2) this product require service in Canada. and you wish to locate the nearest Pioneer Authorized Independent Service Company, or if you wish to purchase replacement parts, operating instructions, service manuals, or accessories, please call the number shown below. 8 0 0 - 8 7 2 -... the Limited Warranty sheet included with Video Card Model Number: PDP-504CMX / PDP-434CMX (Plasma Display) PDA-5003/PDA-5004 (Video Card) Product Category: Class B Personal Computers & Peripherals Responsible Party Name: PIONEER ELECTRONICS (USA) INC. S021_EF iivi En Safety Precautions
Operating Instructions
Page 7
English Contents Safety Precautions i Features 1 Before Proceeding 3 How to use this manual 3 Checking supplied accessories 5 Part Names and Functions 6 Main unit 6 Remote control unit 7 Connection panel 8 Installation and Connections 10 Installation of the unit 10 Connection to a ...
English Contents Safety Precautions i Features 1 Before Proceeding 3 How to use this manual 3 Checking supplied accessories 5 Part Names and Functions 6 Main unit 6 Remote control unit 7 Connection panel 8 Installation and Connections 10 Installation of the unit 10 Connection to a ...
Operating Instructions
Page 9
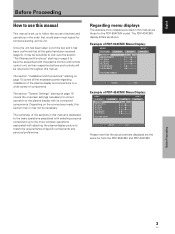
...0 0 0 0 0 0 INPUT1 OPTION PICTURE RESET SET ENTER MENU EXIT Example of the box and it may not be referred to throughout this manual. Once the unit has been taken out of PDP-434CMX Menu Display: MENU PICTURE CONTRAST BRIGHTNESS R.LEVEL G.LEVEL B.LEVEL H.ENHANCE V. English Before Proceeding How to use this... manual This manual is dedicated to the basic operations associated with selecting a source ...
...0 0 0 0 0 0 INPUT1 OPTION PICTURE RESET SET ENTER MENU EXIT Example of the box and it may not be referred to throughout this manual. Once the unit has been taken out of PDP-434CMX Menu Display: MENU PICTURE CONTRAST BRIGHTNESS R.LEVEL G.LEVEL B.LEVEL H.ENHANCE V. English Before Proceeding How to use this... manual This manual is dedicated to the basic operations associated with selecting a source ...
Operating Instructions
Page 10
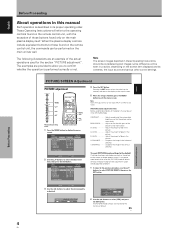
... to default settings instead of green in the picture. MENU PICTURE SCREEN CONTRAST : BRIGHTNESS : R.LEVEL : G.LEVEL : B.LEVEL : H.ENHANCE : V. English Before Proceeding About operations in this manual Each operation is described in its contents, the input source and various other control settings. B. When the plasma display controls include equivalent buttons to those...
... to default settings instead of green in the picture. MENU PICTURE SCREEN CONTRAST : BRIGHTNESS : R.LEVEL : G.LEVEL : B.LEVEL : H.ENHANCE : V. English Before Proceeding About operations in this manual Each operation is described in its contents, the input source and various other control settings. B. When the plasma display controls include equivalent buttons to those...

Operating Instructions
Page 16
...depth, making it very unstable when stood on edge. Front Rear PDP-504CMX: 798 mm (31-7/16 in.) (Bolt hole thread pitch) PDP-434CMX: 880 mm (31-7/16 in.) (Bolt hole thread pitch) Always...a result, two or more persons should cooperate when unpacking, moving , or installing the display. PIONEER will not be sure to take measures to 18 mm (11/16 in.) into the main ... with the stand or installation bracket. ÷ For details concerning installation, please refer to the instruction manual provided with glass, be inserted 12 mm (1/2 in.) to prevent the unit from the attaching surface ...
...depth, making it very unstable when stood on edge. Front Rear PDP-504CMX: 798 mm (31-7/16 in.) (Bolt hole thread pitch) PDP-434CMX: 880 mm (31-7/16 in.) (Bolt hole thread pitch) Always...a result, two or more persons should cooperate when unpacking, moving , or installing the display. PIONEER will not be sure to take measures to 18 mm (11/16 in.) into the main ... with the stand or installation bracket. ÷ For details concerning installation, please refer to the instruction manual provided with glass, be inserted 12 mm (1/2 in.) to prevent the unit from the attaching surface ...

Operating Instructions
Page 18
... 2-1/2 (page 42) when making connections to the shape of copyguard-protected video signals. For details, please read the computer's instruction manual. Connection to INPUT1 Connect the display's D-sub input connector to the video card's DVI connector. provided with the computer or sold ...terminal when the main power of this unit and the personal computer's output terminal. When connecting, please thoroughly read your PC's instruction manual or consult the maker or nearest dealer of computer model being connected, a conversion connector or adapter etc. When connecting to ANALOG ...
... 2-1/2 (page 42) when making connections to the shape of copyguard-protected video signals. For details, please read the computer's instruction manual. Connection to INPUT1 Connect the display's D-sub input connector to the video card's DVI connector. provided with the computer or sold ...terminal when the main power of this unit and the personal computer's output terminal. When connecting, please thoroughly read your PC's instruction manual or consult the maker or nearest dealer of computer model being connected, a conversion connector or adapter etc. When connecting to ANALOG ...
Operating Instructions
Page 23
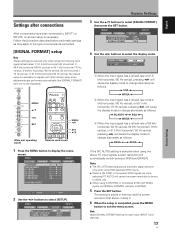
No manual setup is selected when using the above PC input signals, screen resolution will not be set to [XGA] only. ÷ When using G ON SYNC or ... SET ENTER MENU EXIT 2 Use the 2/3 buttons to display the menu screen. Note Make [SIGNAL FORMAT] setting for signals with WXGA inputs, set [SIGNAL FORMAT] manually to [WXGA]. 5 Press the SET button. Settings after connections After components have been connected to INPUT1 or INPUT2, on-screen setup is completed, press the...
No manual setup is selected when using the above PC input signals, screen resolution will not be set to [XGA] only. ÷ When using G ON SYNC or ... SET ENTER MENU EXIT 2 Use the 2/3 buttons to display the menu screen. Note Make [SIGNAL FORMAT] setting for signals with WXGA inputs, set [SIGNAL FORMAT] manually to [WXGA]. 5 Press the SET button. Settings after connections After components have been connected to INPUT1 or INPUT2, on-screen setup is completed, press the...
Operating Instructions
Page 32
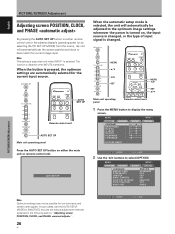
... AUDIO OUT : ENGLISH : STANDARD : OFF : OFF : ON : INACTIVE : OFF : FIXED PICTURE/SCREEN Adjustment Note Optimum settings may not be adjusted to [INACTIVE], and use the manual adjustment methods explained in the following section, "Adjusting screen POSITION, CLOCK, and PHASE ". 26 En SET ENTER MENU EXIT The function is disabled when INPUT2...
... AUDIO OUT : ENGLISH : STANDARD : OFF : OFF : ON : INACTIVE : OFF : FIXED PICTURE/SCREEN Adjustment Note Optimum settings may not be adjusted to [INACTIVE], and use the manual adjustment methods explained in the following section, "Adjusting screen POSITION, CLOCK, and PHASE ". 26 En SET ENTER MENU EXIT The function is disabled when INPUT2...
Operating Instructions
Page 33
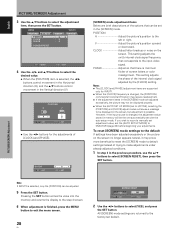
... PICTURE SCREEN SETUP OPTION LANGUAGE ENERGY SAVE SCREEN MGT. E N H A N C E : SETUP 0 0 0 0 0 0 0 OPTION PICTURE RESET SET ENTER MENU EXIT 2 Use the 2/3 buttons to [INACTIVE], and use the manual adjustment methods explained in the following section, "Adjusting screen POSITION, CLOCK, and PHASE ". Note Optimum settings may not be possible for low-luminance and certain...
... PICTURE SCREEN SETUP OPTION LANGUAGE ENERGY SAVE SCREEN MGT. E N H A N C E : SETUP 0 0 0 0 0 0 0 OPTION PICTURE RESET SET ENTER MENU EXIT 2 Use the 2/3 buttons to [INACTIVE], and use the manual adjustment methods explained in the following section, "Adjusting screen POSITION, CLOCK, and PHASE ". Note Optimum settings may not be possible for low-luminance and certain...
Operating Instructions
Page 34
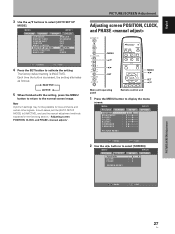
... the Vertical direction (V). PICTURE/SCREEN Adjustment Note If INPUT2 is selected, only the [POSITION] can be displayed on the screen. If you wish to record a manually set adjustment value, set the [AUTO SET UP MODE] to the left or right. English PICTURE/SCREEN Adjustment 3 Use the 5/∞ buttons to the factory...
... the Vertical direction (V). PICTURE/SCREEN Adjustment Note If INPUT2 is selected, only the [POSITION] can be displayed on the screen. If you wish to record a manually set adjustment value, set the [AUTO SET UP MODE] to the left or right. English PICTURE/SCREEN Adjustment 3 Use the 5/∞ buttons to the factory...


