
Operating Instructions
Page 5
... operated. Do not defeat the safety purpose of any way. ÷ When the product exhibits a distinct change in proper operating condition. Power-supply cords should use this can fall , causing serious injury to a child or adult, and serious damage to . CLEANING - Never spill ... this product from the wall outlet before the product is in performance - Unplug this product yourself as an improper adjustment of power supply to . Unauthorized substitutions may expose you are covered by the operating instructions as opening or removing covers may result in a wet...
... operated. Do not defeat the safety purpose of any way. ÷ When the product exhibits a distinct change in proper operating condition. Power-supply cords should use this can fall , causing serious injury to a child or adult, and serious damage to . CLEANING - Never spill ... this product from the wall outlet before the product is in performance - Unplug this product yourself as an improper adjustment of power supply to . Unauthorized substitutions may expose you are covered by the operating instructions as opening or removing covers may result in a wet...
Operating Instructions
Page 7
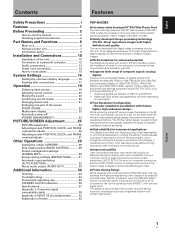
...Before Proceeding 3 How to use this manual 3 Checking supplied accessories 5 Part Names and Functions 6 Main unit 6 Remote control unit 7 Connection panel 8 Installation and Connections 10 Installation of the unit 10 Connection to a personal computer 12 Audio connections 13 Power cord connection 14 How to route cables 15 System Settings... status 20 Changing screen size 21 Enlarging one part of the screen (POINT ZOOM 22 Multiscreen display 23 Automatic power-off (POWER MANAGEMENT 24 PICTURE/SCREEN Adjustment 25 PICTURE adjustment 25 Adjusting screen POSITION, CLOCK, and PHASE
...Before Proceeding 3 How to use this manual 3 Checking supplied accessories 5 Part Names and Functions 6 Main unit 6 Remote control unit 7 Connection panel 8 Installation and Connections 10 Installation of the unit 10 Connection to a personal computer 12 Audio connections 13 Power cord connection 14 How to route cables 15 System Settings... status 20 Changing screen size 21 Enlarging one part of the screen (POINT ZOOM 22 Multiscreen display 23 Automatic power-off (POWER MANAGEMENT 24 PICTURE/SCREEN Adjustment 25 PICTURE adjustment 25 Adjusting screen POSITION, CLOCK, and PHASE

Operating Instructions
Page 11
English Checking supplied accessories Check that the following accessories were supplied. 1 Power cord 2 Remote control unit 3 AA (R6) batteries (x 2) Before Proceeding 7 Display stands (x 2) 8 Washers (x 2) 9 Hex hole bolts (x 2) 0 Remote control unit holder 4 Cleaning cloth (for screen) 5 Speed clamps (x 2) Use as a holder for the remote control unit. When attaching to the rear of the main unit, be careful not to cover the vents. ÷ These Operating Instructions ÷ Warranty 6 Bead bands (x 2) Before Proceeding 5 En
English Checking supplied accessories Check that the following accessories were supplied. 1 Power cord 2 Remote control unit 3 AA (R6) batteries (x 2) Before Proceeding 7 Display stands (x 2) 8 Washers (x 2) 9 Hex hole bolts (x 2) 0 Remote control unit holder 4 Cleaning cloth (for screen) 5 Speed clamps (x 2) Use as a holder for the remote control unit. When attaching to the rear of the main unit, be careful not to cover the vents. ÷ These Operating Instructions ÷ Warranty 6 Bead bands (x 2) Before Proceeding 5 En
Operating Instructions
Page 15
... setup adjustments. 4 ANALOG RGB IN (INPUT1) (mini D-sub 15 pin) For connection of an external left speaker. English Illustration depicts PDP-504CMX model. Connect the audio output jack of components connected to INPUT2 to this unit (page 13). 9 AUDIO (OUTPUT) (Stereo mini... jack) Use to output the audio of components connected to INPUT1 to this connector without first consulting your Pioneer installation technician. AC IN Use to connect the supplied power cord to an external monitor or other component. L = Part Names and Functions R SPEAKER 8+Ω ~16Ω-...
... setup adjustments. 4 ANALOG RGB IN (INPUT1) (mini D-sub 15 pin) For connection of an external left speaker. English Illustration depicts PDP-504CMX model. Connect the audio output jack of components connected to INPUT2 to this unit (page 13). 9 AUDIO (OUTPUT) (Stereo mini... jack) Use to output the audio of components connected to INPUT1 to this connector without first consulting your Pioneer installation technician. AC IN Use to connect the supplied power cord to an external monitor or other component. L = Part Names and Functions R SPEAKER 8+Ω ~16Ω-...
Operating Instructions
Page 19
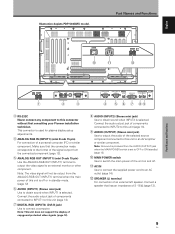
... wire in their terminals. Insecure connections will produce excessive load on the cables to confirm that the audio component's power and the unit's main power is off. The following chart shows the video inputs and the corresponding audio input terminals. Notes ÷ After connecting... INPUT2 OUTPUT AUDIO AUDIO Installation and Connections Audio connections for use with speaker output terminals for connection to the speaker system (not supplied) specially designed for component (computer) connected to INPUT1 ANALOG RGB OUT D-Sub INPUT1 AUDIO A stereo miniplug cable can be used ...
... wire in their terminals. Insecure connections will produce excessive load on the cables to confirm that the audio component's power and the unit's main power is off. The following chart shows the video inputs and the corresponding audio input terminals. Notes ÷ After connecting... INPUT2 OUTPUT AUDIO AUDIO Installation and Connections Audio connections for use with speaker output terminals for connection to the speaker system (not supplied) specially designed for component (computer) connected to INPUT1 ANALOG RGB OUT D-Sub INPUT1 AUDIO A stereo miniplug cable can be used ...
Operating Instructions
Page 20
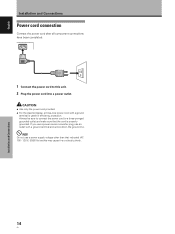
... Hz) as this unit. 2 Plug the power cord into a power outlet. Always be sure to connect the power cord to this may cause fire or electric shock. 14 En Installation and Connections If you use a power source converter plug, use a power supply voltage other than that the cord is used ...for efficiency protection. Do not use an outlet with a ground terminal is properly grounded. CAUTION ÷ Use only the power cord provided. ÷ For the plasma ...
... Hz) as this unit. 2 Plug the power cord into a power outlet. Always be sure to connect the power cord to this may cause fire or electric shock. 14 En Installation and Connections If you use a power source converter plug, use a power supply voltage other than that the cord is used ...for efficiency protection. Do not use an outlet with a ground terminal is properly grounded. CAUTION ÷ Use only the power cord provided. ÷ For the plasma ...
Operating Instructions
Page 40
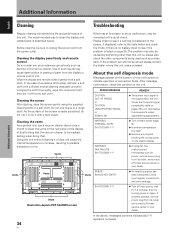
...panel of the display of paint from its outlet, and consult a Pioneer service center or your dealer. Immediately turn off main power, wait for cleaner. Cleaning the display panel body and remote control Do... signals, connections and other settings. Cleaning the screen After dusting, wipe the screen gently using the supplied cleaning cloth or a soft cloth. ERROR MESSAGE CAUTION OUT OF RANGE or CAUTION UNSUPPORTED SIGNAL or ...check to the table below . Vents Illustration depicts PDP-504CMX model. If the problem can still not be caused by something other than this unit.
...panel of the display of paint from its outlet, and consult a Pioneer service center or your dealer. Immediately turn off main power, wait for cleaner. Cleaning the display panel body and remote control Do... signals, connections and other settings. Cleaning the screen After dusting, wipe the screen gently using the supplied cleaning cloth or a soft cloth. ERROR MESSAGE CAUTION OUT OF RANGE or CAUTION UNSUPPORTED SIGNAL or ...check to the table below . Vents Illustration depicts PDP-504CMX model. If the problem can still not be caused by something other than this unit.
Operating Instructions
Page 43
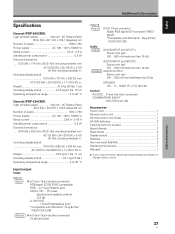
....6 kg (91 lbs. 12 oz) Operating temperature range 0 to 40 °C General (PDP-434CMX) Light emission panel 43-inch" AC Plasma Panel 95.2 (W) x 53.6 (H) x 109.3 (diagonal) cm Number of pixels 1280 x 768 Power supply AC 100 - 120 V, 50/60 Hz Rated current 3.6 A - 2.9 A Standby power consumption 0.8 W External dimensions .... 1218 (W) x 714 (H) x 98 (D: Not including handles) mm 47...
....6 kg (91 lbs. 12 oz) Operating temperature range 0 to 40 °C General (PDP-434CMX) Light emission panel 43-inch" AC Plasma Panel 95.2 (W) x 53.6 (H) x 109.3 (diagonal) cm Number of pixels 1280 x 768 Power supply AC 100 - 120 V, 50/60 Hz Rated current 3.6 A - 2.9 A Standby power consumption 0.8 W External dimensions .... 1218 (W) x 714 (H) x 98 (D: Not including handles) mm 47...


