
Owner's Manual
Page 4
Contents Thank you for future reference. After you will know how to operate your favorite channels 37 Setting up TV channels manually 31 Naming TV channels 32 Checking signal strength 32 Checking the Cable Card ID 32 Enabling data acquisition 32 Parental Control 33 ...caption 38 Selecting the type of the power plug and power outlet may sometimes differ from that shown in a safe place for buying this Pioneer product. Please read through these operating instructions so you have finished reading the instructions, put them away in the explanatory drawings. In some countries...
Contents Thank you for future reference. After you will know how to operate your favorite channels 37 Setting up TV channels manually 31 Naming TV channels 32 Checking signal strength 32 Checking the Cable Card ID 32 Enabling data acquisition 32 Parental Control 33 ...caption 38 Selecting the type of the power plug and power outlet may sometimes differ from that shown in a safe place for buying this Pioneer product. Please read through these operating instructions so you have finished reading the instructions, put them away in the explanatory drawings. In some countries...
Owner's Manual
Page 5
... mode only 44 Adjusting image positions (AV mode only 44 Adjusting image positions and clock automatically (PC mode only 45 Adjusting image positions and clock manually (PC mode only 45 Selecting a screen size 46 Changing the brightness at both sides of the screen (Side Mask 47 Language setting 47 11 Timer...
... mode only 44 Adjusting image positions (AV mode only 44 Adjusting image positions and clock automatically (PC mode only 45 Adjusting image positions and clock manually (PC mode only 45 Selecting a screen size 46 Changing the brightness at both sides of the screen (Side Mask 47 Language setting 47 11 Timer...

Owner's Manual
Page 8
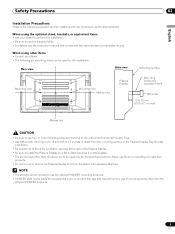
...-Never insert an object into the product. The screen may be sure to the product. 02 Safety Precautions Electricity is used in this manual in a safe place-These safety and operating instructions must operate on a power source specified on safety. This product has been engineered and... before the product is damaged. Use a damp cloth to service the product yourself. The plasma Display used to direct sunlight for the PDP-434PU. Repair-If any of the product. Do not touch the controls other similar surface, since insufficient ventilation can cause fire or electric...
...-Never insert an object into the product. The screen may be sure to the product. 02 Safety Precautions Electricity is used in this manual in a safe place-These safety and operating instructions must operate on a power source specified on safety. This product has been engineered and... before the product is damaged. Use a damp cloth to service the product yourself. The plasma Display used to direct sunlight for the PDP-434PU. Repair-If any of the product. Do not touch the controls other similar surface, since insufficient ventilation can cause fire or electric...
Owner's Manual
Page 9
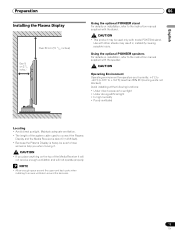
...the installation. • Be sure to use the supplied bolts. • For details, see the instruction manual that comes with speakers attached. • It is strongly recommended to use the optional PIONEER mounting products. • PIONEER shall not be liable for any items such as the optional stand. Safety Precautions 02 English Installation... Display. • Be sure to install the Plasma Display on a flat surface because it contains glass. • The screw holes other than the optional PIONEER products. 9 En See the side view above are to be used only for the specified products.
...the installation. • Be sure to use the supplied bolts. • For details, see the instruction manual that comes with speakers attached. • It is strongly recommended to use the optional PIONEER mounting products. • PIONEER shall not be liable for any items such as the optional stand. Safety Precautions 02 English Installation... Display. • Be sure to install the Plasma Display on a flat surface because it contains glass. • The screw holes other than the optional PIONEER products. 9 En See the side view above are to be used only for the specified products.
Owner's Manual
Page 15
...Display Over 50 cm (19 /11 16 inches) Over 10 cm (3 15/ 16 inches ) 06 Using the optional PIONEER stand For details on installation, refer to the instruction manual supplied with the stand. • This product may result in instability causing possible injury. Use with other stands may ... will not operate properly. • Allow enough space around the upper and back parts when installing to the instruction manual supplied with model PDK-TS04 stand. Using the optional PIONEER speakers For details on the top of the Media Receiver it . • If you place anything on installation, ...
...Display Over 50 cm (19 /11 16 inches) Over 10 cm (3 15/ 16 inches ) 06 Using the optional PIONEER stand For details on installation, refer to the instruction manual supplied with the stand. • This product may result in instability causing possible injury. Use with other stands may ... will not operate properly. • Allow enough space around the upper and back parts when installing to the instruction manual supplied with model PDK-TS04 stand. Using the optional PIONEER speakers For details on the top of the Media Receiver it . • If you place anything on installation, ...
Owner's Manual
Page 18
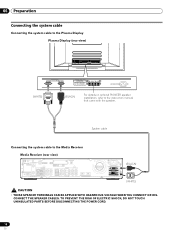
... En 06 Preparation Connecting the system cable Connecting the system cable to the Plasma Display Plasma Display (rear view) (WHITE) (BLACK) For details on optional PIONEER speaker installation, refer to the Media Receiver Media Receiver (rear view) IN OUT VCR CONTROL CONTROL IN ANTENNA B ANTENNA/ CABLE A IN Cable CARD S-VIDEO INPUT... SPEAKER TERMINALS CAN BE APPLIED WITH HAZARDOUS VOLTAGE WHEN YOU CONNECT OR DISCONNECT THE SPEAKER CABLES. System cable Connecting the system cable to the instruction manual that came with the speaker.
... En 06 Preparation Connecting the system cable Connecting the system cable to the Plasma Display Plasma Display (rear view) (WHITE) (BLACK) For details on optional PIONEER speaker installation, refer to the Media Receiver Media Receiver (rear view) IN OUT VCR CONTROL CONTROL IN ANTENNA B ANTENNA/ CABLE A IN Cable CARD S-VIDEO INPUT... SPEAKER TERMINALS CAN BE APPLIED WITH HAZARDOUS VOLTAGE WHEN YOU CONNECT OR DISCONNECT THE SPEAKER CABLES. System cable Connecting the system cable to the instruction manual that came with the speaker.
Owner's Manual
Page 24
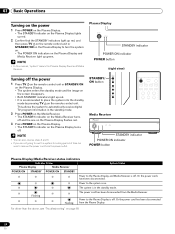
... POWER ON indicators on the Plasma Display turns off. • You can also reverse steps 2 and 3. • If you are not going to use this manual, "system" means the Plasma Display Panel and Media Receiver. (right view) Turning off and the one on the Plasma Display flashes red. 3 Press POWER on...
... POWER ON indicators on the Plasma Display turns off. • You can also reverse steps 2 and 3. • If you are not going to use this manual, "system" means the Plasma Display Panel and Media Receiver. (right view) Turning off and the one on the Plasma Display flashes red. 3 Press POWER on...

Owner's Manual
Page 27
... remote control unit. • Conventional TV channels in mono or stereo). Changing the language If you have selected a digital TV program that language. In this manual designate TV channels that are received through the conventional VHF/UHF frequencies or conventional cable TV channels. • When stereo sound is difficult to obtain... channels over cable, you can use the POD service provided by the video source. Setting MTS/SAP mode When watching conventional TV programs, you may manually switch to the MONO mode to hear, you press MTS, MTS toggles as shown below.
... remote control unit. • Conventional TV channels in mono or stereo). Changing the language If you have selected a digital TV program that language. In this manual designate TV channels that are received through the conventional VHF/UHF frequencies or conventional cable TV channels. • When stereo sound is difficult to obtain... channels over cable, you can use the POD service provided by the video source. Setting MTS/SAP mode When watching conventional TV programs, you may manually switch to the MONO mode to hear, you press MTS, MTS toggles as shown below.
Owner's Manual
Page 30
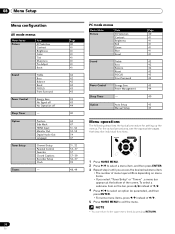
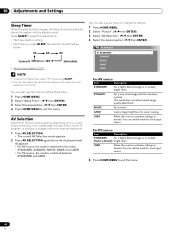
... can return to select an option (or parameter), and then press ENTER. • For some menu items, press / instead of the screen. Option Auto Setup Manual Setup Page 40 41 41 41 41 41 41 42 42 42 42 43 43 43 44 40 45 45 Menu operations The following describes...
... can return to select an option (or parameter), and then press ENTER. • For some menu items, press / instead of the screen. Option Auto Setup Manual Setup Page 40 41 41 41 41 41 41 42 42 42 42 43 43 43 44 40 45 45 Menu operations The following describes...
Owner's Manual
Page 31
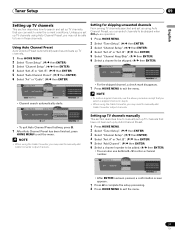
...you may not be able to tune in step 6. • When using the Cable Converter, you may need to manually add Cable Converter output channels. A Auto Channel Preset Cable Enter Begin Preset D Cancel xxxxxxxxxxxxxxxxxxxxx 2.0 xxxxxxxxxxxxxxxxxxxxx 4.0 xxxxxxxxxxxxxxxxxxxxx ... Keep/Skip 2.0 4.0 6.0 xxxxxxxxxxxxxxxxxxxxx xxxxxxxxxxxxxxxxxxxxx xxxxxxxxxxxxxxxxxxxxx Home Menu Exit • For the skipped channel, a check mark disappears. 7 Press HOME MENU to manually set up TV channels. 1 Press HOME MENU. 2 Select "Tuner Setup". ( / then ENTER) 3 Select "Channel Setup". ( / then ENTER...
...you may not be able to tune in step 6. • When using the Cable Converter, you may need to manually add Cable Converter output channels. A Auto Channel Preset Cable Enter Begin Preset D Cancel xxxxxxxxxxxxxxxxxxxxx 2.0 xxxxxxxxxxxxxxxxxxxxx 4.0 xxxxxxxxxxxxxxxxxxxxx ... Keep/Skip 2.0 4.0 6.0 xxxxxxxxxxxxxxxxxxxxx xxxxxxxxxxxxxxxxxxxxx xxxxxxxxxxxxxxxxxxxxx Home Menu Exit • For the skipped channel, a check mark disappears. 7 Press HOME MENU to manually set up TV channels. 1 Press HOME MENU. 2 Select "Tuner Setup". ( / then ENTER) 3 Select "Channel Setup". ( / then ENTER...

Owner's Manual
Page 39
... then ENTER) 3 Select "Clock". ( / then ENTER) 4 Select "Time Zone". ( / then ENTER) 5 Select a time zone for recording. 39 En You can also manually set time is employed in your area. if not specified by the provider are used; If you disconnect the power cord from the selected channel... and time will be automatically corrected using data from the power outlet or power blackout occurs, the set the correct time. Clock Auto/Manual Set Auto/Manual Set •Auto Set Clock Set Channel Ant. Item Font Size Selection Auto/ Large/ Standard/ Small Font1 Auto/ Font 1/ Font ...
... then ENTER) 3 Select "Clock". ( / then ENTER) 4 Select "Time Zone". ( / then ENTER) 5 Select a time zone for recording. 39 En You can also manually set time is employed in your area. if not specified by the provider are used; If you disconnect the power cord from the selected channel... and time will be automatically corrected using data from the power outlet or power blackout occurs, the set the correct time. Clock Auto/Manual Set Auto/Manual Set •Auto Set Clock Set Channel Ant. Item Font Size Selection Auto/ Large/ Standard/ Small Font1 Auto/ Font 1/ Font ...
Owner's Manual
Page 40
...; For PC source, the mode is switched in a normally bright room DYNAMIC For a very sharp image with the maximum contrast This mode does not allow manual image quality adjustment. You can set the mode for easier viewing. AV Selection Select from the five viewing options, depending on the current environment (e.g., room...
...; For PC source, the mode is switched in a normally bright room DYNAMIC For a very sharp image with the maximum contrast This mode does not allow manual image quality adjustment. You can set the mode for easier viewing. AV Selection Select from the five viewing options, depending on the current environment (e.g., room...

Owner's Manual
Page 45
...coming from a personal computer. 1 Press HOME MENU. 2 Select "Option". ( / then ENTER) 3 Select "Auto Setup". ( / then ENTER) Option Auto Setup Manual Setup 5 Perform adjustment. ( / and / ) • Use / only when you can easily adjust the positions and clock of images using Auto Setup. appears, ... with a PC image composed of similar patterns or monochrome. appears. • Even when "Auto Setup completed." Adjusting image positions and clock manually (PC mode only) Usually you adjust the vertical position after selecting "H/V Position Adjust". 6 Press HOME MENU to exit the menu. •...
...coming from a personal computer. 1 Press HOME MENU. 2 Select "Option". ( / then ENTER) 3 Select "Auto Setup". ( / then ENTER) Option Auto Setup Manual Setup 5 Perform adjustment. ( / and / ) • Use / only when you can easily adjust the positions and clock of images using Auto Setup. appears, ... with a PC image composed of similar patterns or monochrome. appears. • Even when "Auto Setup completed." Adjusting image positions and clock manually (PC mode only) Usually you adjust the vertical position after selecting "H/V Position Adjust". 6 Press HOME MENU to exit the menu. •...

Owner's Manual
Page 50
...commercially available) Connecting a VCR Use the INPUT 2 terminals when connecting a VCR and other external equipment. • Refer to the relevant instruction manual (DVD player, personal computer, etc.) carefully before connecting to a DVD player, VCR, personal computer, game console, camcorder, or other audiovisual equipment... only terminals that are to be actually used . • You can connect many types of external equipment to your DVD player instruction manual for the signal type. • The INPUT 1 terminals are checked for cable connections in the order where; 1) S-Video, 2) ...
...commercially available) Connecting a VCR Use the INPUT 2 terminals when connecting a VCR and other external equipment. • Refer to the relevant instruction manual (DVD player, personal computer, etc.) carefully before connecting to a DVD player, VCR, personal computer, game console, camcorder, or other audiovisual equipment... only terminals that are to be actually used . • You can connect many types of external equipment to your DVD player instruction manual for the signal type. • The INPUT 1 terminals are checked for cable connections in the order where; 1) S-Video, 2) ...

Owner's Manual
Page 51
...type. • For the digital video signal types to be made to identify the type of these signals, see the operation manual that came with the connected equipment. Enjoying through External Equipment 12 English Using HDMI Input The INPUT 1 and INPUT 3 terminals include... can be received from the connected equipment. HDMI equipment • If you select "Auto", an attempt will be specified, check the operation manual that came with the connected equipment. Connecting HDMI equipment Media Receiver (rear view) DIGITAL OUT OPTICAL (TS) S400 VIDEO INPUT 1 COMPONENT VIDEO...
...type. • For the digital video signal types to be made to identify the type of these signals, see the operation manual that came with the connected equipment. Enjoying through External Equipment 12 English Using HDMI Input The INPUT 1 and INPUT 3 terminals include... can be received from the connected equipment. HDMI equipment • If you select "Auto", an attempt will be specified, check the operation manual that came with the connected equipment. Connecting HDMI equipment Media Receiver (rear view) DIGITAL OUT OPTICAL (TS) S400 VIDEO INPUT 1 COMPONENT VIDEO...

Owner's Manual
Page 52
.... Specify the output terminal whose output is output, specify another audio signal type. • For the audio signal types to be specified, check the operation manual that its light emitting section faces the remote control sensor on the equipment to be actually used. For more easily by using a VCR or DVD...
.... Specify the output terminal whose output is output, specify another audio signal type. • For the audio signal types to be specified, check the operation manual that its light emitting section faces the remote control sensor on the equipment to be actually used. For more easily by using a VCR or DVD...

Owner's Manual
Page 53
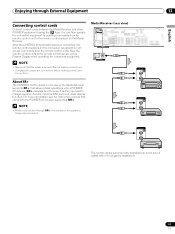
... recording equipment other audio equipment The digital audio output terminal (optical) on this system can output Dolby Digital signals. For more information, see the instruction manual that came with the AV receiver. Enjoying through External Equipment 12 English Connecting a recorder Media Receiver (rear view) IN OUT VCR CONTROL CONTROL IN ANTENNA...
... recording equipment other audio equipment The digital audio output terminal (optical) on this system can output Dolby Digital signals. For more information, see the instruction manual that came with the AV receiver. Enjoying through External Equipment 12 English Connecting a recorder Media Receiver (rear view) IN OUT VCR CONTROL CONTROL IN ANTENNA...
Owner's Manual
Page 55
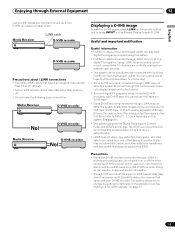
... D-VHS recorder Displaying a D-VHS image To watch a D-VHS image, press i.LINK on the remote control unit or press INPUT on or off . Check the instruction manual that support i.LINK cannot relay data when their power is off the other data to play back digital TV programs recorded using connected D-VHS recorders...
... D-VHS recorder Displaying a D-VHS image To watch a D-VHS image, press i.LINK on the remote control unit or press INPUT on or off . Check the instruction manual that support i.LINK cannot relay data when their power is off the other data to play back digital TV programs recorded using connected D-VHS recorders...
Owner's Manual
Page 61
...AUDIO-L IINNPUTT 33 Y CB/PB CR/PR INPUT 1 INPUT 3 HDMI IN OUT CONTROL • Make sure that allows linked operations with a PIONEER AV receiver. About SR+ The CONTROL OUT terminal on the Plasma Display when operating the connected equipment. SR+ presents functions such as the input switch... linkage operation function and the DSP surround mode display function. For more information, see the instruction manual that came with mini plugs (no resistance). 61 En CONTROL IN OUT CONTROL IN OUT CONTROL IN OUT The control cables (commercially...
...AUDIO-L IINNPUTT 33 Y CB/PB CR/PR INPUT 1 INPUT 3 HDMI IN OUT CONTROL • Make sure that allows linked operations with a PIONEER AV receiver. About SR+ The CONTROL OUT terminal on the Plasma Display when operating the connected equipment. SR+ presents functions such as the input switch... linkage operation function and the DSP surround mode display function. For more information, see the instruction manual that came with mini plugs (no resistance). 61 En CONTROL IN OUT CONTROL IN OUT CONTROL IN OUT The control cables (commercially...


