
User Manual
Page 3
... place. Before using your dealer install and set up the product. Keep this manual in the future. You will know how to handle the product. PIONEER cannot assume liabilities for purchasing this manual to the customer and explain to the customer how to operate the Plasma Display ...properly. Note for Dealers: After installation, be sure to deliver this PIONEER product. Notes on Installation Work: This...
... place. Before using your dealer install and set up the product. Keep this manual in the future. You will know how to handle the product. PIONEER cannot assume liabilities for purchasing this manual to the customer and explain to the customer how to operate the Plasma Display ...properly. Note for Dealers: After installation, be sure to deliver this PIONEER product. Notes on Installation Work: This...
User Manual
Page 6
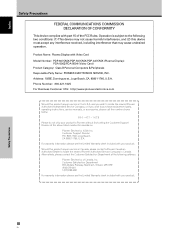
... CONFORMITY This device complies with Video Card Model Number: PDP-607CMX/PDP-507CMX/PDP-427CMX (Plasma Display) PDA-5003/PDA-5004 (Video Card) Product Category: Class B Personal Computers & Peripherals Responsible Party Name: PIONEER ELECTRONICS SERVICE, INC. Product Name: Plasma Display with...please see the Limited Warranty sheet included with your product. and you wish to locate the nearest Pioneer Authorized Independent Service Company, or if you wish to purchase replacement parts, operating instructions, service manuals, or accessories, please call the number shown below. 8 0 0 - 4 2 1 ...
... CONFORMITY This device complies with Video Card Model Number: PDP-607CMX/PDP-507CMX/PDP-427CMX (Plasma Display) PDA-5003/PDA-5004 (Video Card) Product Category: Class B Personal Computers & Peripherals Responsible Party Name: PIONEER ELECTRONICS SERVICE, INC. Product Name: Plasma Display with...please see the Limited Warranty sheet included with your product. and you wish to locate the nearest Pioneer Authorized Independent Service Company, or if you wish to purchase replacement parts, operating instructions, service manuals, or accessories, please call the number shown below. 8 0 0 - 4 2 1 ...
User Manual
Page 7
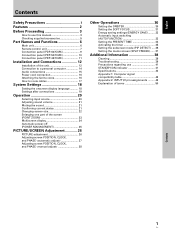
English Contents Safety Precautions i Features 2 Before Proceeding 3 How to use this manual 3 Checking supplied accessories 5 Part Names and Functions 6 Main unit 6 Remote control unit 7 Connection panel (PDP-607CMX 9 Connection panel (PDP-507CMX 10 Connection panel (PDP-427CMX 11 Installation and Connections 12 Installation of the unit 12 Connection to a personal computer 14 Audio connections 15 Power...
English Contents Safety Precautions i Features 2 Before Proceeding 3 How to use this manual 3 Checking supplied accessories 5 Part Names and Functions 6 Main unit 6 Remote control unit 7 Connection panel (PDP-607CMX 9 Connection panel (PDP-507CMX 10 Connection panel (PDP-427CMX 11 Installation and Connections 12 Installation of the unit 12 Connection to a personal computer 14 Audio connections 15 Power...
User Manual
Page 9
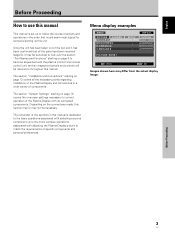
...necessary. E N H A N C E PICTURE RESET SETUP : : : : INPUT1 OPTION 0 0 0 0 SET ENTER MENU EXIT Images shown here may be referred to throughout this manual. The section "System Settings" starting on page 18 covers the on page 12 covers all the parts have been received (page 5), it has been confirmed...been taken out of the box and it may differ from the actual display image. English Before Proceeding How to use this manual This manual is dedicated to the basic operations associated with selecting a source component up to the more complex operations associated with adjusting the ...
...necessary. E N H A N C E PICTURE RESET SETUP : : : : INPUT1 OPTION 0 0 0 0 SET ENTER MENU EXIT Images shown here may be referred to throughout this manual. The section "System Settings" starting on page 18 covers the on page 12 covers all the parts have been received (page 5), it has been confirmed...been taken out of the box and it may differ from the actual display image. English Before Proceeding How to use this manual This manual is dedicated to the basic operations associated with selecting a source component up to the more complex operations associated with adjusting the ...

User Manual
Page 10
... proper operating order. some difference will refer to the operating controls found on the main unit as well. English Before Proceeding About operations in this manual Each operation is performed correctly or not. Note The screen images depicted in these Operating Instructions should be seen in its contents, the input source...
... proper operating order. some difference will refer to the operating controls found on the main unit as well. English Before Proceeding About operations in this manual Each operation is performed correctly or not. Note The screen images depicted in these Operating Instructions should be seen in its contents, the input source...

User Manual
Page 20
... Connection to INPUT2 A computer equipped with combined horizontal and vertical sync signals). For details, please read the computer's instruction manual. English Installation and Connections Connection to a personal computer Connection method differs depending on this unit and the personal computer's output...¶ INPUT1 supports Microsoft "Plug & Play" (VESA DDC 1/2B) components. When connecting, please thoroughly read your PC's instruction manual or consult the maker or nearest dealer of copyguard-protected video signals. Note A video signal will not be connected to 19 for...
... Connection to INPUT2 A computer equipped with combined horizontal and vertical sync signals). For details, please read the computer's instruction manual. English Installation and Connections Connection to a personal computer Connection method differs depending on this unit and the personal computer's output...¶ INPUT1 supports Microsoft "Plug & Play" (VESA DDC 1/2B) components. When connecting, please thoroughly read your PC's instruction manual or consult the maker or nearest dealer of copyguard-protected video signals. Note A video signal will not be connected to 19 for...
User Manual
Page 33
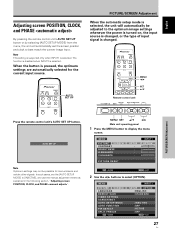
In such cases, set the screen position and clock to [INACTIVE], and use the manual adjustment methods explained in the following section, "Adjusting screen POSITION, CLOCK, and PHASE ". MENU PICTURE SCREEN CONTRAST BRIGHTNESS H.ENHANCE V. AUTO SET UP PICTURE/SCREEN Adjustment ...
In such cases, set the screen position and clock to [INACTIVE], and use the manual adjustment methods explained in the following section, "Adjusting screen POSITION, CLOCK, and PHASE ". MENU PICTURE SCREEN CONTRAST BRIGHTNESS H.ENHANCE V. AUTO SET UP PICTURE/SCREEN Adjustment ...

User Manual
Page 34
... ENTER MENU EXIT PICTURE/SCREEN Adjustment 28 En VOL + MENU SET 5/∞ 2/3 Main unit operating panel 1 Press the MENU button to [INACTIVE], and use the manual adjustment methods explained in the following section, "Adjusting screen POSITION, CLOCK, and PHASE ". English PICTURE/SCREEN Adjustment 3 Use the 5/∞ buttons to the normal screen...
... ENTER MENU EXIT PICTURE/SCREEN Adjustment 28 En VOL + MENU SET 5/∞ 2/3 Main unit operating panel 1 Press the MENU button to [INACTIVE], and use the manual adjustment methods explained in the following section, "Adjusting screen POSITION, CLOCK, and PHASE ". English PICTURE/SCREEN Adjustment 3 Use the 5/∞ buttons to the normal screen...

User Manual
Page 35
...] frequency is changed , the [POSITION] command's horizontal [H] option may require readjustment. ÷ If the adjustment items in the Vertical direction (V). If you wish to record a manually set adjustment value, set default. 29 En PICTURE/SCREEN Adjustment [SCREEN] mode adjustment items Below are adjusted excessively, the picture may prove more beneficial to...
...] frequency is changed , the [POSITION] command's horizontal [H] option may require readjustment. ÷ If the adjustment items in the Vertical direction (V). If you wish to record a manually set adjustment value, set default. 29 En PICTURE/SCREEN Adjustment [SCREEN] mode adjustment items Below are adjusted excessively, the picture may prove more beneficial to...


