
Owner's Manual
Page 4
...54 TV tuner function menu 54 Selecting channels from the preset channel list 54 Audio Adjustments 55 Adjusting the audio easily 55 Adjusting the audio finely 55 Extra functions 55 Recalling equalizer curves 55 Audio menu 56 Using balance adjustment 56 Using loudness 56 Using sound field control, octaver... the entertainment display 67 Using the AUX source 69 Using the telephone muting/ attenuation .......... 69 Additional Information 70 CD player and care 70 MP3 files 71 "Memory Stick" player and care 72 Understanding auto-equalizing error messages 73 Understanding built-in...
...54 TV tuner function menu 54 Selecting channels from the preset channel list 54 Audio Adjustments 55 Adjusting the audio easily 55 Adjusting the audio finely 55 Extra functions 55 Recalling equalizer curves 55 Audio menu 56 Using balance adjustment 56 Using loudness 56 Using sound field control, octaver... the entertainment display 67 Using the AUX source 69 Using the telephone muting/ attenuation .......... 69 Additional Information 70 CD player and care 70 MP3 files 71 "Memory Stick" player and care 72 Understanding auto-equalizing error messages 73 Understanding built-in...
Owner's Manual
Page 5
... Foundation. 4 ITALIANO NEDERLANDS To establish a safe level: • Start your volume control at two feet. ENGLISH ESPAÑOL DEUTSCH FRANÇAIS Selecting fine audio equipment such as the unit you listening for your protection. This manufacturer and the Electronic Industries Association's Consumer Electronics Group want you 've just purchased...
... Foundation. 4 ITALIANO NEDERLANDS To establish a safe level: • Start your volume control at two feet. ENGLISH ESPAÑOL DEUTSCH FRANÇAIS Selecting fine audio equipment such as the unit you listening for your protection. This manufacturer and the Electronic Industries Association's Consumer Electronics Group want you 've just purchased...
Owner's Manual
Page 6
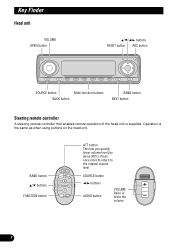
... A steering remote controller that enables remote operation of the head unit is the same as when using buttons on the head unit. SOURCE button 2/3 buttons AUDIO button VOLUME Raise or lower the volume. 5 Operation is supplied.
... A steering remote controller that enables remote operation of the head unit is the same as when using buttons on the head unit. SOURCE button 2/3 buttons AUDIO button VOLUME Raise or lower the volume. 5 Operation is supplied.
Owner's Manual
Page 7
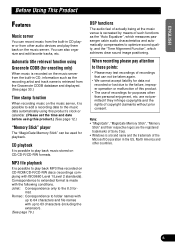
... Stick" and their respective logos are not permitted if they infringe copyrights and the rights of the Microsoft Corporation in CD, information such as the "Auto Equalizer", which measures passenger cabin audio characteristics and automatically compensates to optimize sound quality, and the "Time Alignment Function", which achieves clear sound image positioning. FRAN...
... Stick" and their respective logos are not permitted if they infringe copyrights and the rights of the Microsoft Corporation in CD, information such as the "Auto Equalizer", which measures passenger cabin audio characteristics and automatically compensates to optimize sound quality, and the "Time Alignment Function", which achieves clear sound image positioning. FRAN...
Owner's Manual
Page 12
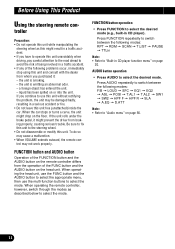
... = TTLin Note: • Refer to select the mode. FUNCTION button operation • Press FUNCTION to "Audio menu" on page 20. AUDIO button operation • Press AUDIO to avoid the risk of being involved in CD player). a foreign object has entered the unit. - To do so may cause a malfunction. • When... VOLUME extends outward, the remote control may be damaged badly, resulting in CD player function menu" on page 56. 11 When operating the head unit, use the FUNC button and the AUDIO button to select the mode. Before Using This Product Using the steering remote con-...
... = TTLin Note: • Refer to select the mode. FUNCTION button operation • Press FUNCTION to "Audio menu" on page 20. AUDIO button operation • Press AUDIO to avoid the risk of being involved in CD player). a foreign object has entered the unit. - To do so may cause a malfunction. • When... VOLUME extends outward, the remote control may be damaged badly, resulting in CD player function menu" on page 56. 11 When operating the head unit, use the FUNC button and the AUDIO button to select the mode. Before Using This Product Using the steering remote con-...
Owner's Manual
Page 17
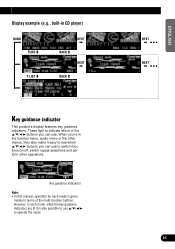
However, in the function menu, audio menu or the other operations. These light to indicate which 5/∞/2/3 buttons you can use 5/∞/2/3 to switch functions on/off, switch repeat selections and perform other menus, they also make it is given mainly in CD player) Key guidance indicator This product's display features key guidance...
However, in the function menu, audio menu or the other operations. These light to indicate which 5/∞/2/3 buttons you can use 5/∞/2/3 to switch functions on/off, switch repeat selections and perform other menus, they also make it is given mainly in CD player) Key guidance indicator This product's display features key guidance...

Owner's Manual
Page 32
To retract VOLUME, press it becomes easier to "Understanding music server error messages" on the music server, "No audio" is displayed. • If the music server cannot operate properly, an error message such as "ERROR-30" is displayed. Turn VOLUME to select...to select a playlist file. 5. form fast forward or reverse. Press 5 or ∞ to playlist mode when nothing has been recorded, "No PlayList" or "No audio" is displayed. 31 Press BAND repeatedly to switch between the following modes: All (each recording date) = Digital (digital recordings) = Analog (analog recordings) = Artist ...
To retract VOLUME, press it becomes easier to "Understanding music server error messages" on the music server, "No audio" is displayed. • If the music server cannot operate properly, an error message such as "ERROR-30" is displayed. Turn VOLUME to select...to select a playlist file. 5. form fast forward or reverse. Press 5 or ∞ to playlist mode when nothing has been recorded, "No PlayList" or "No audio" is displayed. 31 Press BAND repeatedly to switch between the following modes: All (each recording date) = Digital (digital recordings) = Analog (analog recordings) = Artist ...

Owner's Manual
Page 36
... also use 2, 3 and 5 to playlist file repeat. The light goes off . Note: • You can also use 2, 3 and 5 to play on the music server, "No audio" is automatically canceled, select the scan mode again. Press FUNC and then press PAUSE to display the desired playlist file title. Selecting tracks from the...
... also use 2, 3 and 5 to playlist file repeat. The light goes off . Note: • You can also use 2, 3 and 5 to play on the music server, "No audio" is automatically canceled, select the scan mode again. Press FUNC and then press PAUSE to display the desired playlist file title. Selecting tracks from the...

Owner's Manual
Page 38
... select "NO". This mode allows you to play back the tracks you switch to playlist mode when nothing has been recorded, "No PlayList" or "No audio" is deleted along with the track information. Press P.MODE to select the desired playlist file. 2. Press P.MODE repeatedly to switch between the following mode: All...
... select "NO". This mode allows you to play back the tracks you switch to playlist mode when nothing has been recorded, "No PlayList" or "No audio" is deleted along with the track information. Press P.MODE to select the desired playlist file. 2. Press P.MODE repeatedly to switch between the following mode: All...

Owner's Manual
Page 43
... FUNC and NEXT and then press ERSall to select "YES". When the tracks have been erased, the function menu is cancelled and "No audio" is selected and during erasing. DEUTSCH FRANÇAIS ITALIANO NEDERLANDS 42 ENGLISH ESPAÑOL Erasing tracks from the "Memory Stick" Tracks may... be cancelled and "No audio" is displayed. • You can not adjust the volume while "YES" is displayed. • To prevent erasure of the track, press 3 and ...
... FUNC and NEXT and then press ERSall to select "YES". When the tracks have been erased, the function menu is cancelled and "No audio" is selected and during erasing. DEUTSCH FRANÇAIS ITALIANO NEDERLANDS 42 ENGLISH ESPAÑOL Erasing tracks from the "Memory Stick" Tracks may... be cancelled and "No audio" is displayed. • You can not adjust the volume while "YES" is displayed. • To prevent erasure of the track, press 3 and ...
Owner's Manual
Page 50
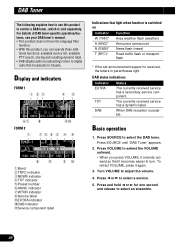
... volume. 4. When DAB reception is sold separately. tional functions: available service list, available PTY search, storing and recalling dynamic label. • DAB (digital audio broadcasting) refers to digital radio that it becomes easier to turn. Turn VOLUME to select a service. 5. The currently received service has a dynamic label. DAB status indications Indicator EXTRA...
... volume. 4. When DAB reception is sold separately. tional functions: available service list, available PTY search, storing and recalling dynamic label. • DAB (digital audio broadcasting) refers to digital radio that it becomes easier to turn. Turn VOLUME to select a service. 5. The currently received service has a dynamic label. DAB status indications Indicator EXTRA...
Owner's Manual
Page 56
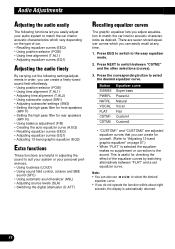
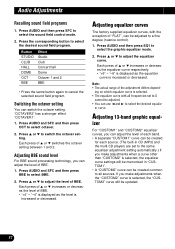
...(EEQ) • Using position selector (POSI) • Using time alignment (T.AL1) • Adjusting equalizer curves (EQ1) Adjusting the audio finely By carrying out the following functions let you easily adjust your personal preferences. • Using loudness (LOUD) • Using sound ... (curves). 3. Press NEXT to select the desired equalizer curve. Press EEQ to switch to the easy equalizer mode. 2. Audio Adjustments Adjusting the audio easily The following settings/adjustments in order, you can create a finely-tuned sound field effortlessly. • Using position selector ...
...(EEQ) • Using position selector (POSI) • Using time alignment (T.AL1) • Adjusting equalizer curves (EQ1) Adjusting the audio finely By carrying out the following functions let you easily adjust your personal preferences. • Using loudness (LOUD) • Using sound ... (curves). 3. Press NEXT to select the desired equalizer curve. Press EEQ to switch to the easy equalizer mode. 2. Audio Adjustments Adjusting the audio easily The following settings/adjustments in order, you can create a finely-tuned sound field effortlessly. • Using position selector ...
Owner's Manual
Page 57
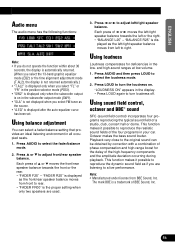
... reproducing the typical sound field of the four programs in your car. FRANÇAIS ITALIANO NEDERLANDS 56 ENGLISH ESPAÑOL DEUTSCH Audio menu The audio menu has the following functions: Note: • If you do not operate the function within about 30 seconds, the display is ...balance mode. 2. Using loudness Loudness compensates for the delay of phase compensation and high-range boost for deficiencies in all occupied seats. 1. Press AUDIO to adjust front/rear speaker balance. Press 2 or 3 to adjust left to reproduce the dynamic sound field as the front/rear speaker balance...
... reproducing the typical sound field of the four programs in your car. FRANÇAIS ITALIANO NEDERLANDS 56 ENGLISH ESPAÑOL DEUTSCH Audio menu The audio menu has the following functions: Note: • If you do not operate the function within about 30 seconds, the display is ...balance mode. 2. Using loudness Loudness compensates for the delay of phase compensation and high-range boost for deficiencies in all occupied seats. 1. Press AUDIO to adjust front/rear speaker balance. Press 2 or 3 to adjust left to reproduce the dynamic sound field as the front/rear speaker balance...
Owner's Manual
Page 58
...select octaver. 2. Switching the octaver setting You can be created common to all frequencies set to a fine degree (nuance control). 1. Press AUDIO and SFC and then press OCT to select the sound field control mode. 2. Adjusting BBE sound level For BBE sound processing technology, you ...) and the multi-CD players are set to 0 cannot be adjusted to the same equalizer adjustment setting automatically.) If you make adjustments when the "CUSTOM2" curve is increased or decreased. Press AUDIO and SFC and then press BBE to adjust the equalizer curve. Adjusting 13-band graphic equal...
...select octaver. 2. Switching the octaver setting You can be created common to all frequencies set to a fine degree (nuance control). 1. Press AUDIO and SFC and then press OCT to select the sound field control mode. 2. Adjusting BBE sound level For BBE sound processing technology, you ...) and the multi-CD players are set to 0 cannot be adjusted to the same equalizer adjustment setting automatically.) If you make adjustments when the "CUSTOM2" curve is increased or decreased. Press AUDIO and SFC and then press BBE to adjust the equalizer curve. Adjusting 13-band graphic equal...

Owner's Manual
Page 59
... time to adjust. Press ASL to set to one of where you want to match the number and position of the sound field. Press AUDIO and NEXT and then press POSI to select the 13-band graphic equalizer mode. 3. ing position. Refer to adjust the level of the ...according to select the automatic sound levelizer mode. 2. The sensitivity (variation of volume level to be set the automatic sound levelizer sensitivity. Press AUDIO and then press ASL to the driving speed and road conditions. Press the corresponding button to cancel the selected listening position. Button Position 2 Front...
... time to adjust. Press ASL to set to one of where you want to match the number and position of the sound field. Press AUDIO and NEXT and then press POSI to select the 13-band graphic equalizer mode. 3. ing position. Refer to adjust the level of the ...according to select the automatic sound levelizer mode. 2. The sensitivity (variation of volume level to be set the automatic sound levelizer sensitivity. Press AUDIO and then press ASL to the driving speed and road conditions. Press the corresponding button to cancel the selected listening position. Button Position 2 Front...

Owner's Manual
Page 60
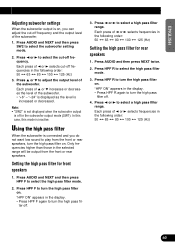
...adjustment mode. 2. Adjusting time alignment For "Custom" time alignment, you adjust the distance between each speaker and the selected position. 1. Press AUDIO and NEXT and then press T.AL2 to select the subwoofer output phase. Each press of distance Centimeter Inch 3. "0.0cm" is displayed as ...The subwoofer output phase can be switched between the selected speaker and the listening position. Press AUDIO and NEXT and then press SW1 to select a unit of distance. Audio Adjustments Using time alignment The time alignment lets you can adjust the distance between each speaker ...
...adjustment mode. 2. Adjusting time alignment For "Custom" time alignment, you adjust the distance between each speaker and the selected position. 1. Press AUDIO and NEXT and then press T.AL2 to select the subwoofer output phase. Each press of distance Centimeter Inch 3. "0.0cm" is displayed as ...The subwoofer output phase can be switched between the selected speaker and the listening position. Press AUDIO and NEXT and then press SW1 to select a unit of distance. Audio Adjustments Using time alignment The time alignment lets you can adjust the distance between each speaker ...
Owner's Manual
Page 61
...level of the subwoofer. ENGLISH ESPAÑOL DEUTSCH Adjusting subwoofer settings When the subwoofer output is on . Press AUDIO and NEXT and then press HPF F to select a high pass filter range. Press AUDIO and then press NEXT twice. 2. Each press of 2 or 3 selects cut-off frequency and the output level... ter off in the following order: 50 Ô 63 Ô 80 Ô 100 Ô 125 (Hz) Setting the high pass filter for front speakers 1. Press AUDIO and NEXT and then press SW2 to select a high pass filter range. Press 2 or 3 to play from the front or rear speakers. Each press of...
...level of the subwoofer. ENGLISH ESPAÑOL DEUTSCH Adjusting subwoofer settings When the subwoofer output is on . Press AUDIO and NEXT and then press HPF F to select a high pass filter range. Press AUDIO and then press NEXT twice. 2. Each press of 2 or 3 selects cut-off frequency and the output level... ter off in the following order: 50 Ô 63 Ô 80 Ô 100 Ô 125 (Hz) Setting the high pass filter for front speakers 1. Press AUDIO and NEXT and then press SW2 to select a high pass filter range. Press 2 or 3 to play from the front or rear speakers. Each press of...
Owner's Manual
Page 62
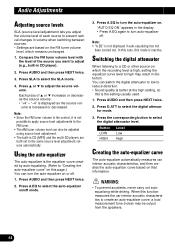
...interior acoustic characteristics to adjust (e.g., built-in CD player). 2. You can also be output from the speakers. 61 Press SLA to select the digital attenuator mode. 3. Press D.ATT to select the SLA mode. 4. Press AUDIO and then press NEXT twice. 3. Switching... the digital attenuator When listening to a CD or other source on that information. "-4" is inactive. Audio Adjustments Adjusting source levels SLA (source level adjustment) lets you ...
...interior acoustic characteristics to adjust (e.g., built-in CD player). 2. You can also be output from the speakers. 61 Press SLA to select the digital attenuator mode. 3. Press D.ATT to select the SLA mode. 4. Press AUDIO and then press NEXT twice. 3. Switching... the digital attenuator When listening to a CD or other source on that information. "-4" is inactive. Audio Adjustments Adjusting source levels SLA (source level adjustment) lets you ...

Owner's Manual
Page 63
....) Before operating the auto-equalization function • Carry out auto-equalizing in the specified location. (Refer to the standard position. • Auto-equalizing changes the audio settings as possible, with input level control, auto-equalizing may prevent correct auto-equalizing. 2. The fader/balance settings return to the center position. (Refer to...
....) Before operating the auto-equalization function • Carry out auto-equalizing in the specified location. (Refer to the standard position. • Auto-equalizing changes the audio settings as possible, with input level control, auto-equalizing may prevent correct auto-equalizing. 2. The fader/balance settings return to the center position. (Refer to...

Owner's Manual
Page 64
... 10 seconds when the 10-second count-down starts. If the car's air conditioner or heater is output from the fan in the safe place. Audio Adjustments 3.
... 10 seconds when the 10-second count-down starts. If the car's air conditioner or heater is output from the fan in the safe place. Audio Adjustments 3.


