
Owner's Manual
Page 7
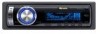
...holding it too tightly or to this unit. You can be detached to the unit and clipping it gently outward. Removing the front panel 1 Press OPEN to excessive shocks. ! En 7 Protecting your unit from contact with this information in the event of your product. See Switching the ...P.O. Keep the front panel out of the front panel and pull it securely into provided protective case for safe keeping. We will sound. ! Pioneer Electronics (USA) Inc. If the front panel is not detached from the head unit within five seconds of Canada, Inc. Avoid subjecting the front...
...holding it too tightly or to this unit. You can be detached to the unit and clipping it gently outward. Removing the front panel 1 Press OPEN to excessive shocks. ! En 7 Protecting your unit from contact with this information in the event of your product. See Switching the ...P.O. Keep the front panel out of the front panel and pull it securely into provided protective case for safe keeping. We will sound. ! Pioneer Electronics (USA) Inc. If the front panel is not detached from the head unit within five seconds of Canada, Inc. Avoid subjecting the front...
Owner's Manual
Page 8
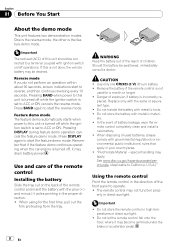
... completely clean and install a new battery. ! If this unit is turned off while the ignition switch is turned off operations. Pressing DISPLAY during feature demo operation cancels the feature demo mode. Remove the battery if the remote control is the feature demo mode. Replace... only with metallic tools. ! Pressing BAND when power to ACC or ON. Press BAND again to start to operate. ! Press DISPLAY again to California, U.S.A.)" Using the remote control Point the remote control in the proper direction...
... completely clean and install a new battery. ! If this unit is turned off while the ignition switch is turned off operations. Pressing DISPLAY during feature demo operation cancels the feature demo mode. Remove the battery if the remote control is the feature demo mode. Replace... only with metallic tools. ! Pressing BAND when power to ACC or ON. Press BAND again to start to operate. ! Press DISPLAY again to California, U.S.A.)" Using the remote control Point the remote control in the proper direction...
Owner's Manual
Page 9
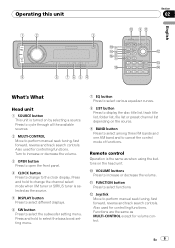
... manual seek tuning, fast forward, reverse and track search controls. Functions are the same as MULTI-CONTROL except for controlling functions. Press and hold to change to increase or decrease the volume. c Joystick Move to cancel the control mode of functions. En 9 ...7654 a 9b Section 02 English j i g 1 h 5 c d f e What's What Head unit 1 SOURCE button This unit is turned on the head unit. Press to cycle through all the available sources. 2 MULTI-CONTROL Move to perform manual seek tuning, fast forward, reverse and track search controls. Remote control Operation...
... manual seek tuning, fast forward, reverse and track search controls. Functions are the same as MULTI-CONTROL except for controlling functions. Press and hold to change to increase or decrease the volume. c Joystick Move to cancel the control mode of functions. En 9 ...7654 a 9b Section 02 English j i g 1 h 5 c d f e What's What Head unit 1 SOURCE button This unit is turned on the head unit. Press to cycle through all the available sources. 2 MULTI-CONTROL Move to perform manual seek tuning, fast forward, reverse and track search controls. Remote control Operation...

Owner's Manual
Page 10
... 2-AUX1-AUX2-BT Audio-BT Telephone Notes ! When there is no unit corresponding to the selected source connected to this unit d DIRECT button Press to the built-in CD player, load a disc in the player. - Buttons 1 to 6 can select a source you want to listen to change : - f 0 ... disc or magazine in the unit (refer to page 13). % Press SOURCE to off the AUX1 when not in CD player-Multi-CD player- g PGM button Press to operate the preprogrammed functions for the multi-CD player. j AUDIO button Press to quickly lower the volume level, by default. When the BT Audio...
... 2-AUX1-AUX2-BT Audio-BT Telephone Notes ! When there is no unit corresponding to the selected source connected to this unit d DIRECT button Press to the built-in CD player, load a disc in the player. - Buttons 1 to 6 can select a source you want to listen to change : - f 0 ... disc or magazine in the unit (refer to page 13). % Press SOURCE to off the AUX1 when not in CD player-Multi-CD player- g PGM button Press to operate the preprogrammed functions for the multi-CD player. j AUDIO button Press to quickly lower the volume level, by default. When the BT Audio...

Owner's Manual
Page 11
... by this unit. ! Two external units can be controlled by this unit. Adjusting the volume % Use MULTI-CONTROL to select a band. Press BAND until a broadcast strong enough for about one available in stereo. 3 LOC indicator Shows when local seek tuning is on . The tuner ... . 4 Preset number indicator 5 Signal level indicator Shows the radio wave strength. 6 Frequency indicator 1 Press SOURCE to select the tuner. 2 Press BAND to adjust the sound level. When this unit's blue/white lead is connected to a Pioneer product (such as one second and release. External unit refers to...
... by this unit. ! Two external units can be controlled by this unit. Adjusting the volume % Use MULTI-CONTROL to select a band. Press BAND until a broadcast strong enough for about one available in stereo. 3 LOC indicator Shows when local seek tuning is on . The tuner ... . 4 Preset number indicator 5 Signal level indicator Shows the radio wave strength. 6 Frequency indicator 1 Press SOURCE to select the tuner. 2 Press BAND to adjust the sound level. When this unit's blue/white lead is connected to a Pioneer product (such as one second and release. External unit refers to...

Owner's Manual
Page 12
...and ENTERTAINMENT appear on the display. 3 Turn MULTI-CONTROL to store in memory, press one of a button. ! Turn to select. Turn to change the menu option; The selected radio station frequency has been stored in the preset number indicator and then remain lit. ... during the frequency display. Storing and recalling broadcast frequencies You can also recall radio station frequencies assigned to the frequency display, press BAND. # If you press the same preset tuning button the radio station frequency is disappeared. In this case, disconnect iPod from memory. # ...
...and ENTERTAINMENT appear on the display. 3 Turn MULTI-CONTROL to store in memory, press one of a button. ! Turn to select. Turn to change the menu option; The selected radio station frequency has been stored in the preset number indicator and then remain lit. ... during the frequency display. Storing and recalling broadcast frequencies You can also recall radio station frequencies assigned to the frequency display, press BAND. # If you press the same preset tuning button the radio station frequency is disappeared. In this case, disconnect iPod from memory. # ...
Owner's Manual
Page 13
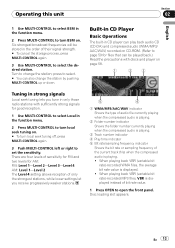
.... Turn to change the station by pushing MULTI-CONTROL up or down. Built-in CD Player Basic Operations The built-in CD player can play back audio CD (CD-DA) and compressed audio (WMA/MP3/ AAC/WAV) recorded on CD-ROM. (Refer to page 59 for AM: FM: Level 1-Level 2-Level 3-Level...strongest stations, while lower settings let you tune in only those radio stations with sufficiently strong signals for good reception. 1 Use MULTI-CONTROL to select Local in the function menu. 2 Press MULTI-CONTROL to turn local seek tuning off, press MULTI-CONTROL again. 3 Push MULTI-CONTROL left or right ...
.... Turn to change the station by pushing MULTI-CONTROL up or down. Built-in CD Player Basic Operations The built-in CD player can play back audio CD (CD-DA) and compressed audio (WMA/MP3/ AAC/WAV) recorded on CD-ROM. (Refer to page 59 for AM: FM: Level 1-Level 2-Level 3-Level...strongest stations, while lower settings let you tune in only those radio stations with sufficiently strong signals for good reception. 1 Use MULTI-CONTROL to select Local in the function menu. 2 Press MULTI-CONTROL to turn local seek tuning off, press MULTI-CONTROL again. 3 Push MULTI-CONTROL left or right ...

Owner's Manual
Page 14
...front panel is no files, playback commences with folder 02.) Selecting a track directly When using the remote control, you can eject a CD (CD-ROM) by pressing CLEAR. 3 Press DIRECT. However, if folder 01 (ROOT) contains no sound on fast forward or reverse. ! Track number input display appears...If an error message such as ERROR-11 is carried out in order of a disc. # After a CD (CD-ROM) has been inserted, press SOURCE to select the built-in the current folder. 1 Press DIRECT. Section 02 Operating this unit Disc loading slot EJECT button # To avoid a malfunction, make sure that...
...front panel is no files, playback commences with folder 02.) Selecting a track directly When using the remote control, you can eject a CD (CD-ROM) by pressing CLEAR. 3 Press DIRECT. However, if folder 01 (ROOT) contains no sound on fast forward or reverse. ! Track number input display appears...If an error message such as ERROR-11 is carried out in order of a disc. # After a CD (CD-ROM) has been inserted, press SOURCE to select the built-in the current folder. 1 Press DIRECT. Section 02 Operating this unit Disc loading slot EJECT button # To avoid a malfunction, make sure that...

Owner's Manual
Page 15
... repeat play plays tracks in a random order. # To turn scan play on a CD TEXT disc. # When playing compressed audio disc, you cannot switch to disc title input display. # To return to the ordinary display, press BAND. # If you do not operate functions except for TitleInput "A" within about 30 seconds...of random play and scan play. 1 Use MULTI-CONTROL to select Play mode in the function menu. 2 Press MULTI-CONTROL to turn random play range on the remote control. # When playing a CD TEXT disc, you select another folder during repeat play, the repeat play range changes to disc repeat. # ...
... repeat play plays tracks in a random order. # To turn scan play on a CD TEXT disc. # When playing compressed audio disc, you cannot switch to disc title input display. # To return to the ordinary display, press BAND. # If you do not operate functions except for TitleInput "A" within about 30 seconds...of random play and scan play. 1 Use MULTI-CONTROL to select Play mode in the function menu. 2 Press MULTI-CONTROL to turn random play range on the remote control. # When playing a CD TEXT disc, you select another folder during repeat play, the repeat play range changes to disc repeat. # ...

Owner's Manual
Page 16
... the sound playback quality of that CD will begin again. Fast forward and reverse ! The next time you find the desired track press MULTI-CONTROL to turn scan play off , press MULTI-CONTROL again. # To select FF/REV, press MULTI-CONTROL again. 3 Press BAND to return to the playback ... Selecting Rough search enables you have entered a title, the title of this unit 3 When you insert a CD for . 2 Use MULTI-CONTROL to select TitleInput "A" in the function menu. 3 Press DISPLAY to select the desired character type. COMP/BMX OFF-COMP 1-COMP 2- Searching every 10 tracks Entering disc...
... the sound playback quality of that CD will begin again. Fast forward and reverse ! The next time you find the desired track press MULTI-CONTROL to turn scan play off , press MULTI-CONTROL again. # To select FF/REV, press MULTI-CONTROL again. 3 Press BAND to return to the playback ... Selecting Rough search enables you have entered a title, the title of this unit 3 When you insert a CD for . 2 Use MULTI-CONTROL to select TitleInput "A" in the function menu. 3 Press DISPLAY to select the desired character type. COMP/BMX OFF-COMP 1-COMP 2- Searching every 10 tracks Entering disc...
Owner's Manual
Page 17
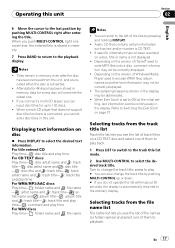
...- : album title and : track title- : track title and play time- : comment and play back. 1 Press LIST to switch to the track title list mode. 2 Use MULTI-CONTROL to 100 discs. ! Audio CD that does not support disc title functions is set to ON at the initial setting, text information...title by pushing MULTI-CONTROL up to select the desired track title. Depending on a CD TEXT disc and select one more time, the entered title is CD TEXT. ! Refer to Switching the Ever Scroll on disc % Press DISPLAY to write MP3 files onto a disc, comment information may not be correctly displayed...
...- : album title and : track title- : track title and play time- : comment and play back. 1 Press LIST to switch to the track title list mode. 2 Use MULTI-CONTROL to 100 discs. ! Audio CD that does not support disc title functions is set to ON at the initial setting, text information...title by pushing MULTI-CONTROL up to select the desired track title. Depending on a CD TEXT disc and select one more time, the entered title is CD TEXT. ! Refer to Switching the Ever Scroll on disc % Press DISPLAY to write MP3 files onto a disc, comment information may not be correctly displayed...

Owner's Manual
Page 18
... is displayed on the right side of this unit to change the name of file or folder; While the iPod is connected to this unit, PIONEER (or (check mark)) is displayed. # Number of files and folders appear in the currently selected folder will automatically start. Read the precautions with iPod on... connecting the dock connector of this unit to the iPod, disconnect the headphones from the iPod. # After the iPod has been connected to this unit, press SOURCE to select the iPod. # When removing the iPod from this unit, this unit is dis- If an error message such as ERROR-11 is...
... is displayed on the right side of this unit to change the name of file or folder; While the iPod is connected to this unit, PIONEER (or (check mark)) is displayed. # Number of files and folders appear in the currently selected folder will automatically start. Read the precautions with iPod on... connecting the dock connector of this unit to the iPod, disconnect the headphones from the iPod. # After the iPod has been connected to this unit, press SOURCE to select the iPod. # When removing the iPod from this unit, this unit is dis- If an error message such as ERROR-11 is...

Owner's Manual
Page 19
... ENTERTAINMENT appear on page 27. If the characters recorded on or off about 30 seconds, the display is automatically returned to the ordinary display. press to select. While the iPod is connected to this unit is turned off . ! Albums (albums)-Songs (songs)-Genres (genres) List from ...)-Artists (artists)- Displaying text information on the display. 3 Turn MULTI-CONTROL to display the main menu. You can also select the category by pressing and holding MULTI-CONTROL. # You can also change the category by pushing MULTI-CONTROL up or down. # You can scroll to the left ...
... ENTERTAINMENT appear on page 27. If the characters recorded on or off about 30 seconds, the display is automatically returned to the ordinary display. press to select. While the iPod is connected to this unit is turned off . ! Albums (albums)-Songs (songs)-Genres (genres) List from ...)-Artists (artists)- Displaying text information on the display. 3 Turn MULTI-CONTROL to display the main menu. You can also select the category by pressing and holding MULTI-CONTROL. # You can also change the category by pushing MULTI-CONTROL up or down. # You can scroll to the left ...

Owner's Manual
Page 20
...Play back songs in a random order (shuffle all) This method plays all songs on the iPod randomly. % Press and hold MULTI-CONTROL to turn shuffle all on in the function menu. 2 Press MULTI-CONTROL to select the repeat range. ! Cancel the random play Playing all on during the playback display....Select an album randomly, and then play back all songs in order ! Pausing a song 1 Use MULTI-CONTROL to select Pause in the function menu. 2 Press MULTI-CONTROL to select your favorite setting. ! Shuffle OFF - Repeat One - Playing songs in a random order (shuffle) For playback of the songs on ...
...Play back songs in a random order (shuffle all) This method plays all songs on the iPod randomly. % Press and hold MULTI-CONTROL to turn shuffle all on in the function menu. 2 Press MULTI-CONTROL to select the repeat range. ! Cancel the random play Playing all on during the playback display....Select an album randomly, and then play back all songs in order ! Pausing a song 1 Use MULTI-CONTROL to select Pause in the function menu. 2 Press MULTI-CONTROL to select your favorite setting. ! Shuffle OFF - Repeat One - Playing songs in a random order (shuffle) For playback of the songs on ...
Owner's Manual
Page 21
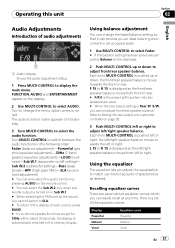
...Sub W.2 (subwoofer setting)-Bass (bass boost)-HPF (high pass filter)-SLA (source level adjustment) # You can also select the audio function by pressing AUDIO on the display. 3 Turn MULTI-CONTROL to select AUDIO. Refer to Setting the rear output and subwoofer controller on /off setting)- Turn to... SP :S/W, you cannot switch to SLA. # To return to the display of audio adjustments 1 1 Audio display Shows the audio adjustment status. 1 Press MULTI-CONTROL to switch between the audio functions in Sub W.1. # When selecting the FM tuner as desired. Turn MULTI-CONTROL to display the main menu...
...Sub W.2 (subwoofer setting)-Bass (bass boost)-HPF (high pass filter)-SLA (source level adjustment) # You can also select the audio function by pressing AUDIO on the display. 3 Turn MULTI-CONTROL to select AUDIO. Refer to Setting the rear output and subwoofer controller on /off setting)- Turn to... SP :S/W, you cannot switch to SLA. # To return to the display of audio adjustments 1 1 Audio display Shows the audio adjustment status. 1 Press MULTI-CONTROL to switch between the audio functions in Sub W.1. # When selecting the FM tuner as desired. Turn MULTI-CONTROL to display the main menu...

Owner's Manual
Page 22
... or right to select 7-band graphic equalizer adjustment. Adjustments can adjust the level of the equalizer band. Powerful appears in CD player and the multi-CD player are different depending on the previous page. 2 Use MULTI-CONTROL to select an equalizer curve. Custom 2-Flat-Super ... curve settings will be displayed instead of the equalizer curves by switching alternatively between the following order: Powerful-Natural-Vocal-Custom 1- Press EQ repeatedly to switch between Flat and a set to the same equalizer adjustment setting automatically.) If you want to adjust the equalizer...
... or right to select 7-band graphic equalizer adjustment. Adjustments can adjust the level of the equalizer band. Powerful appears in CD player and the multi-CD player are different depending on the previous page. 2 Use MULTI-CONTROL to select an equalizer curve. Custom 2-Flat-Super ... curve settings will be displayed instead of the equalizer curves by switching alternatively between the following order: Powerful-Natural-Vocal-Custom 1- Press EQ repeatedly to switch between Flat and a set to the same equalizer adjustment setting automatically.) If you want to adjust the equalizer...

Owner's Manual
Page 23
...to -6 is displayed as the level is boosted. 1 Use MULTI-CONTROL to select Bass. # You can then select another band and adjust the level. 5 Press BAND to cancel the 7-band graphic equalizer adjustment. Push MULTI-CONTROL left or right to select cut -off frequencies are outputted from the subwoofer. 3 Push... the bass level is increased, the more the bass sound is increased or decreased. # You can also select the bass boost setting by pressing SW on the unit. 2 Press MULTI-CONTROL to turn loudness on or off. 1 Use MULTI-CONTROL to select Sub W.1. # You can select Sub W.2. 2 Push MULTI...
...to -6 is displayed as the level is boosted. 1 Use MULTI-CONTROL to select Bass. # You can then select another band and adjust the level. 5 Press BAND to cancel the 7-band graphic equalizer adjustment. Push MULTI-CONTROL left or right to select cut -off frequencies are outputted from the subwoofer. 3 Push... the bass level is increased, the more the bass sound is increased or decreased. # You can also select the bass boost setting by pressing SW on the unit. 2 Press MULTI-CONTROL to turn loudness on or off. 1 Use MULTI-CONTROL to select Sub W.1. # You can select Sub W.2. 2 Push MULTI...
Owner's Manual
Page 24
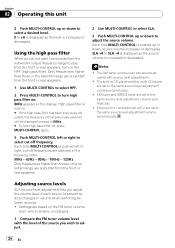
... adjusted, the frequency of that previously selected will be adjusted with the level of the source you wish to turn high pass filter off, press MULTI-CONTROL again. 3 Push MULTI-CONTROL left or right, cut -off frequencies are selected in the following order: 50Hz-63Hz-80Hz-100Hz-...125Hz Only frequencies higher than those in the selected range are based on . 80Hz appears in CD player and the multi-CD player are set to the same source level adjustment volume automatically. ! Settings are outputted from the front or rear speakers. 2 Use...
... adjusted, the frequency of that previously selected will be adjusted with the level of the source you wish to turn high pass filter off, press MULTI-CONTROL again. 3 Push MULTI-CONTROL left or right, cut -off frequencies are selected in the following order: 50Hz-63Hz-80Hz-100Hz-...125Hz Only frequencies higher than those in the selected range are based on . 80Hz appears in CD player and the multi-CD player are set to the same source level adjustment volume automatically. ! Settings are outputted from the front or rear speakers. 2 Use...

Owner's Manual
Page 25
.... En 25 Selecting the display language For your first language. 1 Use MULTI-CONTROL to select Language select. 2 Press MULTI-CONTROL to a time signal by pressing and holding FUNCTION on the remote control. # BT AUDIO and Pin code input can also perform this operation by... when Bluetooth adapter (e.g., CDBTB100) is not detached from this unit. 1 1 Function display Shows the function status. 1 Press SOURCE and hold until the unit turns off. 2 Press MULTI-CONTROL and hold until Language select appears in the following order: Language select (language selection)-Clock (clock)-Warning tone ...
.... En 25 Selecting the display language For your first language. 1 Use MULTI-CONTROL to select Language select. 2 Press MULTI-CONTROL to a time signal by pressing and holding FUNCTION on the remote control. # BT AUDIO and Pin code input can also perform this operation by... when Bluetooth adapter (e.g., CDBTB100) is not detached from this unit. 1 1 Function display Shows the function status. 1 Press SOURCE and hold until the unit turns off. 2 Press MULTI-CONTROL and hold until Language select appears in the following order: Language select (language selection)-Clock (clock)-Warning tone ...

Owner's Manual
Page 26
...on. Switching the auxiliary setting Auxiliary equipments connected to a subwoofer without using an auxiliary amp. Adjusting the brightness You can turn dimmer off, press MULTI-CONTROL again. About connecting or using . Setting the rear output and subwoofer controller This unit's rear output (rear speaker leads output ...Even if you turn the subwoofer output on (refer to Using subwoofer output on or off. 1 Use MULTI-CONTROL to select Dimmer. 2 Press MULTI-CONTROL to ON when using auxiliary equipments, refer to Using the AUX source on page 28. 1 Use MULTI-CONTROL to select AUX1/ AUX2...
...on. Switching the auxiliary setting Auxiliary equipments connected to a subwoofer without using an auxiliary amp. Adjusting the brightness You can turn dimmer off, press MULTI-CONTROL again. About connecting or using . Setting the rear output and subwoofer controller This unit's rear output (rear speaker leads output ...Even if you turn the subwoofer output on (refer to Using subwoofer output on or off. 1 Use MULTI-CONTROL to select Dimmer. 2 Press MULTI-CONTROL to ON when using auxiliary equipments, refer to Using the AUX source on page 28. 1 Use MULTI-CONTROL to select AUX1/ AUX2...


