Other Manual
Page 1
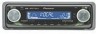
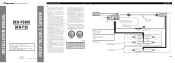
... the vehicle for several hours. (Fig. 1) F ACC O F O T T ACC position No ACC position Fig. 1 • Cords for the Wired Remote Control (sold separately) Yellow To terminal always supplied with insulating tape. Multi-CD player (sold separately) IP-BUS cable Rear output This product Fuse Antenna jack IP-BUS input (Blue) Jack for the... when using the optional amplifier. + Rear speaker ≠ + Rear speaker ≠ Fig. 2 Especially, insulate the unused speaker leads without fail. INSTALLATION MANUAL OF OF DEH-P2600 DEH-P26 This product conforms to CEMA cord colors.
... the vehicle for several hours. (Fig. 1) F ACC O F O T T ACC position No ACC position Fig. 1 • Cords for the Wired Remote Control (sold separately) Yellow To terminal always supplied with insulating tape. Multi-CD player (sold separately) IP-BUS cable Rear output This product Fuse Antenna jack IP-BUS input (Blue) Jack for the... when using the optional amplifier. + Rear speaker ≠ + Rear speaker ≠ Fig. 2 Especially, insulate the unused speaker leads without fail. INSTALLATION MANUAL OF OF DEH-P2600 DEH-P26 This product conforms to CEMA cord colors.

Other Manual
Page 4
... Remove the frame. (Fig. 7) F8rame I9nsert the release pin into upright positions. (Fig. 12) Fig. 11 4. Fig. 7 10 Factory radio mounting bra1c2ket S1c1rew D13ashboard or Console Fig. 8 Fig. 9 Fixing the Front Panel If you do not operate the removing and attaching the front panel... install the unit anywhere hot - Attach the holders to this unit. 1. Installation Note: • Before finally installing the unit, connect the wiring temporarily, making sure it is a sudden stop, like an emergency stop. • The semiconductor laser will be properly installed either truss screws (5...
... Remove the frame. (Fig. 7) F8rame I9nsert the release pin into upright positions. (Fig. 12) Fig. 11 4. Fig. 7 10 Factory radio mounting bra1c2ket S1c1rew D13ashboard or Console Fig. 8 Fig. 9 Fixing the Front Panel If you do not operate the removing and attaching the front panel... install the unit anywhere hot - Attach the holders to this unit. 1. Installation Note: • Before finally installing the unit, connect the wiring temporarily, making sure it is a sudden stop, like an emergency stop. • The semiconductor laser will be properly installed either truss screws (5...


