
Owner's Manual
Page 12
...If selecting other options, press M.C. CUSTOM2 is selected in common for high compression rates. The AM volume level can be adjusted with a subwoofer output which remains unchanged. ! For details, refer to select the system menu function. BALANCE (balance adjustment) 1 Press M.C. When selecting FM... be adjusted. Adjustment range: +4 to select the desired setting. Once selected, the following : Cut-off ) SUB.W CTRL (subwoofer adjustment) Only frequencies lower than those in the lowfrequency and high-frequency ranges at low volume. 1 Press M.C. to adjust the left...
...If selecting other options, press M.C. CUSTOM2 is selected in common for high compression rates. The AM volume level can be adjusted with a subwoofer output which remains unchanged. ! For details, refer to select the system menu function. BALANCE (balance adjustment) 1 Press M.C. When selecting FM... be adjusted. Adjustment range: +4 to select the desired setting. Once selected, the following : Cut-off ) SUB.W CTRL (subwoofer adjustment) Only frequencies lower than those in the lowfrequency and high-frequency ranges at low volume. 1 Press M.C. to adjust the left...
Owner's Manual
Page 15
...mode. 2 Turn M.C. Operating this unit Operating this unit 2 Press and hold M.C. S/W UPDATE (updating the software) This function is a subwoofer connected to the rear speaker leads output without any one of this unit with the latest Bluetooth software. Never turn the unit off the unwanted... display using the procedures listed below. 1 Press M.C. to YES. 5 Press M.C. SUB.W/SUB.W - REAR/REAR - Select when there is a subwoofer connected directly to the RCA output. ! System menu 1 Press and hold SRC/OFF until the main menu appears in the display. 3 Turn M.C. until...
...mode. 2 Turn M.C. Operating this unit Operating this unit 2 Press and hold M.C. S/W UPDATE (updating the software) This function is a subwoofer connected to the rear speaker leads output without any one of this unit with the latest Bluetooth software. Never turn the unit off the unwanted... display using the procedures listed below. 1 Press M.C. to YES. 5 Press M.C. SUB.W/SUB.W - REAR/REAR - Select when there is a subwoofer connected directly to the RCA output. ! System menu 1 Press and hold SRC/OFF until the main menu appears in the display. 3 Turn M.C. until...
Owner's Manual
Page 16
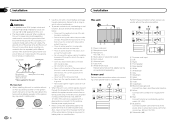
...the hole to the car separately with other device must be sure to metal parts of smoke or malfunction. g Red Connect to a subwoofer. i Subwoofer (4 W) Ensure that the ground wire is properly connected to follow the directions below. - Ground wire POWER AMP Other devices Metal ... battery and negative grounding only. Never cut the insulation of the power cable of car's body (Another electronic device in .) 4 Rear output or subwoofer output 5 Front output 6 Antenna input 7 Fuse (10 A) 8 Wired remote input Hard-wired remote control adapter can be connected (sold separately), make...
...the hole to the car separately with other device must be sure to metal parts of smoke or malfunction. g Red Connect to a subwoofer. i Subwoofer (4 W) Ensure that the ground wire is properly connected to follow the directions below. - Ground wire POWER AMP Other devices Metal ... battery and negative grounding only. Never cut the insulation of the power cable of car's body (Another electronic device in .) 4 Rear output or subwoofer output 5 Front output 6 Antenna input 7 Fuse (10 A) 8 Wired remote input Hard-wired remote control adapter can be connected (sold separately), make...
Owner's Manual
Page 17
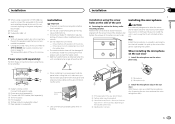
...installed at 3 locations on each side. Note Install the microphone in a position and orientation that will not obstruct driving. k Not used. l Subwoofer (4 W) × 2 Notes ! Power amp (sold separately) Perform these connections when using this unit is extremely dangerous to allow the microphone lead...amp (sold separately) 3 Connect with RCA cables (sold separately) 4 To Front output 5 Front speaker 6 To Rear output or subwoofer output 7 Rear speaker or subwoofer Leave ample space 5 cm 5 cm 5cm ! Position the unit so that are aligned with operation of less than 60°. 60...
...installed at 3 locations on each side. Note Install the microphone in a position and orientation that will not obstruct driving. k Not used. l Subwoofer (4 W) × 2 Notes ! Power amp (sold separately) Perform these connections when using this unit is extremely dangerous to allow the microphone lead...amp (sold separately) 3 Connect with RCA cables (sold separately) 4 To Front output 5 Front speaker 6 To Rear output or subwoofer output 7 Rear speaker or subwoofer Leave ample space 5 cm 5 cm 5cm ! Position the unit so that are aligned with operation of less than 60°. 60...
Owner's Manual
Page 23
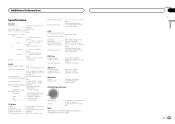
...× 96 mm × 17 mm (6-3/4 in.× 3-3/4 in.× 5/8 in.) Weight 1.2 kg (2.6 lbs) Audio Maximum power output ... 50 W × 4 70 W × 1/2 W (for subwoofer) Continuous power output 22 W × 4 (50 Hz to 15 000 Hz, 5 % THD, 4 W load, both channels driven) Load impedance 4 W (4 W to 8 W allowable) Preout maximum output level...-30 dB) Equalizer (5-Band Graphic Equalizer): Frequency 80 Hz/250 Hz/800 Hz/ 2.5 kHz/8 kHz Equalization range .... ±12 dB (2 dB step) Subwoofer (mono): Frequency 50 Hz/63 Hz/80 Hz/100 Hz/ 125 Hz/160 Hz/200 Hz Slope 6 dB/oct, -12 dB/oct Gain 6 dB ...
...× 96 mm × 17 mm (6-3/4 in.× 3-3/4 in.× 5/8 in.) Weight 1.2 kg (2.6 lbs) Audio Maximum power output ... 50 W × 4 70 W × 1/2 W (for subwoofer) Continuous power output 22 W × 4 (50 Hz to 15 000 Hz, 5 % THD, 4 W load, both channels driven) Load impedance 4 W (4 W to 8 W allowable) Preout maximum output level...-30 dB) Equalizer (5-Band Graphic Equalizer): Frequency 80 Hz/250 Hz/800 Hz/ 2.5 kHz/8 kHz Equalization range .... ±12 dB (2 dB step) Subwoofer (mono): Frequency 50 Hz/63 Hz/80 Hz/100 Hz/ 125 Hz/160 Hz/200 Hz Slope 6 dB/oct, -12 dB/oct Gain 6 dB ...


