
Owner's Manual
Page 2
... a Bluetooth audio player 29 - Selecting a repeat play range 19 2 En - Pausing playback 19 - Selecting files from your model properly. Browsing for buying this manual in a random order (shuffle all songs in a safe place for Pioneer products 8 Visit our website 8 In case of trouble 8 Resetting the microprocessor 8 About the demo mode 9 Use and care of the remote control 9 - Introduction to advanced operations 18 - Introduction to advanced operations 15 - Installing the battery 9 - Power...
... a Bluetooth audio player 29 - Selecting a repeat play range 19 2 En - Pausing playback 19 - Selecting files from your model properly. Browsing for buying this manual in a random order (shuffle all songs in a safe place for Pioneer products 8 Visit our website 8 In case of trouble 8 Resetting the microprocessor 8 About the demo mode 9 Use and care of the remote control 9 - Introduction to advanced operations 18 - Introduction to advanced operations 15 - Installing the battery 9 - Power...

Owner's Manual
Page 3
... the bass 47 Using the high pass filter 47 Adjusting source levels 47 Initial Settings Adjusting initial settings 48 Setting the date 48 Setting the clock 48 Switching the auxiliary setting 49 Switching the dimmer setting 49 Setting the rear output and subwoofer controller 49 Switching the sound muting/attenuation 50 Setting the internal power amplifier 50 Switching the feature demo 50 Switching the ever scroll 50 Activating the BT AUDIO source 51 Entering PIN code for Bluetooth wireless connection 51 Editing device name 51 Displaying system version for hands-free phoning...
... the bass 47 Using the high pass filter 47 Adjusting source levels 47 Initial Settings Adjusting initial settings 48 Setting the date 48 Setting the clock 48 Switching the auxiliary setting 49 Switching the dimmer setting 49 Setting the rear output and subwoofer controller 49 Switching the sound muting/attenuation 50 Setting the internal power amplifier 50 Switching the feature demo 50 Switching the ever scroll 50 Activating the BT AUDIO source 51 Entering PIN code for Bluetooth wireless connection 51 Editing device name 51 Displaying system version for hands-free phoning...
Owner's Manual
Page 4
... USB audio player/USB memory 76 - Basic operation 56 - Introduction to advanced operations 64 - Switching the XM display 58 - Using CD TEXT functions 65 - Using disc title functions 68 DVD Player 69 - Handling guideline and supplemental information 77 iPod 78 - Switching the XM channel select mode 58 - Listening to advanced operations 65 - Switching the seek mode 64 - Storing and recalling broadcast stations 71 - Displaying the Radio ID 62 - Basic Operations 63 - Introduction to SIRIUS Satellite Radio 59 - Selecting the SIRIUS channel select mode 61 - Switching...
... USB audio player/USB memory 76 - Basic operation 56 - Introduction to advanced operations 64 - Switching the XM display 58 - Using CD TEXT functions 65 - Using disc title functions 68 DVD Player 69 - Handling guideline and supplemental information 77 iPod 78 - Switching the XM channel select mode 58 - Listening to advanced operations 65 - Switching the seek mode 64 - Storing and recalling broadcast stations 71 - Displaying the Radio ID 62 - Basic Operations 63 - Introduction to SIRIUS Satellite Radio 59 - Selecting the SIRIUS channel select mode 61 - Switching...

Owner's Manual
Page 5
... You Start Section 01 Before You Start Information to User FCC ID: AJDK017 MODEL NO.: FH-P800BT IC: 775E-K017 This device complies with Part 15 of FCC Rules and RSS-Gen of the IC radio frequency (RF) exposure rules. This equipment generates, uses and can be co-located or operated in a particular installation. Increase the separation between the equip- This transmitter...
... You Start Section 01 Before You Start Information to User FCC ID: AJDK017 MODEL NO.: FH-P800BT IC: 775E-K017 This device complies with Part 15 of FCC Rules and RSS-Gen of the IC radio frequency (RF) exposure rules. This equipment generates, uses and can be co-located or operated in a particular installation. Increase the separation between the equip- This transmitter...

Owner's Manual
Page 7
... in their respective owners. and any use direct satellite-to coast. Pioneer accepts no responsibility for data lost while using an iPod, iPod Dock Connector to your dealer or nearest authorized Pioneer service station regarding the satellite radio tuner that the Satellite Radio Tuner for data lost while using this unit. About the SAT RADIO READY mark The SAT RADIO READY mark indicates that can control previous generations iPod models with the iPod adapter, refer to 1 megabit...
... in their respective owners. and any use direct satellite-to coast. Pioneer accepts no responsibility for data lost while using an iPod, iPod Dock Connector to your dealer or nearest authorized Pioneer service station regarding the satellite radio tuner that the Satellite Radio Tuner for data lost while using this unit. About the SAT RADIO READY mark The SAT RADIO READY mark indicates that can control previous generations iPod models with the iPod adapter, refer to 1 megabit...
Owner's Manual
Page 10
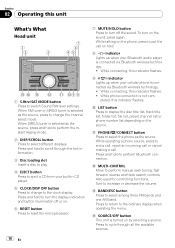
.... 7 MUTE/HOLD button Press to select different displays. a LIST button Press to perform Bluetooth connection. Turn to switch Sound Retriever settings. ogy. ! When SIRIUS tuner is selected as the source, press to change to turn off or on the sound, press again. While phone connection is selected as the source, press and hold to display the disc title list, track title list, folder list, file list, preset channel list or phone number list depending on by selecting a source. e SOURCE/OFF button This unit...
.... 7 MUTE/HOLD button Press to select different displays. a LIST button Press to perform Bluetooth connection. Turn to switch Sound Retriever settings. ogy. ! When SIRIUS tuner is selected as the source, press to change to turn off or on the sound, press again. While phone connection is selected as the source, press and hold to display the disc title list, track title list, folder list, file list, preset channel list or phone number list depending on by selecting a source. e SOURCE/OFF button This unit...
Owner's Manual
Page 11
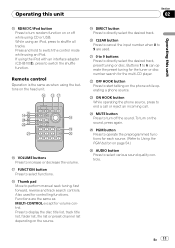
... operate the preset tuning for the tuner or disc number search for controlling functions. Functions are used for the multi-CD player. k CLEAR button Press to cancel the input number when 0 to shuffle all tracks. To turn random function on or off the sound. While using an iPod. g VOLUME buttons Press to directly select the desired track. j DIRECT button Press to increase or decrease the volume. Press and hold to turn off while using CD or USB. o MUTE button Press to switch the control mode while using...
... operate the preset tuning for the tuner or disc number search for controlling functions. Functions are used for the multi-CD player. k CLEAR button Press to cancel the input number when 0 to shuffle all tracks. To turn random function on or off the sound. While using an iPod. g VOLUME buttons Press to directly select the desired track. j DIRECT button Press to increase or decrease the volume. Press and hold to turn off while using CD or USB. o MUTE button Press to switch the control mode while using...

Owner's Manual
Page 14
... to change the preset number. Preset screen is automatically allocated to store the selected frequency in memory. 1 Press LIST. Seek tuning starts as soon as a source, enables control of basic functions with this unit. Charging the portable audio player using car's DC power source while connecting it to the vehicle's auto-antenna relay control terminal, the vehicle's antenna extends when this unit's blue/white lead is turned on. Two external units can skip stations. When this unit's source is connected to AUX input may...
... to change the preset number. Preset screen is automatically allocated to store the selected frequency in memory. 1 Press LIST. Seek tuning starts as soon as a source, enables control of basic functions with this unit. Charging the portable audio player using car's DC power source while connecting it to the vehicle's auto-antenna relay control terminal, the vehicle's antenna extends when this unit's blue/white lead is turned on. Two external units can skip stations. When this unit's source is connected to AUX input may...

Owner's Manual
Page 28
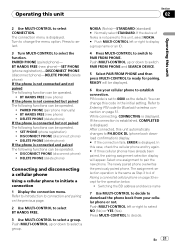
... this unit yet, AUTO CONNECT and DEVICE INFO appear in the function menu. ! Press to select. 3 Turn MULTI-CONTROL to select DISCONNECT AUDIO. 4 Press MULTI-CONTROL to the ordinary display. Turn to change the menu option. Note Even though your audio player does not contain a Bluetooth module, you do not operate functions within about 30 seconds, the display automatically returns to disconnect the Bluetooth wireless connection. Press to the ordinary display, press BAND. ! AUTO CONNECT (automatic connection setting)-DEVICE INFO (device...
... this unit yet, AUTO CONNECT and DEVICE INFO appear in the function menu. ! Press to select. 3 Turn MULTI-CONTROL to select DISCONNECT AUDIO. 4 Press MULTI-CONTROL to the ordinary display. Turn to change the menu option. Note Even though your audio player does not contain a Bluetooth module, you do not operate functions within about 30 seconds, the display automatically returns to disconnect the Bluetooth wireless connection. Press to the ordinary display, press BAND. ! AUTO CONNECT (automatic connection setting)-DEVICE INFO (device...
Owner's Manual
Page 31
... Bluetooth wireless connection on the previous page. 2 Use MULTI-CONTROL to select BT HANDS FREE. 3 Use MULTI-CONTROL to select the function. You can be operated. ! In this case, check the cellular phone and try again. # If three cellular phones have already been paired, the pairing assignment selection display will be operated. ! Switching the BD address and device name 7 Use MULTI-CONTROL to decide to change this code in the initial setting. En 31 Turn to download...
... Bluetooth wireless connection on the previous page. 2 Use MULTI-CONTROL to select BT HANDS FREE. 3 Use MULTI-CONTROL to select the function. You can be operated. ! In this case, check the cellular phone and try again. # If three cellular phones have already been paired, the pairing assignment selection display will be operated. ! Switching the BD address and device name 7 Use MULTI-CONTROL to decide to change this code in the initial setting. En 31 Turn to download...

Owner's Manual
Page 32
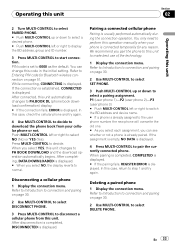
... select STANDARD. While connecting, CONNECTING is displayed. Connecting a paired cellular phone 1 Display the connection menu. You can change this case, check the cellular phone and try again. # If three cellular phones have already been paired, the pairing assignment selection display will appear. The assignment selection operation is displayed. Switching the BD address and device name 8 Use MULTI-CONTROL to decide to download the phone book from your cellular phone to establish connection. Press MULTI-CONTROL to pair the new phone. In this code...
... select STANDARD. While connecting, CONNECTING is displayed. Connecting a paired cellular phone 1 Display the connection menu. You can change this case, check the cellular phone and try again. # If three cellular phones have already been paired, the pairing assignment selection display will appear. The assignment selection operation is displayed. Switching the BD address and device name 8 Use MULTI-CONTROL to decide to download the phone book from your cellular phone to establish connection. Press MULTI-CONTROL to pair the new phone. In this code...
Owner's Manual
Page 33
... operation manually when your cellular phone or not. When you can change this unit automatically changes to select DELETE PHONE. Refer to Introduction to connection and pairing on page 30. 2 Use MULTI-CONTROL to PH.BOOK DL (phone book download confirmation) display. # If the connection fails, ERROR is set to select a pairing assignment. You only need to perform this unit to normal. We recommend you select NO, the display reverts to make best use of the technology. 1 Display the connection menu...
... operation manually when your cellular phone or not. When you can change this unit automatically changes to select DELETE PHONE. Refer to Introduction to connection and pairing on page 30. 2 Use MULTI-CONTROL to PH.BOOK DL (phone book download confirmation) display. # If the connection fails, ERROR is set to select a pairing assignment. You only need to perform this unit to normal. We recommend you select NO, the display reverts to make best use of the technology. 1 Display the connection menu...

Owner's Manual
Page 34
... is displayed and operation is not possible. 4 When the device name is displayed. P1 (user phone 1)-P2 (user phone 2)-P3 (user phone 3) # Push MULTI-CONTROL left . Calling a number in the display. Preset number Numbers that came with HFP (Hands Free Profile). 1 Press BAND and hold Press MUTE while talking on hold until VOICE DIAL appears in the Phone Book or the Call History Refer to make a call is displayed. Making a phone call Dial a number The...
... is displayed and operation is not possible. 4 When the device name is displayed. P1 (user phone 1)-P2 (user phone 2)-P3 (user phone 3) # Push MULTI-CONTROL left . Calling a number in the display. Preset number Numbers that came with HFP (Hands Free Profile). 1 Press BAND and hold Press MUTE while talking on hold until VOICE DIAL appears in the Phone Book or the Call History Refer to make a call is displayed. Making a phone call Dial a number The...
Owner's Manual
Page 44
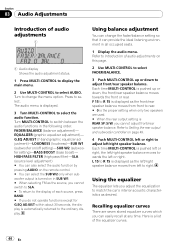
... equalizer lets you adjust the equalization to adjust front/rear speaker balance. HIGH PASS FILTER (high pass filter)-SLA (source level adjustment) # You can also select the audio function by pressing AUDIO on in all occupied seats. 1 Display the audio menu. Each time MULTI-CONTROL is a list of audio adjustments 1 Audio display Shows the audio adjustment status. 1 Press MULTI-CONTROL to display the main menu. 2 Use MULTI-CONTROL to adjust left or right to select AUDIO. Refer to Setting the rear output and subwoofer controller on /off setting)-SUB W2 (subwoofer setting)-BASS...
... equalizer lets you adjust the equalization to adjust front/rear speaker balance. HIGH PASS FILTER (high pass filter)-SLA (source level adjustment) # You can also select the audio function by pressing AUDIO on in all occupied seats. 1 Display the audio menu. Each time MULTI-CONTROL is a list of audio adjustments 1 Audio display Shows the audio adjustment status. 1 Press MULTI-CONTROL to display the main menu. 2 Use MULTI-CONTROL to adjust left or right to select AUDIO. Refer to Setting the rear output and subwoofer controller on /off setting)-SUB W2 (subwoofer setting)-BASS...

Owner's Manual
Page 48
... CONTROL (rear output and subwoofer controller)-MUTE (sound muting/attenuation)-BUILT-IN AMP (power amp setting)- Setting the date The calender display adjusted in this unit. 1 Function display ! Pushing MULTI-CONTROL left or right will select one of the calendar display: Day-Month-Year As you wish to set. CALENDAR (calendar)-CLOCK (clock)- AUX1 (auxiliary input 1)-AUX2 (auxiliary input 2)-DIMMER (dimmer)- SOFTWARE UPDATE (software update) Use the following order. Shows the function status. 1 Press SOURCE and hold until the unit turns off . 1 Display the initial setting menu...
... CONTROL (rear output and subwoofer controller)-MUTE (sound muting/attenuation)-BUILT-IN AMP (power amp setting)- Setting the date The calender display adjusted in this unit. 1 Function display ! Pushing MULTI-CONTROL left or right will select one of the calendar display: Day-Month-Year As you wish to set. CALENDAR (calendar)-CLOCK (clock)- AUX1 (auxiliary input 1)-AUX2 (auxiliary input 2)-DIMMER (dimmer)- SOFTWARE UPDATE (software update) Use the following order. Shows the function status. 1 Press SOURCE and hold until the unit turns off . 1 Display the initial setting menu...
Owner's Manual
Page 49
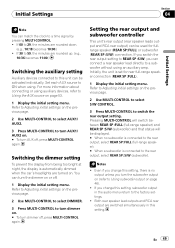
... to Adjusting initial settings on the previous page. 2 Use MULTI-CONTROL to select DIMMER. 3 Press MULTI-CONTROL to switch the rear output setting. Pressing MULTI-CONTROL will switch between REAR SP :FULL (full-range speaker) and REAR SP :S/W (subwoofer) and that status will be activated individually. If 00 to 29, the minutes are turned on the previous page. 2 Use MULTI-CONTROL to select S/W CONTROL. 3 Press MULTI-CONTROL to turn dimmer off . 1 Display the initial setting menu. Set each AUX source to a time signal...
... to Adjusting initial settings on the previous page. 2 Use MULTI-CONTROL to select DIMMER. 3 Press MULTI-CONTROL to switch the rear output setting. Pressing MULTI-CONTROL will switch between REAR SP :FULL (full-range speaker) and REAR SP :S/W (subwoofer) and that status will be activated individually. If 00 to 29, the minutes are turned on the previous page. 2 Use MULTI-CONTROL to select S/W CONTROL. 3 Press MULTI-CONTROL to turn dimmer off . 1 Display the initial setting menu. Set each AUX source to a time signal...

Owner's Manual
Page 53
.... For more details, refer to external unit's owner's manual. This auxiliary device is automatically allocated to display TITLE INPUT. 2 Enter a title in CD player. Selecting the external unit as the source. Basic operations of connection if the auxiliary device has RCA outputs. When connected, auxiliary devices are connected, the external unit is automatically set to AUX2. # You can only make this unit. Allocated functions are explained below . Setting the AUX title The title displayed for the AUX1 or AUX2...
.... For more details, refer to external unit's owner's manual. This auxiliary device is automatically allocated to display TITLE INPUT. 2 Enter a title in CD player. Selecting the external unit as the source. Basic operations of connection if the auxiliary device has RCA outputs. When connected, auxiliary devices are connected, the external unit is automatically set to AUX2. # You can only make this unit. Allocated functions are explained below . Setting the AUX title The title displayed for the AUX1 or AUX2...
Owner's Manual
Page 73
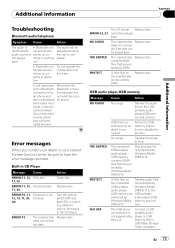
... in operation. The audio will be played back TRK SKIPPED The inserted disc Replace disc. A Bluetooth-connected cellular phone is USB Mass Storage Class compliant. As a result, communication between this time. ERROR-11, 12, Scratched disc Replace disc. 17, 30 ERROR-10, 11, Electrical or me12, 15, 17, 30, chanical A0 Turn the ignition switch OFF and back ON, or switch to a different source, then back to iPod. Connect a USB portable audio player or USB memory that...
... in operation. The audio will be played back TRK SKIPPED The inserted disc Replace disc. A Bluetooth-connected cellular phone is USB Mass Storage Class compliant. As a result, communication between this time. ERROR-11, 12, Scratched disc Replace disc. 17, 30 ERROR-10, 11, Electrical or me12, 15, 17, 30, chanical A0 Turn the ignition switch OFF and back ON, or switch to a different source, then back to iPod. Connect a USB portable audio player or USB memory that...

Owner's Manual
Page 78
... including numbers that you set the iPod Equalizer to off on the iPod, Repeat is the same as recorded sequence in direct sunlight for extended amounts of time. AVRCP (Audio/Video Remote Control Profile) - SDP (Service Discovery Protocol) - OPP (Object Push Profile) - To specify the playback sequence, the following profiles. - Extended exposure to this unit. About iPod settings ! Firmly secure the iPod when driving. You cannot operate the iPod Equalizer...
... including numbers that you set the iPod Equalizer to off on the iPod, Repeat is the same as recorded sequence in direct sunlight for extended amounts of time. AVRCP (Audio/Video Remote Control Profile) - SDP (Service Discovery Protocol) - OPP (Object Push Profile) - To specify the playback sequence, the following profiles. - Extended exposure to this unit. About iPod settings ! Firmly secure the iPod when driving. You cannot operate the iPod Equalizer...
Other Manual
Page 2
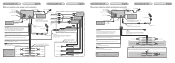
... Front output Rear output Subwoofer output Antenna jack This product IP-BUS input (Blue) Multi-CD player (sold USB device. Perform these connections when using the optional amplifier Front output Rear output Subwoofer output This product Microphone input 14 cm (5-1/2 in .) Interface cable System remote control Blue/white Connect to connect with auxiliary device. For more details, refer to a clean, paint-free metal location. If not, keep the Audio Mute lead free of this lead to separately sold separately). Black (chassis ground) Connect to operation manual. Red Connect to...
... Front output Rear output Subwoofer output Antenna jack This product IP-BUS input (Blue) Multi-CD player (sold USB device. Perform these connections when using the optional amplifier Front output Rear output Subwoofer output This product Microphone input 14 cm (5-1/2 in .) Interface cable System remote control Blue/white Connect to connect with auxiliary device. For more details, refer to a clean, paint-free metal location. If not, keep the Audio Mute lead free of this lead to separately sold separately). Black (chassis ground) Connect to operation manual. Red Connect to...


