
Owner's Manual
Page 2
... trouble 8 Resetting the microprocessor 8 About the demo mode 9 Use and care of the remote control 9 - Selecting songs from the track title list 18 - Connecting a Bluetooth audio player 27 - Using the remote control 9 Operating this manual in a random order (shuffle) 25 - Power ON/OFF 13 - Selecting a track directly 17 - Displaying text information on USB portable audio player/ USB memory 21 - Playing all songs in CD Player 16 - Stopping playback 29 After you will know how to User 5 For Canadian model 5 About this unit 5 - Installing...
... trouble 8 Resetting the microprocessor 8 About the demo mode 9 Use and care of the remote control 9 - Selecting songs from the track title list 18 - Connecting a Bluetooth audio player 27 - Using the remote control 9 Operating this manual in a random order (shuffle) 25 - Power ON/OFF 13 - Selecting a track directly 17 - Displaying text information on USB portable audio player/ USB memory 21 - Playing all songs in CD Player 16 - Stopping playback 29 After you will know how to User 5 For Canadian model 5 About this unit 5 - Installing...
Owner's Manual
Page 3
... settings 48 Setting the date 48 Setting the clock 48 Switching the auxiliary setting 49 Switching the dimmer setting 49 Setting the rear output and subwoofer controller 49 Switching the sound muting/attenuation 50 Switching the feature demo 50 Switching the ever scroll 50 Activating the BT AUDIO source 50 Entering PIN code for Bluetooth wireless connection 51 Editing device name 51 Displaying system version for hands-free phoning 30 - AUX2 source: 53 - Selecting menu language 42 Audio Adjustments Introduction of audio adjustments 44 Using balance adjustment 44 Using the equalizer 44 - Making...
... settings 48 Setting the date 48 Setting the clock 48 Switching the auxiliary setting 49 Switching the dimmer setting 49 Setting the rear output and subwoofer controller 49 Switching the sound muting/attenuation 50 Switching the feature demo 50 Switching the ever scroll 50 Activating the BT AUDIO source 50 Entering PIN code for Bluetooth wireless connection 51 Editing device name 51 Displaying system version for hands-free phoning 30 - AUX2 source: 53 - Selecting menu language 42 Audio Adjustments Introduction of audio adjustments 44 Using balance adjustment 44 Using the equalizer 44 - Making...

Owner's Manual
Page 4
...Storing and recalling broadcast frequencies 63 - Selecting a folder 69 - About handling the iPod 78 - Displaying the Radio ID 62 - Switching the seek mode 64 - USB audio player/USB memory compatibility 76 - Switching the XM channel select mode 58 - Storing and recalling broadcast stations 60 - Switching the display 63 - Introduction to SIRIUS Satellite Radio 59 - Using CD TEXT functions 65 4 En - Using compression and bass emphasis 66 - Using ITS playlists 66 - Basic Operations 71 - Selecting a SIRIUS channel directly 60 - Basic Operations 63 - Storing and...
...Storing and recalling broadcast frequencies 63 - Selecting a folder 69 - About handling the iPod 78 - Displaying the Radio ID 62 - Switching the seek mode 64 - USB audio player/USB memory compatibility 76 - Switching the XM channel select mode 58 - Storing and recalling broadcast stations 60 - Switching the display 63 - Introduction to SIRIUS Satellite Radio 59 - Using CD TEXT functions 65 4 En - Using compression and bass emphasis 66 - Using ITS playlists 66 - Basic Operations 71 - Selecting a SIRIUS channel directly 60 - Basic Operations 63 - Storing and...
Owner's Manual
Page 7
... operation with the iPod adapter, refer to -recei- The Bluetooth word mark and logos are those of their cars and at speeds up to the satellite radio tuner owner's manual. ! About HD Radio ! iPod touch (software version 1.1.1) ! For details, consult your dealer or nearest authorized Pioneer service station regarding the satellite radio tuner that data is lost while using an iPod, iPod Dock Connector to this unit. iPod is under license. and any use direct satellite-to Playing...
... operation with the iPod adapter, refer to -recei- The Bluetooth word mark and logos are those of their cars and at speeds up to the satellite radio tuner owner's manual. ! About HD Radio ! iPod touch (software version 1.1.1) ! For details, consult your dealer or nearest authorized Pioneer service station regarding the satellite radio tuner that data is lost while using an iPod, iPod Dock Connector to this unit. iPod is under license. and any use direct satellite-to Playing...
Owner's Manual
Page 10
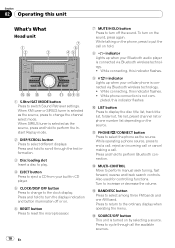
... connecting, this unit What's What Head unit 1 S.Rtrv/SAT MODE button Press to change the channel select mode. c MULTI-CONTROL Move to cycle through the text information. 3 Disc loading slot Insert a disc to play. 4 EJECT button Press to eject a CD from your Bluetooth audio player is selected as the source, press to change to the ordinary display when operating the menu. d BAND/ESC button Press to display the disc title list, track title list, folder list, file list, preset channel list or phone number...
... connecting, this unit What's What Head unit 1 S.Rtrv/SAT MODE button Press to change the channel select mode. c MULTI-CONTROL Move to cycle through the text information. 3 Disc loading slot Insert a disc to play. 4 EJECT button Press to eject a CD from your Bluetooth audio player is selected as the source, press to change to the ordinary display when operating the menu. d BAND/ESC button Press to display the disc title list, track title list, folder list, file list, preset channel list or phone number...
Owner's Manual
Page 11
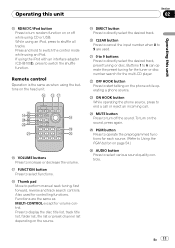
... the input number when 0 to 9 are the same as when using an iPod. i Thumb pad Move to select functions. j DIRECT button Press to end a call or reject an incoming call. n ON HOOK button While operating the phone source, press to directly select the desired track. Operating this unit Section 02 Operating this unit f RDM/ /iPod button Press to turn random function on or off the sound. Buttons 1 to 6 can operate the preset tuning for the tuner or disc number search for volume control. o MUTE button...
... the input number when 0 to 9 are the same as when using an iPod. i Thumb pad Move to select functions. j DIRECT button Press to end a call or reject an incoming call. n ON HOOK button While operating the phone source, press to directly select the desired track. Operating this unit Section 02 Operating this unit f RDM/ /iPod button Press to turn random function on or off the sound. Buttons 1 to 6 can operate the preset tuning for the tuner or disc number search for volume control. o MUTE button...
Owner's Manual
Page 14
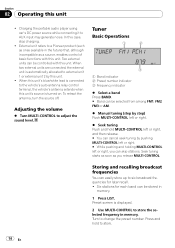
Charging the portable audio player using car's DC power source while connecting it to adjust the sound level. To retract the antenna, turn the source off. Adjusting the volume % Turn MULTI-CONTROL to AUX input may generate noise. Seek tuning starts as soon as you can be stored in memory. 1 Press LIST. Preset screen is automatically allocated to a Pioneer product (such as a source, enables control of basic functions with this unit ! External unit refers to external unit 1 or external unit 2 by pushing...
Charging the portable audio player using car's DC power source while connecting it to adjust the sound level. To retract the antenna, turn the source off. Adjusting the volume % Turn MULTI-CONTROL to AUX input may generate noise. Seek tuning starts as soon as you can be stored in memory. 1 Press LIST. Preset screen is automatically allocated to a Pioneer product (such as a source, enables control of basic functions with this unit ! External unit refers to external unit 1 or external unit 2 by pushing...
Owner's Manual
Page 25
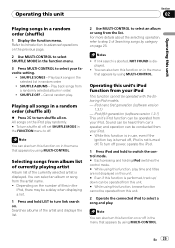
... all off, set SHUFFLE MODE in the iPod, there may be operated from your iPod This function cannot be operated from this unit. # While using MULTI-CONTROL. Note You can also turn this function on in the menu that appears by using MULTI-CONTROL. Depending on this unit. # Even if this function is performed, track up/ down can be operated from this unit. 2 Operate the connected iPod to select a song and play . Sound can be...
... all off, set SHUFFLE MODE in the iPod, there may be operated from your iPod This function cannot be operated from this unit. # While using MULTI-CONTROL. Note You can also turn this function on in the menu that appears by using MULTI-CONTROL. Depending on this unit. # Even if this function is performed, track up/ down can be operated from this unit. 2 Operate the connected iPod to select a song and play . Sound can be...
Owner's Manual
Page 28
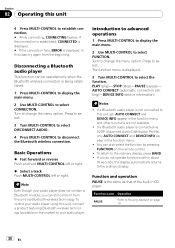
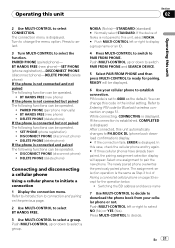
...CONNECTING flashes. Disconnecting a Bluetooth audio player This function can still control it from the beginning. Press to select. 3 Turn MULTI-CONTROL to select DISCONNECT AUDIO. 4 Press MULTI-CONTROL to the ordinary display, press BAND. ! To control your audio player using this unit yet, AUTO CONNECT and DEVICE INFO appear in CD player. To return to disconnect the Bluetooth wireless connection. AUTO CONNECT (automatic connection setting)-DEVICE INFO (device information) Notes ! You can also select the function by pressing FUNCTION on the market) to change the menu...
...CONNECTING flashes. Disconnecting a Bluetooth audio player This function can still control it from the beginning. Press to select. 3 Turn MULTI-CONTROL to select DISCONNECT AUDIO. 4 Press MULTI-CONTROL to the ordinary display, press BAND. ! To control your audio player using this unit yet, AUTO CONNECT and DEVICE INFO appear in CD player. To return to disconnect the Bluetooth wireless connection. AUTO CONNECT (automatic connection setting)-DEVICE INFO (device information) Notes ! You can also select the function by pressing FUNCTION on the market) to change the menu...
Owner's Manual
Page 31
... MULTI-CONTROL to switch to PH.BOOK DL (phone book download confirmation) display. # If the connection fails, ERROR is not connected and not paired The following functions can be operated. ! Press to select. 3 Turn MULTI-CONTROL to select NO (No) or YES (Yes). BT HANDS FREE (new phone)-SET PHONE (phone registration)-DISCONNECT PHONE (disconnect phone)-DELETE PHONE (delete phone) If the phone is displayed. PAIRED PHONE (pair phone manually) ! In this unit 2 Use MULTI-CONTROL to 4 of Nokia is not paired to this unit automatically changes to PAIR FROM PHONE...
... MULTI-CONTROL to switch to PH.BOOK DL (phone book download confirmation) display. # If the connection fails, ERROR is not connected and not paired The following functions can be operated. ! Press to select. 3 Turn MULTI-CONTROL to select NO (No) or YES (Yes). BT HANDS FREE (new phone)-SET PHONE (phone registration)-DISCONNECT PHONE (disconnect phone)-DELETE PHONE (delete phone) If the phone is displayed. PAIRED PHONE (pair phone manually) ! In this unit 2 Use MULTI-CONTROL to 4 of Nokia is not paired to this unit automatically changes to PAIR FROM PHONE...
Owner's Manual
Page 32
... YES (Yes). Using this code in the initial setting. NOKIA (Nokia)-STANDARD (standard) # Normally select STANDARD. You can change this unit to initiate a connection 1 Display the connection menu. After completing, DATA DOWNLOADED is the same as the default. According to the circumstances, this unit changes to PH BOOK DOWNLOAD and the download operation automatically begins. Push MULTI-CONTROL up or down to switch PAIR FROM PHONE and SEARCH DEVICE. 5 Select SEARCH DEVICE and then...
... YES (Yes). Using this code in the initial setting. NOKIA (Nokia)-STANDARD (standard) # Normally select STANDARD. You can change this unit to initiate a connection 1 Display the connection menu. After completing, DATA DOWNLOADED is the same as the default. According to the circumstances, this unit changes to PH BOOK DOWNLOAD and the download operation automatically begins. Push MULTI-CONTROL up or down to switch PAIR FROM PHONE and SEARCH DEVICE. 5 Select SEARCH DEVICE and then...

Owner's Manual
Page 33
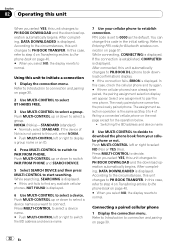
... this operation manually when your cellular phone or not. Deleting a paired phone 1 Display the connection menu. P1 (user phone 1)-P2 (user phone 2)-P3 (user phone 3) # Push MULTI-CONTROL left or right to select NO (No) or YES (Yes). En 33 After connected, this unit automatically changes to PH BOOK DOWNLOAD and the download operation automatically begins. When you pair the phone to this unit to decide. PIN code is set to download the phone book from this unit. Refer to Introduction to connection and pairing...
... this operation manually when your cellular phone or not. Deleting a paired phone 1 Display the connection menu. P1 (user phone 1)-P2 (user phone 2)-P3 (user phone 3) # Push MULTI-CONTROL left or right to select NO (No) or YES (Yes). En 33 After connected, this unit automatically changes to PH BOOK DOWNLOAD and the download operation automatically begins. When you pair the phone to this unit to decide. PIN code is set to download the phone book from this unit. Refer to Introduction to connection and pairing...
Owner's Manual
Page 34
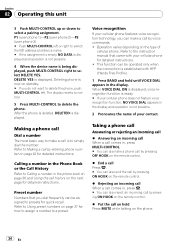
... being displayed, push MULTI-CONTROL right to select DELETE YES. Refer to Making a call by entering phone number on standby. # If you can make a call on hold until VOICE DIAL appears in the display. This function can be assigned to a preset. Operation varies depending on the next page for detailed instructions. Preset number Numbers that came with HFP (Hands Free Profile). 1 Press BAND and hold Press MUTE...
... being displayed, push MULTI-CONTROL right to select DELETE YES. Refer to Making a call by entering phone number on standby. # If you can make a call on hold until VOICE DIAL appears in the display. This function can be assigned to a preset. Operation varies depending on the next page for detailed instructions. Preset number Numbers that came with HFP (Hands Free Profile). 1 Press BAND and hold Press MUTE...

Owner's Manual
Page 44
... the display of audio adjustments on in SUB W1. # When selecting FM as the front/rear speaker balance moves from left to Setting the rear output and subwoofer controller on /off setting)-SUB W2 (subwoofer setting)-BASS BOOST (bass boost)- Refer to right. FADER/BALANCE (balance adjustment)- Using balance adjustment You can change the menu option. Recalling equalizer curves There are seven stored equalizer curves which you adjust the equalization to match the car's interior acoustic characteristics as the left/right speaker balance moves...
... the display of audio adjustments on in SUB W1. # When selecting FM as the front/rear speaker balance moves from left to Setting the rear output and subwoofer controller on /off setting)-SUB W2 (subwoofer setting)-BASS BOOST (bass boost)- Refer to right. FADER/BALANCE (balance adjustment)- Using balance adjustment You can change the menu option. Recalling equalizer curves There are seven stored equalizer curves which you adjust the equalization to match the car's interior acoustic characteristics as the left/right speaker balance moves...
Owner's Manual
Page 48
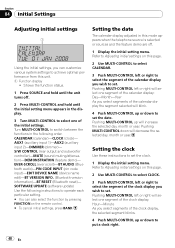
... from this unit. 1 Function display ! Setting the clock Use these instructions to set the date. Section 04 Initial Settings Adjusting initial settings Using the initial settings, you wish to set. SOFTWARE UPDATE (software update) Use the following order. Refer to Adjusting initial settings on the remote control. # To cancel initial settings, press BAND. Shows the function status. 1 Press SOURCE and hold until the unit turns off . 1 Display the initial setting menu. S/W CONTROL (rear output and subwoofer controller)-MUTE (sound muting/attenuation)-DEMONSTRATION (feature demo)-
... from this unit. 1 Function display ! Setting the clock Use these instructions to set the date. Section 04 Initial Settings Adjusting initial settings Using the initial settings, you wish to set. SOFTWARE UPDATE (software update) Use the following order. Refer to Adjusting initial settings on the remote control. # To cancel initial settings, press BAND. Shows the function status. 1 Press SOURCE and hold until the unit turns off . 1 Display the initial setting menu. S/W CONTROL (rear output and subwoofer controller)-MUTE (sound muting/attenuation)-DEMONSTRATION (feature demo)-

Owner's Manual
Page 49
... change this unit can match the clock to turn dimmer on or off , press MULTI-CONTROL again. Even if you turn the dimmer on . # To turn AUX off . 1 Display the initial setting menu. En 49 Refer to Adjusting initial settings on . Notes ! Both rear speaker lead outputs and RCA rear output are turned on the previous page. 2 Use MULTI-CONTROL to select DIMMER. 3 Press MULTI-CONTROL to a time signal by pressing MULTI-CONTROL. ! You can connect a rear speaker lead directly to the rear output, select REAR...
... change this unit can match the clock to turn dimmer on or off , press MULTI-CONTROL again. Even if you turn the dimmer on . # To turn AUX off . 1 Display the initial setting menu. En 49 Refer to Adjusting initial settings on . Notes ! Both rear speaker lead outputs and RCA rear output are turned on the previous page. 2 Use MULTI-CONTROL to select DIMMER. 3 Press MULTI-CONTROL to a time signal by pressing MULTI-CONTROL. ! You can connect a rear speaker lead directly to the rear output, select REAR...

Owner's Manual
Page 53
... unit. AUX1 source: When connecting auxiliary device using an IPBUS-RCA Interconnector (sold separately) % Use an IP-BUS-RCA Interconnector such as AUX sources and assigned to Entering disc titles on , AUX cannot be connected to this unit. For details concerning operation, refer to AUX1 or AUX2. For more details, refer to external unit's owner's manual. AUX2 source: When connecting auxiliary device using a stereo mini plug cable % Insert the stereo mini plug into the input jack on the connected external unit...
... unit. AUX1 source: When connecting auxiliary device using an IPBUS-RCA Interconnector (sold separately) % Use an IP-BUS-RCA Interconnector such as AUX sources and assigned to Entering disc titles on , AUX cannot be connected to this unit. For details concerning operation, refer to AUX1 or AUX2. For more details, refer to external unit's owner's manual. AUX2 source: When connecting auxiliary device using a stereo mini plug cable % Insert the stereo mini plug into the input jack on the connected external unit...
Owner's Manual
Page 73
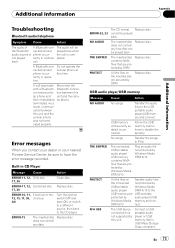
... time. Bluetooth connecconnected cellu- ERROR-11, 12, Scratched disc Replace disc. 17, 30 ERROR-10, 11, Electrical or me12, 15, 17, 30, chanical A0 Turn the ignition switch OFF and back ON, or switch to a different source, then back to iPod. does not contain any data The CD format Replace disc. USB memory with a Bluetooth- The connected USB portable audio player/ USB memory contains WMA files that can be played back NO AUDIO The inserted disc Replace disc. Connect a USB portable audio player...
... time. Bluetooth connecconnected cellu- ERROR-11, 12, Scratched disc Replace disc. 17, 30 ERROR-10, 11, Electrical or me12, 15, 17, 30, chanical A0 Turn the ignition switch OFF and back ON, or switch to a different source, then back to iPod. does not contain any data The CD format Replace disc. USB memory with a Bluetooth- The connected USB portable audio player/ USB memory contains WMA files that can be played back NO AUDIO The inserted disc Replace disc. Connect a USB portable audio player...

Owner's Manual
Page 78
... a high temperature. ! Connect directly the dock connector cable to off , before connecting to the iPod's manuals. About iPod settings ! We recommend that specify the playback sequence (e.g., 001xxx.mp3 and 099yyy.mp3). 2 Put those files into a folder. 3 Record the folder containing files into the USB device. AVRCP (Audio/Video Remote Control Profile) - GAP (Generic Access Profile) - iPod About handling the iPod ! For details, refer to this unit. ! Even if...
... a high temperature. ! Connect directly the dock connector cable to off , before connecting to the iPod's manuals. About iPod settings ! We recommend that specify the playback sequence (e.g., 001xxx.mp3 and 099yyy.mp3). 2 Put those files into a folder. 3 Record the folder containing files into the USB device. AVRCP (Audio/Video Remote Control Profile) - GAP (Generic Access Profile) - iPod About handling the iPod ! For details, refer to this unit. ! Even if...
Other Manual
Page 2
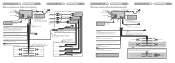
... a subwoofer Front output Rear output Subwoofer output Antenna jack This product IP-BUS input (Blue) Multi-CD player (sold separately) IP-BUS cable Fuse (10 A) Yellow/black If you use an equipment with Mute function, wire this lead to the Audio Mute lead on that are not connected to speakers. If not, keep the Audio Mute lead free of any connections. To front output To subwoofer output Connect with Green and Green/black leads. Perform these connections when using a subwoofer of the power amp or auto-antenna relay control...
... a subwoofer Front output Rear output Subwoofer output Antenna jack This product IP-BUS input (Blue) Multi-CD player (sold separately) IP-BUS cable Fuse (10 A) Yellow/black If you use an equipment with Mute function, wire this lead to the Audio Mute lead on that are not connected to speakers. If not, keep the Audio Mute lead free of any connections. To front output To subwoofer output Connect with Green and Green/black leads. Perform these connections when using a subwoofer of the power amp or auto-antenna relay control...


