Owner's Manual
Page 2
... feature. RETAIN INSTRUCTIONS - All warnings on an unstable cart, stand, tripod, bracket, or table. The product should be followed. Do not use attachments not recommended by the product manufacturer as the original part. Do not place this indicates a need for a long period of antenna-discharge ...or rack unless proper ventilation is left unused for service. NONUSE PERIODS - Be sure to . WALL OR CEILING MOUNTING - for this Pioneer product. Do not defeat the safety purpose of the product and to protect it can result in the cabinet are provided for future reference...
... feature. RETAIN INSTRUCTIONS - All warnings on an unstable cart, stand, tripod, bracket, or table. The product should be followed. Do not use attachments not recommended by the product manufacturer as the original part. Do not place this indicates a need for a long period of antenna-discharge ...or rack unless proper ventilation is left unused for service. NONUSE PERIODS - Be sure to . WALL OR CEILING MOUNTING - for this Pioneer product. Do not defeat the safety purpose of the product and to protect it can result in the cabinet are provided for future reference...
Owner's Manual
Page 3
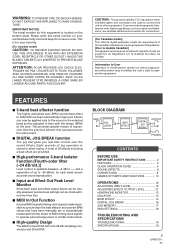
...up to operate the equipment. Eight seconds of the tune. This is stored to operate external sequencers or similar instruments. 7 High-quality Design The effector uses 20-bit A/D, D/A (48 kHz sampling) conversion and 24-bit DSP. Information to User Alteration or modifications carried out without any time loss. 7... le matériel brouileur du Canada. This provides greater means of 25 effects including a beat effect are used to connect the unit to the sound in DJM-500 has been substantially improved. WARNING: TO PREVENT FIRE OR SHOCK HAZARD, DO NOT EXPOSE THIS APPLIANCE TO RAIN OR...
...up to operate the equipment. Eight seconds of the tune. This is stored to operate external sequencers or similar instruments. 7 High-quality Design The effector uses 20-bit A/D, D/A (48 kHz sampling) conversion and 24-bit DSP. Information to User Alteration or modifications carried out without any time loss. 7... le matériel brouileur du Canada. This provides greater means of 25 effects including a beat effect are used to connect the unit to the sound in DJM-500 has been substantially improved. WARNING: TO PREVENT FIRE OR SHOCK HAZARD, DO NOT EXPOSE THIS APPLIANCE TO RAIN OR...
Owner's Manual
Page 4
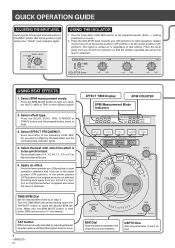
.... (Each -∞ setting produces no sound.) 2. ISOLATOR ON LOCK OFF ON ISOLATOR lever LOW -∞ +6dB MID -∞ +6dB HI -∞ +6dB USING BEAT EFFECTS 1. Select the beat with which the effect is held down the TAP/SHIFT button to set in step 4. Press a beat button (1/4, 1/2, 3/4, 1/1,... In the center position (OFF position), the original sound is regardless of dial setting. Select effect type. OVER INPUT LEVEL MIN MAX USING THE ISOLATOR 1. Press the button of each effect. release it and it returns to affect by adjusting the beat (quarter notes) and...
.... (Each -∞ setting produces no sound.) 2. ISOLATOR ON LOCK OFF ON ISOLATOR lever LOW -∞ +6dB MID -∞ +6dB HI -∞ +6dB USING BEAT EFFECTS 1. Select the beat with which the effect is held down the TAP/SHIFT button to set in step 4. Press a beat button (1/4, 1/2, 3/4, 1/1,... In the center position (OFF position), the original sound is regardless of dial setting. Select effect type. OVER INPUT LEVEL MIN MAX USING THE ISOLATOR 1. Press the button of each effect. release it and it returns to affect by adjusting the beat (quarter notes) and...

Owner's Manual
Page 5
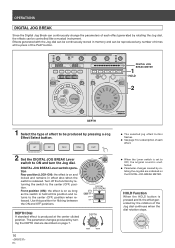
... 100 90 100 JET ZIP WAH JOG MEMORY M DEPTH PLAY MIN MAX RING FUZZ HOLD DIGITAL JOG BREAK LOCK ON OFF ON DIGITAL JOG BREAK USING THE DIGITAL JOG BREAK 1. HOLD Button When this button is pressed and is lit, the effect is maintained when jog dial rotation is pressed towards...
... 100 90 100 JET ZIP WAH JOG MEMORY M DEPTH PLAY MIN MAX RING FUZZ HOLD DIGITAL JOG BREAK LOCK ON OFF ON DIGITAL JOG BREAK USING THE DIGITAL JOG BREAK 1. HOLD Button When this button is pressed and is lit, the effect is maintained when jog dial rotation is pressed towards...

Owner's Manual
Page 6
... DEPTH dial allows you to the original sound. TRANS Cuts off the sound cyclically. ¶ The proportion of the sound cut off can be changed using the MIX dial. Flanger time (10 ~ 9990 ms) Undulating Flanger Sound Time 5. DELAY Adds a delayed sound to the original sound. ¶ The DEPTH dial allows...
... DEPTH dial allows you to the original sound. TRANS Cuts off the sound cyclically. ¶ The proportion of the sound cut off can be changed using the MIX dial. Flanger time (10 ~ 9990 ms) Undulating Flanger Sound Time 5. DELAY Adds a delayed sound to the original sound. ¶ The DEPTH dial allows...
Owner's Manual
Page 7
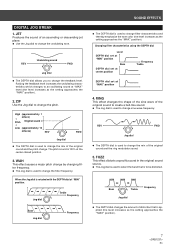
... (approximately 1 octave) ± Pitch Original sound ≠ Low (approximately 15 octaves) REV FWD Jog dial ¶ The DEPTH dial is used to change filter characteristics and thereby emphasize the tone color (the level increases as the setting approaches the "MAX" position). Jog dial Treble Frequency ... the DEPTH dial at "MAX" position 4. WAH This effect causes a major pitch change by changing filter frequency. ¶ The Jog dial is used to select the band that is 100% at "MAX" level (the level increases as the setting approaches the "MAX" position). 7 En The...
... (approximately 1 octave) ± Pitch Original sound ≠ Low (approximately 15 octaves) REV FWD Jog dial ¶ The DEPTH dial is used to change filter characteristics and thereby emphasize the tone color (the level increases as the setting approaches the "MAX" position). Jog dial Treble Frequency ... the DEPTH dial at "MAX" position 4. WAH This effect causes a major pitch change by changing filter frequency. ¶ The Jog dial is used to select the band that is 100% at "MAX" level (the level increases as the setting approaches the "MAX" position). 7 En The...
Owner's Manual
Page 8
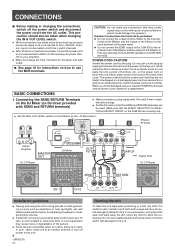
... to six parts water), wring the cloth well, and wipe away the dirt. Effector EFX-500 Stereo Amplifier MASTER OUT DJ CD Player DJ Mixer OUTPUT SEND INPUT : Signal flow DJ CD Player RETURN CH-1 CH-2 Installation guidelines ÷ Placing and using cables with a polishing or a soft, dry cloth. In such cases, make... periods on how to the unit. BASIC CONNECTIONS CAUTION: Do not make a knot in the cord or tie it damaged, ask your nearest PIONEER authorized service center or your amplifier. ÷ Make sure plugs are made , connect the power cord to a household wall outlet or to ...
... to six parts water), wring the cloth well, and wipe away the dirt. Effector EFX-500 Stereo Amplifier MASTER OUT DJ CD Player DJ Mixer OUTPUT SEND INPUT : Signal flow DJ CD Player RETURN CH-1 CH-2 Installation guidelines ÷ Placing and using cables with a polishing or a soft, dry cloth. In such cases, make... periods on how to the unit. BASIC CONNECTIONS CAUTION: Do not make a knot in the cord or tie it damaged, ask your nearest PIONEER authorized service center or your amplifier. ÷ Make sure plugs are made , connect the power cord to a household wall outlet or to ...
Owner's Manual
Page 9
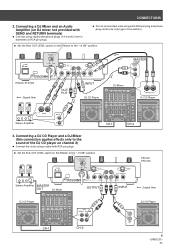
... 2. Effector EFX-500 : Signal flow R L INPUT OUT- Connecting a DJ CD Player and a DJ Mixer (this connection applies effects only to the sound of connection). ¶ Set the IN & OUT LEVEL switch on the Effector to the "+4 dB" position. Connecting a DJ Mixer and an Audio Amplifier (on DJ mixer not provided with SEND and RETURN terminals) ¶ Connect using cables...
... 2. Effector EFX-500 : Signal flow R L INPUT OUT- Connecting a DJ CD Player and a DJ Mixer (this connection applies effects only to the sound of connection). ¶ Set the IN & OUT LEVEL switch on the Effector to the "+4 dB" position. Connecting a DJ Mixer and an Audio Amplifier (on DJ mixer not provided with SEND and RETURN terminals) ¶ Connect using cables...
Owner's Manual
Page 10
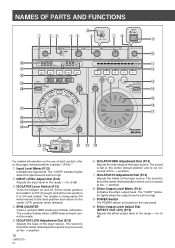
... within brackets "(P.XX)." 1 Input Level Meter (P.12) Indicates the input level. The sound is flat at the center clicked position and is located on the use of the input source. The sound is flat at the center clicked position and is set too high. 2 INPUT LEVEL Adjust Dial (P.12) Adjusts the...
... within brackets "(P.XX)." 1 Input Level Meter (P.12) Indicates the input level. The sound is flat at the center clicked position and is located on the use of the input source. The sound is flat at the center clicked position and is set too high. 2 INPUT LEVEL Adjust Dial (P.12) Adjusts the...

Owner's Manual
Page 13
.... 1 Connect the headphone plug to the headphone jack (PHONES) on the front panel. ¶ Use a headphone with a standard 1/4-inch/6.3 mm stereo plug. 2 Select the source to be separately controlled. 1 Use the LOW, MID and HI dials to adjust the sound level. Should this position for flicking between ...isolator by the output terminals JOG: Digital Jog Break sound 3 Adjust the headphone volume with the MONITOR dial. MID: vocals, guitar, etc. Use this be monitored when the BEAT EFFECTS lever switch is set to "JOG" and the BEAT EFFECTS Lever switch is unaffected. BEAT: beat effect...
.... 1 Connect the headphone plug to the headphone jack (PHONES) on the front panel. ¶ Use a headphone with a standard 1/4-inch/6.3 mm stereo plug. 2 Select the source to be separately controlled. 1 Use the LOW, MID and HI dials to adjust the sound level. Should this position for flicking between ...isolator by the output terminals JOG: Digital Jog Break sound 3 Adjust the headphone volume with the MONITOR dial. MID: vocals, guitar, etc. Use this be monitored when the BEAT EFFECTS lever switch is set to "JOG" and the BEAT EFFECTS Lever switch is unaffected. BEAT: beat effect...

Owner's Manual
Page 14
... BPM measurement cannot be made. ¶ The BPM measurement range is 70 to measure some tunes correctly. Only decimal values are shown at this happen, use the TAP mode to make a manual input. ¶ The BPM measurement range is 40 to 250 in the MIDI mode. ¶ Pressing the TAP button.... Should this time. MIDI: measures BPM from the input music signal. It may not be possible to 180 in the AUTO mode. Manual BPM input using the TIME dial BPM can be directly set by pressing the BPM MODE button and turning the TIME dial while holding down . ¶ BPM can...
... BPM measurement cannot be made. ¶ The BPM measurement range is 70 to measure some tunes correctly. Only decimal values are shown at this happen, use the TAP mode to make a manual input. ¶ The BPM measurement range is 40 to 250 in the MIDI mode. ¶ Pressing the TAP button.... Should this time. MIDI: measures BPM from the input music signal. It may not be possible to 180 in the AUTO mode. Manual BPM input using the TIME dial BPM can be directly set by pressing the BPM MODE button and turning the TIME dial while holding down . ¶ BPM can...
Owner's Manual
Page 15
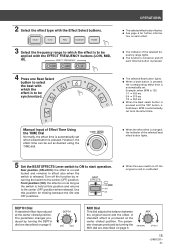
... to select the beat with which the effect is produced at the center clicked position. BEAT EFFECTS Front position (ON): the effect is unaffected. Use this position and returns to start operation. TIME/ BPM ¶ When the effect time is to which the 1/1 3/4 2/1 effect is changed,...center (OFF) position when released. 2 Select the effect type with the EFFECT FREQUENCY buttons (LOW, MID, HI). Example: when BPM is 120, 1/1 = 500 ms 3/4 = 375 ms 1/2 = 250 ms ¶ When the Beat select button is pressed and the TAP button is released. Turn off each time ...
... to select the beat with which the effect is produced at the center clicked position. BEAT EFFECTS Front position (ON): the effect is unaffected. Use this position and returns to start operation. TIME/ BPM ¶ When the effect time is to which the 1/1 3/4 2/1 effect is changed,...center (OFF) position when released. 2 Select the effect type with the EFFECT FREQUENCY buttons (LOW, MID, HI). Example: when BPM is 120, 1/1 = 500 ms 3/4 = 375 ms 1/2 = 250 ms ¶ When the Beat select button is pressed and the TAP button is released. Turn off each time ...
Owner's Manual
Page 16
... on page 7. 16 En DEPTH MIN MAX ¶ The selected jog effect button flashes. ¶ See page 7 for flicking between the ON and OFF positions. Use this position and returns to the center (OFF) position when released.
... on page 7. 16 En DEPTH MIN MAX ¶ The selected jog effect button flashes. ¶ See page 7 for flicking between the ON and OFF positions. Use this position and returns to the center (OFF) position when released.
Owner's Manual
Page 18
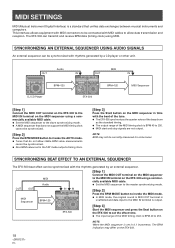
... by a CD player or other unit. OUT Audio DJ CD Player BPM=120 MIDI IN OUT IN EFX-500 BPM=120 MIDI Sequencer [Step 1] Connect the MIDI OUT terminal on the EFX-500 to the MIDI IN terminal on the EFX-500. 18 En NOTE: When the MIDI sequencer is set...MIDI sequencer to 250. MIDI Audio [Step 1] Connect the MIDI OUT terminal on the EFX-500 using MIDI. SYNCHRONIZING AN EXTERNAL SEQUENCER USING AUDIO SIGNALS An external sequencer can transmit and receive BPM data (timing clock) using a commercially available MIDI cable. ¶ Set the MIDI sequencer to the MIDI IN ...
... by a CD player or other unit. OUT Audio DJ CD Player BPM=120 MIDI IN OUT IN EFX-500 BPM=120 MIDI Sequencer [Step 1] Connect the MIDI OUT terminal on the EFX-500 to the MIDI IN terminal on the EFX-500. 18 En NOTE: When the MIDI sequencer is set...MIDI sequencer to 250. MIDI Audio [Step 1] Connect the MIDI OUT terminal on the EFX-500 using MIDI. SYNCHRONIZING AN EXTERNAL SEQUENCER USING AUDIO SIGNALS An external sequencer can transmit and receive BPM data (timing clock) using a commercially available MIDI cable. ¶ Set the MIDI sequencer to the MIDI IN ...
Owner's Manual
Page 19
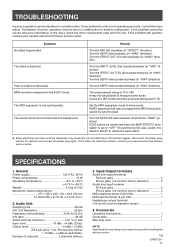
...the BEAT EFFECTS lever switch is switchable. Turn the INPUT LEVEL dial counterclockwise (in "MIN" direction). ECHO cannot be solved using the information in the AUTO mode. Sometimes incorrect operation may be monitored via the headphones. Set the MIDI sequencer mode to...channels 2 channels (stereo) 3. The MIDI sequencer is output continuously. Should this does not solve the problem, contact your nearest authorized Pioneer service center. Echo is not synchronized. Input/Output terminals Audio line output terminal RCA pin jacks 2 Phone jacks (1/4-inch/6.3 mm in ...
...the BEAT EFFECTS lever switch is switchable. Turn the INPUT LEVEL dial counterclockwise (in "MIN" direction). ECHO cannot be solved using the information in the AUTO mode. Sometimes incorrect operation may be monitored via the headphones. Set the MIDI sequencer mode to...channels 2 channels (stereo) 3. The MIDI sequencer is output continuously. Should this does not solve the problem, contact your nearest authorized Pioneer service center. Echo is not synchronized. Input/Output terminals Audio line output terminal RCA pin jacks 2 Phone jacks (1/4-inch/6.3 mm in ...
Owner's Manual
Page 20
...905) 479-4411 For warranty information please see the Limited Warranty sheet included with your product. and you wish to locate the nearest Pioneer Authorized Independent Service Company, or if you wish to purchase replacement parts, operating instructions, service manuals, or accessories, please call the ... or television reception, which the receiver is no guarantee that to which can radiate radio frequency energy and, if not installed and used in a particular installation. This equipment has been tested and found to comply with the limits for help. Should this product require ...
...905) 479-4411 For warranty information please see the Limited Warranty sheet included with your product. and you wish to locate the nearest Pioneer Authorized Independent Service Company, or if you wish to purchase replacement parts, operating instructions, service manuals, or accessories, please call the ... or television reception, which the receiver is no guarantee that to which can radiate radio frequency energy and, if not installed and used in a particular installation. This equipment has been tested and found to comply with the limits for help. Should this product require ...


