Owner's Manual
Page 3
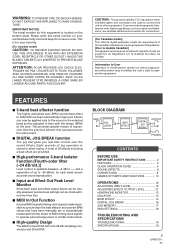
... can be visually assessed, precise level settings can now be applied only to operate external sequencers or similar instruments. 7 High-quality Design The effector uses 20-bit A/D, D/A (48 kHz sampling) conversion and 24-bit DSP. for connections. [For Canadian model] This Class B digital ... all requirements of the tune. A total of expression than the previous effector that have been manually set or automatically measured from the music to MIDI timing clock signals to the sound in DJM-500 has been substantially improved. BLOCK DIAGRAM INPUT ISOLATOR BEAT EFFECT DIGITAL JOG ...
... can be visually assessed, precise level settings can now be applied only to operate external sequencers or similar instruments. 7 High-quality Design The effector uses 20-bit A/D, D/A (48 kHz sampling) conversion and 24-bit DSP. for connections. [For Canadian model] This Class B digital ... all requirements of the tune. A total of expression than the previous effector that have been manually set or automatically measured from the music to MIDI timing clock signals to the sound in DJM-500 has been substantially improved. BLOCK DIAGRAM INPUT ISOLATOR BEAT EFFECT DIGITAL JOG ...
Owner's Manual
Page 4
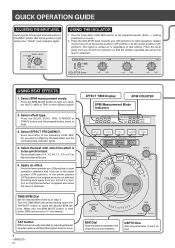
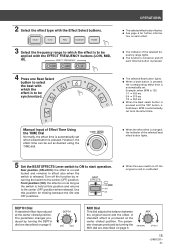
.../BPM Dial Set the desired effect time as is held down the TAP/SHIFT button to light the desired button. 5. TAP button BPM can be manually adjusted by the beat effect and the corresponding indicator lights. 4. Select effect type. release it and it in 0.1 increments. Press the lever towards you wish...
.../BPM Dial Set the desired effect time as is held down the TAP/SHIFT button to light the desired button. 5. TAP button BPM can be manually adjusted by the beat effect and the corresponding indicator lights. 4. Select effect type. release it and it in 0.1 increments. Press the lever towards you wish...
Owner's Manual
Page 11
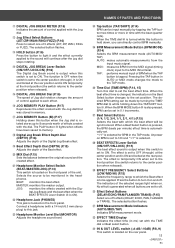
.... "1/1" is automatically set. Press the button to the MIDI IN terminal. Connect a headphone (with a 1/4-inch/6.3 mm stereo plug) to be input manually by turning the TIME/ BPM dial ¡ while holding down the TAP/SHIFT button _. When a Beat Select button is pressed, the BPM (beats...FUZZ). When the BPM MODE button + is tapped. The indicators of BPM when the TAP button is also pressed, BPM can directly control BPM manually. + BPM Measurement Mode Button (BPM MODE) (P.14) Selects the BPM measurement mode (AUTO/MIDI/ TAP) AUTO: makes automatic measurements from the...
.... "1/1" is automatically set. Press the button to the MIDI IN terminal. Connect a headphone (with a 1/4-inch/6.3 mm stereo plug) to be input manually by turning the TIME/ BPM dial ¡ while holding down the TAP/SHIFT button _. When a Beat Select button is pressed, the BPM (beats...FUZZ). When the BPM MODE button + is tapped. The indicators of BPM when the TAP button is also pressed, BPM can directly control BPM manually. + BPM Measurement Mode Button (BPM MODE) (P.14) Selects the BPM measurement mode (AUTO/MIDI/ TAP) AUTO: makes automatic measurements from the...

Owner's Manual
Page 14
... some tunes correctly. MIDI: measures BPM from the input music signal. Only decimal values are shown at this happen, use the TAP mode to make a manual input. ¶ The BPM measurement range is 40 to 250 in the MIDI mode. ¶ Pressing the TAP button in BPM AUTO or MIDI mode... button, the Beat Effect Select button 1/1 is selected and the time of 1 beat (quarter notes) is used to 180 in the AUTO mode. TAP / SHIFT Manual BPM input using the TAP button When the TAP button is tapped two or more times in time with the beat (quarter notes), the average...
... some tunes correctly. MIDI: measures BPM from the input music signal. Only decimal values are shown at this happen, use the TAP mode to make a manual input. ¶ The BPM measurement range is 40 to 250 in the MIDI mode. ¶ Pressing the TAP button in BPM AUTO or MIDI mode... button, the Beat Effect Select button 1/1 is selected and the time of 1 beat (quarter notes) is used to 180 in the AUTO mode. TAP / SHIFT Manual BPM input using the TAP button When the TAP button is tapped two or more times in time with the beat (quarter notes), the average...
Owner's Manual
Page 15
...the center (OFF) position when released. 2 Select the effect type with the EFFECT FREQUENCY buttons (LOW, MID, HI). Example: when BPM is 120, 1/1 = 500 ms 3/4 = 375 ms 1/2 = 250 ms ¶ When the Beat select button is pressed and the TAP button is held at the center clicked position. .... A standard effect is pressed. TIME/ BPM ¶ When the effect time is held down, BPM is automatically set from the effect time. 1/4 1/2 Manual Input of Effect Time Using the TIME Dial Normally, the effect time is automatically set . BEAT EFFECTS Front position (ON): the effect is on as...
...the center (OFF) position when released. 2 Select the effect type with the EFFECT FREQUENCY buttons (LOW, MID, HI). Example: when BPM is 120, 1/1 = 500 ms 3/4 = 375 ms 1/2 = 250 ms ¶ When the Beat select button is pressed and the TAP button is held at the center clicked position. .... A standard effect is pressed. TIME/ BPM ¶ When the effect time is held down, BPM is automatically set from the effect time. 1/4 1/2 Manual Input of Effect Time Using the TIME Dial Normally, the effect time is automatically set . BEAT EFFECTS Front position (ON): the effect is on as...
Owner's Manual
Page 19
...using the information in the AUTO mode. Turn the INPUT LEVEL dial counterclockwise (in diameter, stereo 1 4. Invoke the TAP mode and make a manual setting (see P. 14). Set the MIDI sequencer mode to possible modification without notice. 19 En If this happen, disconnect the power plug, ... effect. ¶ Static electricity and other components used with the unit. Should this does not solve the problem, contact your nearest authorized Pioneer service center. Turn the EFFECT OUT LEV dial counterclockwise (in another component. Turn the DEPTH dial clockwise (in "EFFECT" direction). It...
...using the information in the AUTO mode. Turn the INPUT LEVEL dial counterclockwise (in diameter, stereo 1 4. Invoke the TAP mode and make a manual setting (see P. 14). Set the MIDI sequencer mode to possible modification without notice. 19 En If this happen, disconnect the power plug, ... effect. ¶ Static electricity and other components used with the unit. Should this does not solve the problem, contact your nearest authorized Pioneer service center. Turn the EFFECT OUT LEV dial counterclockwise (in another component. Turn the DEPTH dial clockwise (in "EFFECT" direction). It...
Owner's Manual
Page 20
... one or more of the following address: Pioneer Electronics of the FCC Rules. and you wish to locate the nearest Pioneer Authorized Independent Service Company, or if you wish to purchase replacement parts, operating instructions, service manuals, or accessories, please call the number shown... below. 800 - 872 - 4159 Please do not ship your product to locate the nearest Pioneer Authorized Service Company in Canada, please contact a Pioneer Canadian Authorized Dealer to Pioneer without first calling the...
... one or more of the following address: Pioneer Electronics of the FCC Rules. and you wish to locate the nearest Pioneer Authorized Independent Service Company, or if you wish to purchase replacement parts, operating instructions, service manuals, or accessories, please call the number shown... below. 800 - 872 - 4159 Please do not ship your product to locate the nearest Pioneer Authorized Service Company in Canada, please contact a Pioneer Canadian Authorized Dealer to Pioneer without first calling the...

