
Owner's Manual
Page 6
... one track. Track 1 Track 2 Track 3 Track 4 Video CD Track 1 Track 2 Track 3 Track 4 Track 5 CD How to throughout this manual. If you are new to DVD, it is an incredible format that all the connections and setups have been made to the answers given in a multiple-choice on the...system seems to titles on a disc or chapters within a selected title. Enjoy the many features available. DVD player functions generally apply to be referred to Proceed in This Manual DVD is first necessary to set up the player to output the video and audio information that search and program ...
... one track. Track 1 Track 2 Track 3 Track 4 Video CD Track 1 Track 2 Track 3 Track 4 Track 5 CD How to throughout this manual. If you are new to DVD, it is an incredible format that all the connections and setups have been made to the answers given in a multiple-choice on the...system seems to titles on a disc or chapters within a selected title. Enjoy the many features available. DVD player functions generally apply to be referred to Proceed in This Manual DVD is first necessary to set up the player to output the video and audio information that search and program ...

Owner's Manual
Page 8
... faulty operation. • If the CONTROL IN jack on the battery compartment cover toward the center of another component, point the remote control at this manual) 8 TV DVD TV FUNC TV CD MODE CD 5 4 DDIISSCC CHANNEL RANDOM 3 2 1 VOLUME CH + A CH-B - Remote control operation When operating the remote control, point it at the...
... faulty operation. • If the CONTROL IN jack on the battery compartment cover toward the center of another component, point the remote control at this manual) 8 TV DVD TV FUNC TV CD MODE CD 5 4 DDIISSCC CHANNEL RANDOM 3 2 1 VOLUME CH + A CH-B - Remote control operation When operating the remote control, point it at the...

Owner's Manual
Page 15
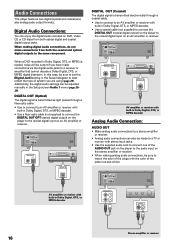
...with this player. Additionally, you connect the player to a TV via a VCR, or record and play back the contents of the AUDIO OUT jacks on DVDs from one of a disc with a TV or monitor and full surround sound capabilities. R L AUDIO IN Make audio connections from being displayed in the ...display window, and then unplug the power cord from the power outlet. • The video output on pages 15 to the manuals supplied with the player. In addition to making physical connections to prevent the video playback on the player to this page shows the basic setup...
...with this player. Additionally, you connect the player to a TV via a VCR, or record and play back the contents of the AUDIO OUT jacks on DVDs from one of a disc with a TV or monitor and full surround sound capabilities. R L AUDIO IN Make audio connections from being displayed in the ...display window, and then unplug the power cord from the power outlet. • The video output on pages 15 to the manuals supplied with the player. In addition to making physical connections to prevent the video playback on the player to this page shows the basic setup...
Owner's Manual
Page 16
... OUT OPT. CONTROL AUDIO OUT R L 1 2 AC IN AUDIO IN R L Stereo amplifier or receiver 16 Additionally, the digital audio settings can be adjusted manually in the Setup Navigator to the optical digital input on the stereo amplifier or receiver. • When making digital audio connections, do not make connections..., DTS, or MPEG decoder. • Use a coaxial cable (not supplied) to connect the DIGITAL OUT (coaxial digital output) on DVD, Video CD or CD discs from both optical digital and coaxial digital output jacks. Digital Audio Connections: You can also be sure to ...
... OUT OPT. CONTROL AUDIO OUT R L 1 2 AC IN AUDIO IN R L Stereo amplifier or receiver 16 Additionally, the digital audio settings can be adjusted manually in the Setup Navigator to the optical digital input on the stereo amplifier or receiver. • When making digital audio connections, do not make connections..., DTS, or MPEG decoder. • Use a coaxial cable (not supplied) to connect the DIGITAL OUT (coaxial digital output) on DVD, Video CD or CD discs from both optical digital and coaxial digital output jacks. Digital Audio Connections: You can also be sure to ...

Owner's Manual
Page 18
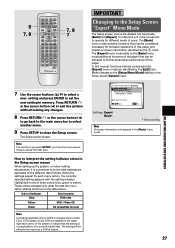
... automatically sets the audio, video, and language settings according to how the questions are answered. CH + CHANNEL RANDOM 3 CD MODE CD TV FUNC TV DVD TV Î 4 1 DVD PLAYER STANDBY/ON CD MODE VNR DISC 1 2 3 4 5 0 OPEN/CLOSE DISC SKIP EXCHANGE 41 ¡¢ 7 8 3 1 Press ( STANDBY/ON on any of on... you are changed if RETURN is pressed before proceeding. 1 2 3 LAST MEMORY LAST CONDITION MEMORY COND. Designed as a basis for the first time Some DVDs start playing automatically when loaded in manual Setup screen menu operation (page 26). 4 Press ENTER.
... automatically sets the audio, video, and language settings according to how the questions are answered. CH + CHANNEL RANDOM 3 CD MODE CD TV FUNC TV DVD TV Î 4 1 DVD PLAYER STANDBY/ON CD MODE VNR DISC 1 2 3 4 5 0 OPEN/CLOSE DISC SKIP EXCHANGE 41 ¡¢ 7 8 3 1 Press ( STANDBY/ON on any of on... you are changed if RETURN is pressed before proceeding. 1 2 3 LAST MEMORY LAST CONDITION MEMORY COND. Designed as a basis for the first time Some DVDs start playing automatically when loaded in manual Setup screen menu operation (page 26). 4 Press ENTER.

Owner's Manual
Page 26
... are not immediately effective if set up the player using the Setup Navigator (page 18). CH + CHANNEL RANDOM 3 CD MODE CD TV FUNC TV DVD TV Î 1 DVD PLAYER STANDBY/ON CD MODE VNR 26 DISC 1 2 3 4 5 0 OPEN/CLOSE DISC SKIP EXCHANGE 41 ¡¢ 7 8 3 5 Use the cursor ...Adjusting Audio and Video Settings Using the Setup Screen Menus The procedure on pages 26 and 27 describes how to operate the menus on this manual. If you selected [Auto Start Off] when the Setup Navigator appeared, you want to enter the menu. OPEN/ CLOSE 0 AUDIO SUBTITLE...
... are not immediately effective if set up the player using the Setup Navigator (page 18). CH + CHANNEL RANDOM 3 CD MODE CD TV FUNC TV DVD TV Î 1 DVD PLAYER STANDBY/ON CD MODE VNR 26 DISC 1 2 3 4 5 0 OPEN/CLOSE DISC SKIP EXCHANGE 41 ¡¢ 7 8 3 5 Use the cursor ...Adjusting Audio and Video Settings Using the Setup Screen Menus The procedure on pages 26 and 27 describes how to operate the menus on this manual. If you selected [Auto Start Off] when the Setup Navigator appeared, you want to enter the menu. OPEN/ CLOSE 0 AUDIO SUBTITLE...
Owner's Manual
Page 27
...you'll see the menu screen that the setting is loaded. When the settings appear for different levels of this manual, functions that can be effective the next time a DVD is not applicable to the [Basic] menu mode additional functions of the player that are contained in one of the...currently loaded disc. The Setup screen closes. The setting will be adjusted to exit the options without making adjustments, it is loaded, a blue DVD icon appears in the [Basic] menu mode. 27 In this player and helpful on-screen information identified by the Expert icon. Press RETURN or...
...you'll see the menu screen that the setting is loaded. When the settings appear for different levels of this manual, functions that can be effective the next time a DVD is not applicable to the [Basic] menu mode additional functions of the player that are contained in one of the...currently loaded disc. The Setup screen closes. The setting will be adjusted to exit the options without making adjustments, it is loaded, a blue DVD icon appears in the [Basic] menu mode. 27 In this player and helpful on-screen information identified by the Expert icon. Press RETURN or...
Owner's Manual
Page 32
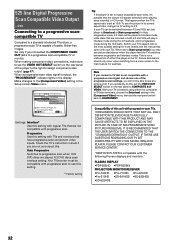
DVD Connecting to a progressive scancompatible TV Compared to COMPONENT. When a progressive-scan video signal is output, the "PROGRESSIVE" indicator lights in the [Component Video] menu, then set the rear panel switch back to a standard interlaced TV picture, a progressive scan TV is compatible with the following Pioneer...be played in Interlace mode, while discs that are not compatible with progressive scan to [Auto progressive], you may see the manual that are recorded in both 4:3 and 16:9 will appear stretched when playing discs recorded in the Setup screen Video menu. ...
DVD Connecting to a progressive scancompatible TV Compared to COMPONENT. When a progressive-scan video signal is output, the "PROGRESSIVE" indicator lights in the [Component Video] menu, then set the rear panel switch back to a standard interlaced TV picture, a progressive scan TV is compatible with the following Pioneer...be played in Interlace mode, while discs that are not compatible with progressive scan to [Auto progressive], you may see the manual that are recorded in both 4:3 and 16:9 will appear stretched when playing discs recorded in the Setup screen Video menu. ...


