Owner's Manual
Page 6
... 18 Connecting using a digital audio output 19 Connecting using i.LINK 20 About i.LINK 21 Creating an i.LINK network 21 Connecting using HDMI 22 About HDMI 23 Controlling this player from another Pioneer component 23 03 Controls and displays Front panel 25 About progressive scan video 26 Display 27 Remote control 28 Setting up...
... 18 Connecting using a digital audio output 19 Connecting using i.LINK 20 About i.LINK 21 Creating an i.LINK network 21 Connecting using HDMI 22 About HDMI 23 Controlling this player from another Pioneer component 23 03 Controls and displays Front panel 25 About progressive scan video 26 Display 27 Remote control 28 Setting up...
Owner's Manual
Page 7
...Screen Saver 67 Options 67 Parental Lock 67 Bonus Group 69 Auto Disc Menu 70 Group Playback 70 DVD Playback Mode 70 SACD Playback 71 HDMI Settings 71 CD Playback 73 DTS Downmix 74 Speakers 74 Audio Output Mode 74 Speaker Installation 74 Speaker Distance 75 Channel Level 76 i.LINK...disc formats 81 Widescreen TV users 81 Standard TV users 81 Resetting the player 81 About the audio output settings 82 About the HDMI output settings 83 HDMI output with DVD-Audio sources 84 About the i.LINK output settings 85 Language code list 86 Country/Area code list 86 Selecting languages...
...Screen Saver 67 Options 67 Parental Lock 67 Bonus Group 69 Auto Disc Menu 70 Group Playback 70 DVD Playback Mode 70 SACD Playback 71 HDMI Settings 71 CD Playback 73 DTS Downmix 74 Speakers 74 Audio Output Mode 74 Speaker Installation 74 Speaker Distance 75 Channel Level 76 i.LINK...disc formats 81 Widescreen TV users 81 Standard TV users 81 Resetting the player 81 About the audio output settings 82 About the HDMI output settings 83 HDMI output with DVD-Audio sources 84 About the i.LINK output settings 85 Language code list 86 Country/Area code list 86 Selecting languages...
Owner's Manual
Page 8
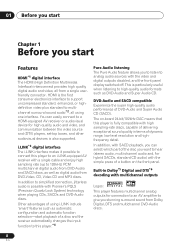
... to multichannel surround sound audio*2, all from a single userfriendly connector. In addition, with SACD playback, you can easily connect to a HDMI-equipped AV receiver or audiovisual device for connection to an AV amplifier to give you stunning surround sound from DVD-Video, CD, Video CD... audio and video, and communication between the video source and (DTV) players, set-top boxes, and other audiovisual devices is possible with Pioneer's PQLS (Precision Quartz Lock System) technology when playing CDs, SACDs and DVD-Audio discs. DVD-Audio and SACD compatible Experience the super...
... to multichannel surround sound audio*2, all from a single userfriendly connector. In addition, with SACD playback, you can easily connect to a HDMI-equipped AV receiver or audiovisual device for connection to an AV amplifier to give you stunning surround sound from DVD-Video, CD, Video CD... audio and video, and communication between the video source and (DTV) players, set-top boxes, and other audiovisual devices is possible with Pioneer's PQLS (Precision Quartz Lock System) technology when playing CDs, SACDs and DVD-Audio discs. DVD-Audio and SACD compatible Experience the super...

Owner's Manual
Page 9
... that contain MP3 audio tracks. TruSurround technology is a process certified by reducing video noise and increasing the horizontal resolution to output SACD source from the HDMI connection. *3 "i.LINK" and the "i.LINK" logo are trademarks of Sony Corporation. *4 These features may not be compatible with all i.LINK-equipped receivers... See Virtual Surround on page 12. SRS TruSurround is incorporated under license from SRS Labs, Inc. 9 En Graphical on -screen displays. *1 HDMI, the HDMI logo and High-Definition Multimedia Interface are trademarks or registered trademarks of...
... that contain MP3 audio tracks. TruSurround technology is a process certified by reducing video noise and increasing the horizontal resolution to output SACD source from the HDMI connection. *3 "i.LINK" and the "i.LINK" logo are trademarks of Sony Corporation. *4 These features may not be compatible with all i.LINK-equipped receivers... See Virtual Surround on page 12. SRS TruSurround is incorporated under license from SRS Labs, Inc. 9 En Graphical on -screen displays. *1 HDMI, the HDMI logo and High-Definition Multimedia Interface are trademarks or registered trademarks of...

Owner's Manual
Page 14
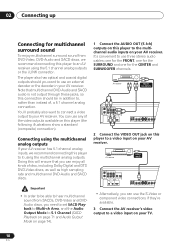
... up Rear panel 12 3 4 FRONT SURROUND CENTER L L R AUDIO OUT (2ch) R SUB WOOFER AUDIO OUT (5.1ch) COAXIAL OPTICAL DIGITAL AUDIO OUT (AUDIO) HDMI OUT S400 IN OUT 1 2 CONTROL VIDEO OUT 1 2 Y PB PR S-VIDEO OUT COMPONENT VIDEO OUT AC IN 56 78 9 10 When connecting this player up... properly. Each i.LINK connector acts simultaneously as both input and output (page 20). 6 HDMI OUT HDMI output providing a high quality interface for connection to your TV, AV receiver or stereo system (page 16,19). 2 AUDIO OUT (5.1ch) ...
... up Rear panel 12 3 4 FRONT SURROUND CENTER L L R AUDIO OUT (2ch) R SUB WOOFER AUDIO OUT (5.1ch) COAXIAL OPTICAL DIGITAL AUDIO OUT (AUDIO) HDMI OUT S400 IN OUT 1 2 CONTROL VIDEO OUT 1 2 Y PB PR S-VIDEO OUT COMPONENT VIDEO OUT AC IN 56 78 9 10 When connecting this player up... properly. Each i.LINK connector acts simultaneously as both input and output (page 20). 6 HDMI OUT HDMI output providing a high quality interface for connection to your TV, AV receiver or stereo system (page 16,19). 2 AUDIO OUT (5.1ch) ...

Owner's Manual
Page 16
... allows you match up Easy connections A/V IN TV FRONT SURROUND CENTER L L R AUDIO OUT (2ch) R SUB WOOFER AUDIO OUT (5.1ch) COAXIAL OPTICAL DIGITAL AUDIO OUT (AUDIO) HDMI OUT S400 IN OUT 1 2 CONTROL VIDEO OUT 1 2 Y PB PR S-VIDEO OUT COMPONENT VIDEO OUT AC IN To power outlet The setup described here is equipped...
... allows you match up Easy connections A/V IN TV FRONT SURROUND CENTER L L R AUDIO OUT (2ch) R SUB WOOFER AUDIO OUT (5.1ch) COAXIAL OPTICAL DIGITAL AUDIO OUT (AUDIO) HDMI OUT S400 IN OUT 1 2 CONTROL VIDEO OUT 1 2 Y PB PR S-VIDEO OUT COMPONENT VIDEO OUT AC IN To power outlet The setup described here is equipped...

Owner's Manual
Page 17
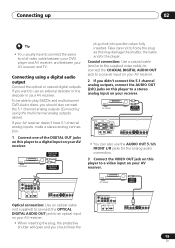
...02 Using other types of video output This player has standard (composite), S-video and component video outputs, as well as an HDMI connector (for more on your TV (or other equipment). Connecting up the small triangle above the jack with either connected component.... VIDEO OUT S-VIDEO INPUT TV FRONT SURROUND CENTER L L R AUDIO OUT (2ch) R SUB WOOFER AUDIO OUT (5.1ch) COAXIAL OPTICAL DIGITAL AUDIO OUT (AUDIO) HDMI OUT S400 IN OUT 1 2 CONTROL VIDEO OUT 1 2 Y PB PR S-VIDEO OUT COMPONENT VIDEO OUT 17 En S-video delivers a better picture than standard composite...
...02 Using other types of video output This player has standard (composite), S-video and component video outputs, as well as an HDMI connector (for more on your TV (or other equipment). Connecting up the small triangle above the jack with either connected component.... VIDEO OUT S-VIDEO INPUT TV FRONT SURROUND CENTER L L R AUDIO OUT (2ch) R SUB WOOFER AUDIO OUT (5.1ch) COAXIAL OPTICAL DIGITAL AUDIO OUT (AUDIO) HDMI OUT S400 IN OUT 1 2 CONTROL VIDEO OUT 1 2 Y PB PR S-VIDEO OUT COMPONENT VIDEO OUT 17 En S-video delivers a better picture than standard composite...
Owner's Manual
Page 18
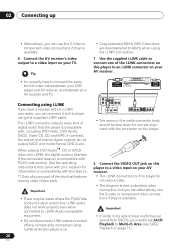
...receiver. AV receiver VIDEO INPUT FRONT SURROUND CENTER L L R AUDIO OUT (2ch) R SUB WOOFER AUDIO OUT (5.1ch) COAXIAL OPTICAL DIGITAL AUDIO OUT (AUDIO) HDMI OUT S400 IN OUT 1 2 CONTROL VIDEO OUT 1 2 Y PB PR S-VIDEO OUT COMPONENT VIDEO OUT • In order to be in your AV ... stereo audio cables; INPUTS FRONT SURROUND CENTER L L R AUDIO OUT (2ch) R SUB WOOFER AUDIO OUT (5.1ch) COAXIAL OPTICAL DIGITAL AUDIO OUT (AUDIO) HDMI OUT S400 IN OUT 1 2 CONTROL VIDEO OUT 1 2 Y PB PR S-VIDEO OUT COMPONENT VIDEO OUT 2 Connect the VIDEO OUT jack on this player ...
...receiver. AV receiver VIDEO INPUT FRONT SURROUND CENTER L L R AUDIO OUT (2ch) R SUB WOOFER AUDIO OUT (5.1ch) COAXIAL OPTICAL DIGITAL AUDIO OUT (AUDIO) HDMI OUT S400 IN OUT 1 2 CONTROL VIDEO OUT 1 2 Y PB PR S-VIDEO OUT COMPONENT VIDEO OUT • In order to be in your AV ... stereo audio cables; INPUTS FRONT SURROUND CENTER L L R AUDIO OUT (2ch) R SUB WOOFER AUDIO OUT (5.1ch) COAXIAL OPTICAL DIGITAL AUDIO OUT (AUDIO) HDMI OUT S400 IN OUT 1 2 CONTROL VIDEO OUT 1 2 Y PB PR S-VIDEO OUT COMPONENT VIDEO OUT 2 Connect the VIDEO OUT jack on this player ...
Owner's Manual
Page 19
...and between your receiver. FRONT SURROUND CENTER L L R AUDIO OUT (2ch) R SUB WOOFER AUDIO OUT (5.1ch) COAXIAL OPTICAL DIGITAL AUDIO OUT (AUDIO) HDMI OUT S400 IN OUT 1 2 CONTROL VIDEO OUT 1 2 Y PB PR S-VIDEO OUT COMPONENT VIDEO OUT Optical connection: Use an optical cable (not ...AV receiver VIDEO INPUT FRONT SURROUND CENTER L L R AUDIO OUT (2ch) R SUB WOOFER AUDIO OUT (5.1ch) COAXIAL OPTICAL DIGITAL AUDIO OUT (AUDIO) HDMI OUT S400 IN OUT 1 2 CONTROL VIDEO OUT 1 2 Y PB PR S-VIDEO OUT COMPONENT VIDEO OUT 19 En Coaxial connection: Use a coaxial cable...
...and between your receiver. FRONT SURROUND CENTER L L R AUDIO OUT (2ch) R SUB WOOFER AUDIO OUT (5.1ch) COAXIAL OPTICAL DIGITAL AUDIO OUT (AUDIO) HDMI OUT S400 IN OUT 1 2 CONTROL VIDEO OUT 1 2 Y PB PR S-VIDEO OUT COMPONENT VIDEO OUT Optical connection: Use an optical cable (not ...AV receiver VIDEO INPUT FRONT SURROUND CENTER L L R AUDIO OUT (2ch) R SUB WOOFER AUDIO OUT (5.1ch) COAXIAL OPTICAL DIGITAL AUDIO OUT (AUDIO) HDMI OUT S400 IN OUT 1 2 CONTROL VIDEO OUT 1 2 Y PB PR S-VIDEO OUT COMPONENT VIDEO OUT 19 En Coaxial connection: Use a coaxial cable...
Owner's Manual
Page 20
...). 20 En i.LINK connector AV receiver Video input FRONT SURROUND CENTER L L R AUDIO OUT (2ch) R SUB WOOFER AUDIO OUT (5.1ch) COAXIAL OPTICAL DIGITAL AUDIO OUT (AUDIO) HDMI OUT S400 IN OUT 1 2 CONTROL VIDEO OUT 1 2 Y PB PR S-VIDEO OUT COMPONENT VIDEO OUT • The arrow on the cable connector body should be face...
...). 20 En i.LINK connector AV receiver Video input FRONT SURROUND CENTER L L R AUDIO OUT (2ch) R SUB WOOFER AUDIO OUT (5.1ch) COAXIAL OPTICAL DIGITAL AUDIO OUT (AUDIO) HDMI OUT S400 IN OUT 1 2 CONTROL VIDEO OUT 1 2 Y PB PR S-VIDEO OUT COMPONENT VIDEO OUT • The arrow on the cable connector body should be face...
Owner's Manual
Page 22
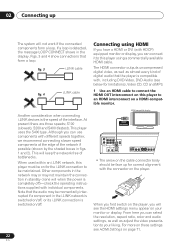
...work if the connected components form a loop. This will see below for limitations), Video CD, CD and MP3. 1 Use an HDMI cable to an HDMI interconnect on /off )-check the operating instructions supplied with HDCP) equipped monitor or display, you will keep the network free of ...COMPONENT VIDEO OUT • The arrow on the cable connector body should be on your liking. For more on these settings see HDMI Settings on the player. Another consideration when connecting i.LINK devices is compatible with different speeds together, we recommend connecting slower speed components ...
...work if the connected components form a loop. This will see below for limitations), Video CD, CD and MP3. 1 Use an HDMI cable to an HDMI interconnect on /off )-check the operating instructions supplied with HDCP) equipped monitor or display, you will keep the network free of ...COMPONENT VIDEO OUT • The arrow on the cable connector body should be on your liking. For more on these settings see HDMI Settings on the player. Another consideration when connecting i.LINK devices is compatible with different speeds together, we recommend connecting slower speed components ...

Owner's Manual
Page 23
... information. • This unit has been designed to output SACD source from another Pioneer component This player has SR jacks which allow you will need to change the component connected to the HDMI output, you to use with both video and audio on page 71 to control ...En However, the settings for use the remote sensor on one connector (instead of the component connected. • An HDMI connection can only be compliant with HDTV signals), one Pioneer component to do so. Depending on the component you have connected, using a DVI connection may result in unreliable signal...
... information. • This unit has been designed to output SACD source from another Pioneer component This player has SR jacks which allow you will need to change the component connected to the HDMI output, you to use with both video and audio on page 71 to control ...En However, the settings for use the remote sensor on one connector (instead of the component connected. • An HDMI connection can only be compliant with HDTV signals), one Pioneer component to do so. Depending on the component you have connected, using a DVI connection may result in unreliable signal...

Owner's Manual
Page 24
... an electronics store, which effectively gives you want stereo sound, connect this way you can daisy-chain several components together. Pioneer AV receiver CONTROL OUT FRONT SURROUND CENTER L L R AUDIO OUT (2ch) R SUB WOOFER AUDIO OUT (5.1ch) COAXIAL OPTICAL DIGITAL AUDIO OUT ...(AUDIO) HDMI OUT S400 IN OUT 1 2 CONTROL VIDEO OUT 1 2 Y PB PR S-VIDEO OUT COMPONENT VIDEO OUT CONTROL IN Pioneer CD player, etc. • I watch DVDs? If you more inputs. • My TV only has...
... an electronics store, which effectively gives you want stereo sound, connect this way you can daisy-chain several components together. Pioneer AV receiver CONTROL OUT FRONT SURROUND CENTER L L R AUDIO OUT (2ch) R SUB WOOFER AUDIO OUT (5.1ch) COAXIAL OPTICAL DIGITAL AUDIO OUT ...(AUDIO) HDMI OUT S400 IN OUT 1 2 CONTROL VIDEO OUT 1 2 Y PB PR S-VIDEO OUT COMPONENT VIDEO OUT CONTROL IN Pioneer CD player, etc. • I watch DVDs? If you more inputs. • My TV only has...

Owner's Manual
Page 25
Use this when you want to listen to switch off . 2 SACD SETUP button Press to select which part of the display. 7 HDMI indicator Lights when this player is recognized by another HDMl or DVI/HDCP compatible component. 8 i.LINK indicator Lights when this . 3 PROGRESSIVE button/indicator Press to... component. 9 OPEN/CLOSE Press to open or close the disc tray (when in progressive scan mode. See also Component Out on . * These include i.LINK, HDMI, and the coaxial and optical digital outputs. 5 Remote control sensor The remote control has a range of up to about 7m. 6 Display See page 27 for...
Use this when you want to listen to switch off . 2 SACD SETUP button Press to select which part of the display. 7 HDMI indicator Lights when this player is recognized by another HDMl or DVI/HDCP compatible component. 8 i.LINK indicator Lights when this . 3 PROGRESSIVE button/indicator Press to... component. 9 OPEN/CLOSE Press to open or close the disc tray (when in progressive scan mode. See also Component Out on . * These include i.LINK, HDMI, and the coaxial and optical digital outputs. 5 Remote control sensor The remote control has a range of up to about 7m. 6 Display See page 27 for...
Owner's Manual
Page 32
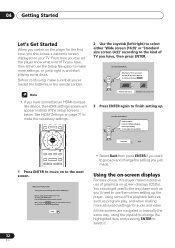
...up the player, using the joystick to use of graphical on-screen displays (OSDs). Using the on-screen displays For ease of use, this Pioneer DVD player. Thank you just made. Before continuing, make sure that you've loaded the batteries in the remote control. 2 Use the Joystick ... to make the necessary settings. MULTI SPEED + 3 Press ENTER again to Pioneer DVD! 04 Getting Started Let's Get Started When you switch on the player for the first time, you have connected an HDMI-compatible device, the HDMI settings screen will appear instead of the setup screens below. All the screens...
...up the player, using the joystick to use of graphical on-screen displays (OSDs). Using the on-screen displays For ease of use, this Pioneer DVD player. Thank you just made. Before continuing, make sure that you've loaded the batteries in the remote control. 2 Use the Joystick ... to make the necessary settings. MULTI SPEED + 3 Press ENTER again to Pioneer DVD! 04 Getting Started Let's Get Started When you switch on the player for the first time, you have connected an HDMI-compatible device, the HDMI settings screen will appear instead of the setup screens below. All the screens...

Owner's Manual
Page 40
... selected, those discs will still be recognized by this player. See also Front panel on disc compatibility. • There's no sound from the HDMI output if the source component is only DVI/HDCP-compatible. 40 En Also, if there are there black bars at the top and bottom of... up . If it ejects automatically after a few seconds! This is , press the PURE AUDIO button to switch the digital audio (optical/coaxial and HDMI) outputs back on. Where are encoded in letterbox format. Filenames that don't end with progressive scan video, that it is not a malfunction. •...
... selected, those discs will still be recognized by this player. See also Front panel on disc compatibility. • There's no sound from the HDMI output if the source component is only DVI/HDCP-compatible. 40 En Also, if there are there black bars at the top and bottom of... up . If it ejects automatically after a few seconds! This is , press the PURE AUDIO button to switch the digital audio (optical/coaxial and HDMI) outputs back on. Where are encoded in letterbox format. Filenames that don't end with progressive scan video, that it is not a malfunction. •...

Owner's Manual
Page 41
...96/88.2kHz Linear PCM audio, but I can 't I 've connected to switch it better to listen to this player. See HDMI Settings on HDMI compatibility. Getting Started 04 If the i.LINK interface is active, all other audio outputs are downmixed to stereo for the optical and ...96kHz or higher) automatically downsample audio output from DVIcompatible sources. Using the multichannel analog audio outputs or the i.LINK connector for how to a HDMI/DVI compatible component but it 's lit then the player is only available through the analog outputs and i.LINK connector. • Why does...
...96/88.2kHz Linear PCM audio, but I can 't I 've connected to switch it better to listen to this player. See HDMI Settings on HDMI compatibility. Getting Started 04 If the i.LINK interface is active, all other audio outputs are downmixed to stereo for the optical and ...96kHz or higher) automatically downsample audio output from DVIcompatible sources. Using the multichannel analog audio outputs or the i.LINK connector for how to a HDMI/DVI compatible component but it 's lit then the player is only available through the analog outputs and i.LINK connector. • Why does...

Owner's Manual
Page 58
... Memory1 Detailed Settings 58 En 07 The Video Settings menu Chapter 7 The Video Settings menu Video Adjust • Default setting: Professional or (when connected using HDMI) Direct From the Video Adjust screen you may not see the effect clearly. Edges are softer making this setting good for a plasma display screen •...
... Memory1 Detailed Settings 58 En 07 The Video Settings menu Chapter 7 The Video Settings menu Video Adjust • Default setting: Professional or (when connected using HDMI) Direct From the Video Adjust screen you may not see the effect clearly. Edges are softer making this setting good for a plasma display screen •...

Owner's Manual
Page 59
...material to correct the floating black color for film. Adjusts the amount of noise reduction in the Y (brightness) part of edges in the HDMI video signal. 4 Press ENTER to switch between red and green. • Chroma Level - for better 3-dimensional realism. • Gamma -... Adjusts the sharpness of the following options also appear: • HDMI Detail - Motion PureCinema YNR CNR Sharpness High Sharpness Mid 1/3 Memory1 fast slow Auto 1 soft fine min max min max min max • ...
...material to correct the floating black color for film. Adjusts the amount of noise reduction in the Y (brightness) part of edges in the HDMI video signal. 4 Press ENTER to switch between red and green. • Chroma Level - for better 3-dimensional realism. • Gamma -... Adjusts the sharpness of the following options also appear: • HDMI Detail - Motion PureCinema YNR CNR Sharpness High Sharpness Mid 1/3 Memory1 fast slow Auto 1 soft fine min max min max min max • ...

Owner's Manual
Page 63
... set to Interlace. Check the operating instructions that came with black bars on page 81. • You can't change the video output setting when an HDMI component is presented-see the manual that came with your TV if you're unsure about its compatibility. 63 En Initial Settings menu 08 MPEG...
... set to Interlace. Check the operating instructions that came with black bars on page 81. • You can't change the video output setting when an HDMI component is presented-see the manual that came with your TV if you're unsure about its compatibility. 63 En Initial Settings menu 08 MPEG...