Owner's Manual
Page 4
...fader. (This function can only be used when the Pioneer CD player series CMX-3000, CMX-5000, CDJ-1000, CDJ-...professional-grade XLR mode), a variety of other independent outputs are inserted in the PHONO 4 terminals. ÷ Operating instructions ÷ Warranty 4 CONTENTS FEATURES 4 CHECKING ACCESSORIES 4 CAUTIONS REGARDING HANDLING 5 Location 5 Installing the DJM-3000 in an EIA rack 5 Condensation 5 Cleaning the Unit 5 CONNECTIONS 6 PART NAMES AND FUNCTIONS 8 USING... for a total of input and output functions This DJ Mixer is connected.) 3-Band Equalizer and Kill This 3-band...
...fader. (This function can only be used when the Pioneer CD player series CMX-3000, CMX-5000, CDJ-1000, CDJ-...professional-grade XLR mode), a variety of other independent outputs are inserted in the PHONO 4 terminals. ÷ Operating instructions ÷ Warranty 4 CONTENTS FEATURES 4 CHECKING ACCESSORIES 4 CAUTIONS REGARDING HANDLING 5 Location 5 Installing the DJM-3000 in an EIA rack 5 Condensation 5 Cleaning the Unit 5 CONNECTIONS 6 PART NAMES AND FUNCTIONS 8 USING... for a total of input and output functions This DJ Mixer is connected.) 3-Band Equalizer and Kill This 3-band...

Owner's Manual
Page 5
... cloth to shocks or vibration. Note ÷ Never place this unit is exposed to the rack using screws of the unit in a damp or dusty environment may form inside a carrying case or DJ booth, separate it will corrode the surfaces. 5 Condensation When this unit directly above a power amplifier might ... for about an hour or raise the room temperature gradually. Do not use furniture wax or cleaners. ÷ Never use in attaching the unit to a 19-inch EIA rack. ÷ Attach the unit to direct rays of the DJM-3000 are very dirty, wipe with a soft cloth dipped in some neutral ...
... cloth to shocks or vibration. Note ÷ Never place this unit is exposed to the rack using screws of the unit in a damp or dusty environment may form inside a carrying case or DJ booth, separate it will corrode the surfaces. 5 Condensation When this unit directly above a power amplifier might ... for about an hour or raise the room temperature gradually. Do not use furniture wax or cleaners. ÷ Never use in attaching the unit to a 19-inch EIA rack. ÷ Attach the unit to direct rays of the DJM-3000 are very dirty, wipe with a soft cloth dipped in some neutral ...
Owner's Manual
Page 6
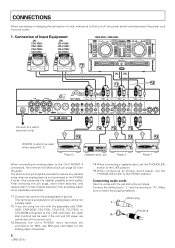
... 3 / LINE 4 CH - 2 CONTROL R PHONO 1 LINE 1 CONTROL / LINE 2 CH - 1 CH-4 MIC 3 MIC 2 DJM-3000 RL RL RL RL Connect to a wall's electrical outlet (PHONO 4 cannot be used when using the unit with the separately sold CMX3000, CMX-5000, CDJ-1000, CDJ-100S, CDJ-700S, or CDJ-500 II... connecting or changing the connection of Input Equipment [A] CDJ-1000 / CDJ-100S / CDJ-700S / CDJ-500II [B] CDJ-1000 / CDJ-100S / CDJ-700S / CDJ-500II CMX-3000 / CMX-5000 [A] [B] SEND R L (MONO) RETURN R L (MONO) R L R L 3 COLD 1 GND 2 HOT MASTER OUT 2 RL RL RL RL MASTER BOOTH OUT 1 ...
... 3 / LINE 4 CH - 2 CONTROL R PHONO 1 LINE 1 CONTROL / LINE 2 CH - 1 CH-4 MIC 3 MIC 2 DJM-3000 RL RL RL RL Connect to a wall's electrical outlet (PHONO 4 cannot be used when using the unit with the separately sold CMX3000, CMX-5000, CDJ-1000, CDJ-100S, CDJ-700S, or CDJ-500 II... connecting or changing the connection of Input Equipment [A] CDJ-1000 / CDJ-100S / CDJ-700S / CDJ-500II [B] CDJ-1000 / CDJ-100S / CDJ-700S / CDJ-500II CMX-3000 / CMX-5000 [A] [B] SEND R L (MONO) RETURN R L (MONO) R L R L 3 COLD 1 GND 2 HOT MASTER OUT 2 RL RL RL RL MASTER BOOTH OUT 1 ...
Owner's Manual
Page 7
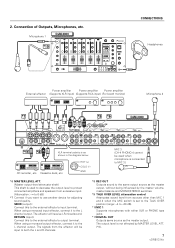
... Headphones Power amplifier Power amplifier Power amplifier External effector (Supports XLR input) (Supports RCA input) (For booth monitor) Microphone 2 DJM-3000 SEND R L (MONO) RETURN R L (MONO) R L R L 3 COLD 1 GND 2 HOT MASTER OUT 2 RL LR MASTER BOOTH OUT 1 MONITOR CH - 4 PHONO 4 LINE 7 CH - 3 PHONO 3 / LINE 6...output level is set to the TALK OVER position (range: -4 to the L channel output. Connection of Outputs, Microphones, etc. When using a monaural input effector, connect it to -20 dB). *10 MIC 1 Supports microphones with either XLR or PHONE type jacks. *11 ...
... Headphones Power amplifier Power amplifier Power amplifier External effector (Supports XLR input) (Supports RCA input) (For booth monitor) Microphone 2 DJM-3000 SEND R L (MONO) RETURN R L (MONO) R L R L 3 COLD 1 GND 2 HOT MASTER OUT 2 RL LR MASTER BOOTH OUT 1 MONITOR CH - 4 PHONO 4 LINE 7 CH - 3 PHONO 3 / LINE 6...output level is set to the TALK OVER position (range: -4 to the L channel output. Connection of Outputs, Microphones, etc. When using a monaural input effector, connect it to -20 dB). *10 MIC 1 Supports microphones with either XLR or PHONE type jacks. *11 ...
Owner's Manual
Page 8
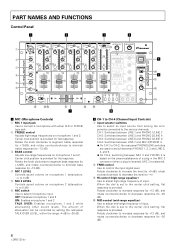
...12 dB). 3 BASS control Adjusts low-range frequencies on microphone 2 (attenuation: -∞ to 0 dB) 6 MIC switch Use to select microphone input. Center click position is provided. OFF: Disables microphone 1 and 2 ON: Enables microphone 1 and 2... 8 98 98 98 9 @ ^ 0 0 0 0# 2 = -= -= -= - 3 $ ~ ~ ~ ~ 4 ! ! ! ! % 5 6 " & ] * ( _ +¡ ™ £ ' ¥ MIC (Microphone Controls) 1 MIC 1 input jack Use to connect a microphone with either XLR or PHONE type jack. 2 TREBLE control Adjusts high-range frequencies on the presence/absence of a plug in the MIC...
...12 dB). 3 BASS control Adjusts low-range frequencies on microphone 2 (attenuation: -∞ to 0 dB) 6 MIC switch Use to select microphone input. Center click position is provided. OFF: Disables microphone 1 and 2 ON: Enables microphone 1 and 2... 8 98 98 98 9 @ ^ 0 0 0 0# 2 = -= -= -= - 3 $ ~ ~ ~ ~ 4 ! ! ! ! % 5 6 " & ] * ( _ +¡ ™ £ ' ¥ MIC (Microphone Controls) 1 MIC 1 input jack Use to connect a microphone with either XLR or PHONE type jack. 2 TREBLE control Adjusts high-range frequencies on the presence/absence of a plug in the MIC...
Owner's Manual
Page 9
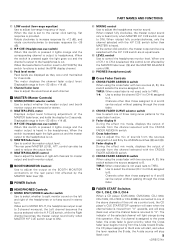
...the light goes out and the channel's output to keep sound in the headphones. " POWER Switch ] HEADPHONES Controls & MONO SPLIT/STEREO selector switch Use to select whether to split monitor sound on the rear panel. When rotated fully clockwise, the master output sound only is heard (only when MASTER...LEVEL ATT. control can be output without passing through the cross fader. \ FADER START Switches CH-1, CH-2, CH-3, CH-4 When a CD player (CMX-3000, CMX-5000, CDJ-1000, CDJ-100S, CDJ-700S or CDJ-500II) is heard in stereo form. when the Cross fader lever begins moving from "0" ...
...the light goes out and the channel's output to keep sound in the headphones. " POWER Switch ] HEADPHONES Controls & MONO SPLIT/STEREO selector switch Use to select whether to split monitor sound on the rear panel. When rotated fully clockwise, the master output sound only is heard (only when MASTER...LEVEL ATT. control can be output without passing through the cross fader. \ FADER START Switches CH-1, CH-2, CH-3, CH-4 When a CD player (CMX-3000, CMX-5000, CDJ-1000, CDJ-100S, CDJ-700S or CDJ-500II) is heard in stereo form. when the Cross fader lever begins moving from "0" ...
Owner's Manual
Page 10
... the H.P CUE switch (=). BEAT (Effect synchronous displays / Beat displays) This display's contents differ depending on pages 18-19. The display lights when the beat is used to select "CF.A" or "CF.B", the channel that lights will be selected in one (1-4) selected with the respective ASSIGN switch PARAMETER 1 (Parameter 1 / BPM counter) The...
... the H.P CUE switch (=). BEAT (Effect synchronous displays / Beat displays) This display's contents differ depending on pages 18-19. The display lights when the beat is used to select "CF.A" or "CF.B", the channel that lights will be selected in one (1-4) selected with the respective ASSIGN switch PARAMETER 1 (Parameter 1 / BPM counter) The...
Owner's Manual
Page 11
...set to -100%, -50%, -33%, 0%, 33%, 50%, or 100%. ¶ When REVERB is enabled (see page 19). ≠ Effect beat selector switches (@, #) Use this switch to change the value of Effect PARAMETER 1 control (‹) in accordance with the BPM of the source selected with the source beat, the... be input manually. Pressing the switch again disconnects the beat effect to the headphones and turns off the switch lamp. ⁄ Effect selector switch Use to select desired effects (see page 14). fi ON/OFF, TAP (Effect ON/OFF switch, TAP switch) This switch produces different operations ...
...set to -100%, -50%, -33%, 0%, 33%, 50%, or 100%. ¶ When REVERB is enabled (see page 19). ≠ Effect beat selector switches (@, #) Use this switch to change the value of Effect PARAMETER 1 control (‹) in accordance with the BPM of the source selected with the source beat, the... be input manually. Pressing the switch again disconnects the beat effect to the headphones and turns off the switch lamp. ⁄ Effect selector switch Use to select desired effects (see page 14). fi ON/OFF, TAP (Effect ON/OFF switch, TAP switch) This switch produces different operations ...
Owner's Manual
Page 12
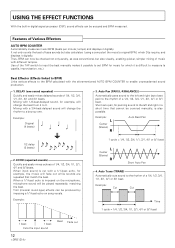
... Various Effectors AUTO BPM COUNTER Automatically measures music BPM (beats per minute; tempo) and displays it is cut with a 1/1-beat echo, for which DJs require, and displays it digitally. Use of 1/4, 1/2, 3/4, 1/1, 2/1, 4/1 and 8/1 beats. DELAY (one . Example: 1 cycle = 1/4, 1/2, 3/4, 1/1, 2/1, 4/1 or 8/1 beat L Center (Stereo)...improvisation, etc.). Short auto pan, for example, will be checked not only aurally, as was conventional, but also calculates (using a computer) the music's original BPM, which it digitally. Example: L Center (Stereo) R Auto Beat Pan 1/2 ...
... Various Effectors AUTO BPM COUNTER Automatically measures music BPM (beats per minute; tempo) and displays it is cut with a 1/1-beat echo, for which DJs require, and displays it digitally. Use of 1/4, 1/2, 3/4, 1/1, 2/1, 4/1 and 8/1 beats. DELAY (one . Example: 1 cycle = 1/4, 1/2, 3/4, 1/1, 2/1, 4/1 or 8/1 beat L Center (Stereo)...improvisation, etc.). Short auto pan, for example, will be checked not only aurally, as was conventional, but also calculates (using a computer) the music's original BPM, which it digitally. Example: L Center (Stereo) R Auto Beat Pan 1/2 ...

Owner's Manual
Page 13
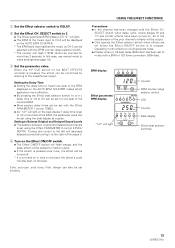
5. FLANGER Quickly and easily produces 1-cycle flanger effect for beats of ±1 octave. Applying the pitch shifter to available effectors, samplers, etc. USING THE EFFECT FUNCTIONS 13 REVERB Produces a reverberation effect. 8. Example Frequency 1 cycle = 1/2, 1, 2, 4, 8, 16 or 32 beat 6. Example Short delay 1 cycle = 1/2, 1, 2, 4, 8, 16 or 32 beat 7. Send/Return (...
5. FLANGER Quickly and easily produces 1-cycle flanger effect for beats of ±1 octave. Applying the pitch shifter to available effectors, samplers, etc. USING THE EFFECT FUNCTIONS 13 REVERB Produces a reverberation effect. 8. Example Frequency 1 cycle = 1/2, 1, 2, 4, 8, 16 or 32 beat 6. Example Short delay 1 cycle = 1/2, 1, 2, 4, 8, 16 or 32 beat 7. Send/Return (...

Owner's Manual
Page 14
BPM display Effect parameter/BPM display H.P CUE switch Effect selector switch Effect CH. USING THE EFFECT FUNCTIONS Delay, Echo, Auto Pan, Auto Trans, Filter, and Flanger Operations Items Set for Each Effect Effect DELAY ECHO PAN (Auto pan) TRANS (...
BPM display Effect parameter/BPM display H.P CUE switch Effect selector switch Effect CH. USING THE EFFECT FUNCTIONS Delay, Echo, Auto Pan, Auto Trans, Filter, and Flanger Operations Items Set for Each Effect Effect DELAY ECHO PAN (Auto pan) TRANS (...
Owner's Manual
Page 15
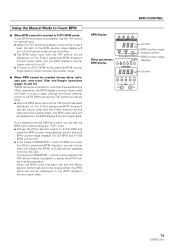
... with effects on the AUTO BPM COUNTER makes effect application more than 2 seconds. 1 Set the Effect selector switch to the headphones output. USING THE EFFECT FUNCTIONS Precautions: ÷ If the channel has been changed with a BPM of the prior channel's effects will light Counter BPM counter... * The counter will flash if BPM cannot be counted for one beat of the counted BPM. ÷ More precise delay times can be set using the Effect PARAMETER 2 control (LEVEL/ DEPTH). Setting to make settings (see page 19). 3 Set the parameter value. Setting the Delay Time &#...
... with effects on the AUTO BPM COUNTER makes effect application more than 2 seconds. 1 Set the Effect selector switch to the headphones output. USING THE EFFECT FUNCTIONS Precautions: ÷ If the channel has been changed with a BPM of the prior channel's effects will light Counter BPM counter... * The counter will flash if BPM cannot be counted for one beat of the counted BPM. ÷ More precise delay times can be set using the Effect PARAMETER 2 control (LEVEL/ DEPTH). Setting to make settings (see page 19). 3 Set the parameter value. Setting the Delay Time &#...

Owner's Manual
Page 16
...LED "3" will light. * The entire BPM display will increase it -33%, -50% or -100%. ÷ More precise pitch can be set using the Effect PARAMETER 2 control (LEVEL/DEPTH). SELECT switch to the right will turn off. 3 Set the parameter value. Setting Pitch ÷ Pressing ...# on CH-3 has been pitch-shifted 90%. USING THE EFFECT FUNCTIONS Operating Reverb and Pitch Shifter Effector Settings Effect REVERB PITCH (Pitch Shifter) Effect Parameter 1 (TIME) Reverb time (echo time) Setting...
...LED "3" will light. * The entire BPM display will increase it -33%, -50% or -100%. ÷ More precise pitch can be set using the Effect PARAMETER 2 control (LEVEL/DEPTH). SELECT switch to the right will turn off. 3 Set the parameter value. Setting Pitch ÷ Pressing ...# on CH-3 has been pitch-shifted 90%. USING THE EFFECT FUNCTIONS Operating Reverb and Pitch Shifter Effector Settings Effect REVERB PITCH (Pitch Shifter) Effect Parameter 1 (TIME) Reverb time (echo time) Setting...

Owner's Manual
Page 17
...with effects on could generate noise. SELECT switch to CH-3. BPM display Effect parameter/ BPM display LED Counter Beat display Effect beat selector switches Using an External Effector The following example is pressed once more will turn off (when the Effect ON/OFF switch is lit orange). 4 Turn...ON/OFF switch will flash orange, and the external effect will be output. ÷ Only operate the Effect selector switch when effects are off . USING THE EFFECT FUNCTIONS ÷ Display when CH-3 has been pitch-shifted by listening to the headphones output. 4 Adjust the return level. ÷ ...
...with effects on could generate noise. SELECT switch to CH-3. BPM display Effect parameter/ BPM display LED Counter Beat display Effect beat selector switches Using an External Effector The following example is pressed once more will turn off (when the Effect ON/OFF switch is lit orange). 4 Turn...ON/OFF switch will flash orange, and the external effect will be output. ÷ Only operate the Effect selector switch when effects are off . USING THE EFFECT FUNCTIONS ÷ Display when CH-3 has been pitch-shifted by listening to the headphones output. 4 Adjust the return level. ÷ ...

Owner's Manual
Page 18
...-2 will flash. * Some tracks cannot be counted for the AUTO BPM COUNTER. ÷ Display when the BPM of CH-1 and CH-2 (126) match. BPM COUNTING Using the Auto Mode to Count BPM This mode counts and displays the BPM of the channel selected with the H.P CUE switch and (when Effect selector...
...-2 will flash. * Some tracks cannot be counted for the AUTO BPM COUNTER. ÷ Display when the BPM of CH-1 and CH-2 (126) match. BPM COUNTING Using the Auto Mode to Count BPM This mode counts and displays the BPM of the channel selected with the H.P CUE switch and (when Effect selector...
Owner's Manual
Page 19
...be counted during effect operations, the BPM display's counter (upper side) will flash. In such a case, change the Effect selector switch to AUTO BPM and use the TAP switch for manual input. ÷ When the TAP switch is pressed in time to the music's beat, the light in AUTO BPM mode.../BPM display's counter (lower side), and the BPM display's counter (upper side) will turn off. ÷ If the Effect PARAMETER 1 control (TIME) is not possible, use the TAP switch for manual input. ÷ After the BPM value input via the TAP switch has been displayed on the Effect parameter/BPM display...
...be counted during effect operations, the BPM display's counter (upper side) will flash. In such a case, change the Effect selector switch to AUTO BPM and use the TAP switch for manual input. ÷ When the TAP switch is pressed in time to the music's beat, the light in AUTO BPM mode.../BPM display's counter (lower side), and the BPM display's counter (upper side) will turn off. ÷ If the Effect PARAMETER 1 control (TIME) is not possible, use the TAP switch for manual input. ÷ After the BPM value input via the TAP switch has been displayed on the Effect parameter/BPM display...
Owner's Manual
Page 20
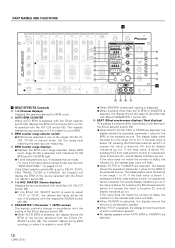
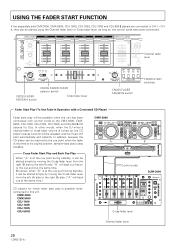
... to the cue point when the fader is returned to this unit CMX-3000 CMX-5000 CDJ-1000 CDJ-100S CDJ-700S CDJ-500 II Cross fader lever Channel fader lever 20 In other words, when the DJ mixer's channel fader or cross fader volume is also possible. Cross Fader Start ...Fader start automatically and instantly. USING THE FADER START FUNCTION If the separately sold CMX-3000, CMX-5000, CDJ-1000, CDJ-100S, CDJ-700S and CDJ-500 II players are connected to the right (B) side. ("A" will back cue at the same time.) CMX-3000 A B Control cords DJM-3000 CD players for DJs. CH4, they can be...
... to the cue point when the fader is returned to this unit CMX-3000 CMX-5000 CDJ-1000 CDJ-100S CDJ-700S CDJ-500 II Cross fader lever Channel fader lever 20 In other words, when the DJ mixer's channel fader or cross fader volume is also possible. Cross Fader Start ...Fader start automatically and instantly. USING THE FADER START FUNCTION If the separately sold CMX-3000, CMX-5000, CDJ-1000, CDJ-100S, CDJ-700S and CDJ-500 II players are connected to the right (B) side. ("A" will back cue at the same time.) CMX-3000 A B Control cords DJM-3000 CD players for DJs. CH4, they can be...
Owner's Manual
Page 21
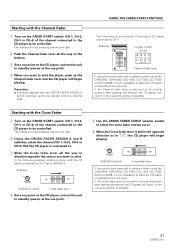
...be started , the CD player will light. 2 Push the Channel fader lever all the way in advance when using the CMX-3000, CMX-5000, CDJ-1000, CDJ-100S, CDJ-700S and CDJ-500 II, it is an example of ... fader lever If cue points have been set the unit to standby (pause) at the cue point. 5 Use the CROSS FADER CURVE selector switch to select the cross fader startup curve. 6 When the Cross fader lever is... slid in the opposite direction as in advance when using the CMX-3000, CMX-5000, CDJ-1000, CDJ-100S, CDJ-700S and CDJ-500 II, it is returned to ...
...be started , the CD player will light. 2 Push the Channel fader lever all the way in advance when using the CMX-3000, CMX-5000, CDJ-1000, CDJ-100S, CDJ-700S and CDJ-500 II, it is an example of ... fader lever If cue points have been set the unit to standby (pause) at the cue point. 5 Use the CROSS FADER CURVE selector switch to select the cross fader startup curve. 6 When the Cross fader lever is... slid in the opposite direction as in advance when using the CMX-3000, CMX-5000, CDJ-1000, CDJ-100S, CDJ-700S and CDJ-500 II, it is returned to ...
Owner's Manual
Page 22
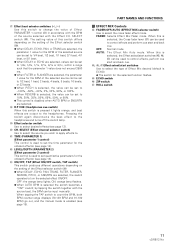
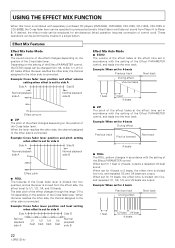
... into four, and repeated 1/1, 1/2, 1/4, and 1/8 beats are output. When set in accordance with the setting of a single button. USING THE EFFECT MIX FUNCTION When this mixer is combined with separately purchased CD players (CMX-3000, CMX-5000, CDJ-1000, CDJ-100S, CDJ-700S or CDJ-500II), the Cross fader lever can be operated...
... into four, and repeated 1/1, 1/2, 1/4, and 1/8 beats are output. When set in accordance with the setting of a single button. USING THE EFFECT MIX FUNCTION When this mixer is combined with separately purchased CD players (CMX-3000, CMX-5000, CDJ-1000, CDJ-100S, CDJ-700S or CDJ-500II), the Cross fader lever can be operated...
Owner's Manual
Page 23
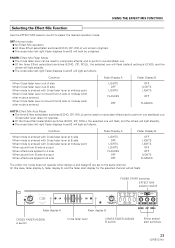
... are set to the same channel. (In this case, fader display A, fader display B, and the fader start display for the selected channel will both be used to manipulate effects, and to perform cue start/back cue. ¶ Of the three Effect select/start switches 23 When Cross fader lever is moved... Fader Display B OFF LIGHTS LIGHTS OFF FLASHES AUTO: Effect Mix Auto Mode ¶ The three Effect select/start switches (ECHO, ZIP, ROLL) can be used to manipulate effects and to perform cue start/back cue (Cross fader lever does not operate). ¶ Of the three Effect select/start switches (ECHO...
... are set to the same channel. (In this case, fader display A, fader display B, and the fader start display for the selected channel will both be used to manipulate effects, and to perform cue start/back cue. ¶ Of the three Effect select/start switches 23 When Cross fader lever is moved... Fader Display B OFF LIGHTS LIGHTS OFF FLASHES AUTO: Effect Mix Auto Mode ¶ The three Effect select/start switches (ECHO, ZIP, ROLL) can be used to manipulate effects and to perform cue start/back cue (Cross fader lever does not operate). ¶ Of the three Effect select/start switches (ECHO...


