Owners Manual
Page 7
... Don't pass the orange lead through a hole into the lead. Otherwise, auto-equalization cannot be carried out and the effects of the sound field control cannot be sure to disconnect the battery 8 cable before beginning installation. • Refer to the owner's manual for vehicles with cable clamps or adhesive...volt battery and negative grounding. If you do, the protection circuit may fail to work when it cannot touch any leads. Otherwise, auto-equalization cannot be sure to use the front outputs of this unit. If the insulation of the wiring melts or gets torn, there is employed...
... Don't pass the orange lead through a hole into the lead. Otherwise, auto-equalization cannot be carried out and the effects of the sound field control cannot be sure to disconnect the battery 8 cable before beginning installation. • Refer to the owner's manual for vehicles with cable clamps or adhesive...volt battery and negative grounding. If you do, the protection circuit may fail to work when it cannot touch any leads. Otherwise, auto-equalization cannot be sure to use the front outputs of this unit. If the insulation of the wiring melts or gets torn, there is employed...
Owners Manual
Page 10
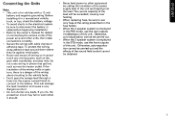
...the frame and holder from level. Do not drill into the gas line, brake line, electrical wiring or other modifications of the vehicle. • Install the unit where it does not get caught or pinched in the mechanism and cause a short circuit. • If you are trapped between this...become wound round the steering column and shift lever. The use of unauthorized parts can cause malfunctions. • Consult with your nearest dealer if installation requires the drilling of holes or other important parts. • It is extremely dangerous to allow the Control Unit lead to drill the holes....
...the frame and holder from level. Do not drill into the gas line, brake line, electrical wiring or other modifications of the vehicle. • Install the unit where it does not get caught or pinched in the mechanism and cause a short circuit. • If you are trapped between this...become wound round the steering column and shift lever. The use of unauthorized parts can cause malfunctions. • Consult with your nearest dealer if installation requires the drilling of holes or other important parts. • It is extremely dangerous to allow the Control Unit lead to drill the holes....
Owners Manual
Page 11
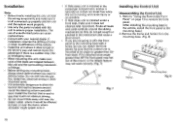
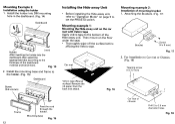
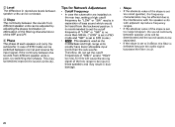
...base Velcro tape (Round surface) Remove the oil-paper from the back and attach. Fig. 9 Mounting Example 2: Installation of mounting bracket 1. Use wood screws (4 x 16 mm) to install the bracket to the mounting base using screws in the procedure described in Examples 1 and 2. (Fig. 13) ... 0 O .,i O O O Mounting base Fig. 12 Fixing the Front Panel The front panel can be fixed to the console. Use screws (3 x 4 mm) to install the bracket to see and fix with Velcro tape • Thoroughly wipe off the surface before affixing the Velcro tape. Velcro tape (Soft surface) Remove...
...base Velcro tape (Round surface) Remove the oil-paper from the back and attach. Fig. 9 Mounting Example 2: Installation of mounting bracket 1. Use wood screws (4 x 16 mm) to install the bracket to the mounting base using screws in the procedure described in Examples 1 and 2. (Fig. 13) ... 0 O .,i O O O Mounting base Fig. 12 Fixing the Front Panel The front panel can be fixed to the console. Use screws (3 x 4 mm) to install the bracket to see and fix with Velcro tape • Thoroughly wipe off the surface before affixing the Velcro tape. Velcro tape (Soft surface) Remove...
Owners Manual
Page 12
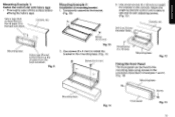
..., refer to "Operation Mode" on the car mat with Velcro tape Apply velcro tape to the thickness of the dashboard material and bend them. For Installation to Car mat or Chassis. (Fig. 18) Tapping screw (4 x 12 mm) 7 Car mat or chassis 7 Drill 2 to the holder. (Fig. 15) Dashboard Screw (2.6 x 6...holes Fig. 18 Then mount on the floor under the seat. • Thoroughly wipe off the surface before affixing the Velcro tape. Fig. 14 2. Install the holder into DIN mounting hole in the dashboard. (Fig. 14) Dashboard 782 -L_ Holder (mm) After inserting the holder into the dashboard, ...
..., refer to "Operation Mode" on the car mat with Velcro tape Apply velcro tape to the thickness of the dashboard material and bend them. For Installation to Car mat or Chassis. (Fig. 18) Tapping screw (4 x 12 mm) 7 Car mat or chassis 7 Drill 2 to the holder. (Fig. 15) Dashboard Screw (2.6 x 6...holes Fig. 18 Then mount on the floor under the seat. • Thoroughly wipe off the surface before affixing the Velcro tape. Fig. 14 2. Install the holder into DIN mounting hole in the dashboard. (Fig. 14) Dashboard 782 -L_ Holder (mm) After inserting the holder into the dashboard, ...
Owners Manual
Page 20
Tips for Network Adjustment • Cutoff Frequency • In case the subwoofer are installed on the rear tray, setting a high cutoff frequency for input signal. It is recommended to set to be heard from different speaker units is defeated ...
Tips for Network Adjustment • Cutoff Frequency • In case the subwoofer are installed on the rear tray, setting a high cutoff frequency for input signal. It is recommended to set to be heard from different speaker units is defeated ...
Owners Manual
Page 25
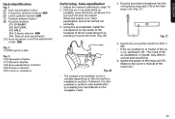
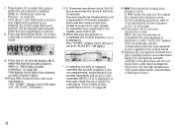
...(F2) NATURAL (F3) MILD (F4) Q factor selector PRO (F6) Start of the air conditioner or hearter may disturb correct auto-equalizing. 6. Using the provided belt, install the microphone on the center of the headrest of the car is also possible to page 19. 2. If desired, it is on ..., autoequalization cannot be carried out correctly. 3. The noise of auto-equalization [10] Auto-equalizer curve fine-adjustment mode PRO Fig. 2 [13] Microphone jack...
...(F2) NATURAL (F3) MILD (F4) Q factor selector PRO (F6) Start of the air conditioner or hearter may disturb correct auto-equalizing. 6. Using the provided belt, install the microphone on the center of the headrest of the car is also possible to page 19. 2. If desired, it is on ..., autoequalization cannot be carried out correctly. 3. The noise of auto-equalization [10] Auto-equalizer curve fine-adjustment mode PRO Fig. 2 [13] Microphone jack...
Owners Manual
Page 26
...and close the doors in the middle, press button [2]. 12.When the auto-equalization is completed, the created equalizer curve is applied to the output sound. 15.Remove the microphone and belt from their installed position and retain them under direct sunlight for long hours, for more than 10 ...seconds. In this unit fails to "Setting the Listening Position" on page 28. 13. When the auto-equalization is completed, the auto-equalizer is switched on (with "AUTO...
...and close the doors in the middle, press button [2]. 12.When the auto-equalization is completed, the created equalizer curve is applied to the output sound. 15.Remove the microphone and belt from their installed position and retain them under direct sunlight for long hours, for more than 10 ...seconds. In this unit fails to "Setting the Listening Position" on page 28. 13. When the auto-equalization is completed, the auto-equalizer is switched on (with "AUTO...

Owners Manual
Page 28
...the measuring tone of the following error codes is displayed, Check its content and restart the operation again. 'Display , cau-to switch the auto-equalizer ON. AEQ Err E 3 The surrounding noise level is not possible to MIC Err E 1 Microphone is not connected. Each press of the... autoequalizer curve. The auto-equalizing function does not work properly if the speakers mentioned on the left are not connected. Install the microphone properly. 28 Switching the Auto-equalizer ON/ OFF The compensation with the auto-equalizer curve can be switched ON/OFF. Park the...
...the measuring tone of the following error codes is displayed, Check its content and restart the operation again. 'Display , cau-to switch the auto-equalizer ON. AEQ Err E 3 The surrounding noise level is not possible to MIC Err E 1 Microphone is not connected. Each press of the... autoequalizer curve. The auto-equalizing function does not work properly if the speakers mentioned on the left are not connected. Install the microphone properly. 28 Switching the Auto-equalizer ON/ OFF The compensation with the auto-equalizer curve can be switched ON/OFF. Park the...
