Owners Manual
Page 7
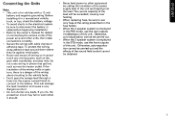
...Do not route wiring in places that get hot, such as the gear shift, handbrake, and seat rails. Otherwise, auto-equalization cannot be sure to disconnect the battery 8 cable before beginning installation. • Refer to work when it in a recreational vehicle, truck, or bus, check the battery voltage. •... carried out. • When the 2-speaker system is employed in the STD mode, use the rear outputs (middle/bass) of this unit. Before installing it should. • Never feed power to the vehicle body. • Don't pass the orange lead through a hole into the lead. The current...
...Do not route wiring in places that get hot, such as the gear shift, handbrake, and seat rails. Otherwise, auto-equalization cannot be sure to disconnect the battery 8 cable before beginning installation. • Refer to work when it in a recreational vehicle, truck, or bus, check the battery voltage. •... carried out. • When the 2-speaker system is employed in the STD mode, use the rear outputs (middle/bass) of this unit. Before installing it should. • Never feed power to the vehicle body. • Don't pass the orange lead through a hole into the lead. The current...
Owners Manual
Page 10
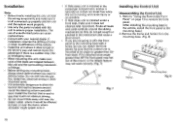
...injure the passenger if there is all connected up properly and the unit and the system work correctly. (Fig. 7) 30° Fig. 7 Installing the Control Unit Disassembling the Control Unit 1. Do not drill into the gas line, brake line, electrical wiring or other modifications of the leads ... or an accident. • If Hide-away unit is extremely dangerous to allow the Control Unit lead to the mounting base.) 2. Installation Note: • Before finally installing the unit, connect the wiring temporarily and make sure it is a sudden stop, like an emergency stop. • When mounting this...
...injure the passenger if there is all connected up properly and the unit and the system work correctly. (Fig. 7) 30° Fig. 7 Installing the Control Unit Disassembling the Control Unit 1. Do not drill into the gas line, brake line, electrical wiring or other modifications of the leads ... or an accident. • If Hide-away unit is extremely dangerous to allow the Control Unit lead to the mounting base.) 2. Installation Note: • Before finally installing the unit, connect the wiring temporarily and make sure it is a sudden stop, like an emergency stop. • When mounting this...
Owners Manual
Page 11
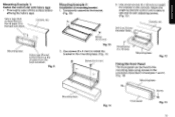
.... 11) I) Screw (3 x 4 mm) 0 o 0 O 6 I 0 3. Velcro tape (Soft surface) Remove the oil-paper from the back and attach. Fig. 9 Mounting Example 2: Installation of mounting bracket 1. Mounting base Velcro tape (Round surface) Remove the oil-paper from the back and attach. Mounting Example 1: Fasten the control unit with... adjusting screws. (Fig. 12) Console, etc. Use screws (3 x 4 mm) to install the bracket to see and fix with Velcro tape • Thoroughly wipe off the surface before affixing the Velcro tape.
.... 11) I) Screw (3 x 4 mm) 0 o 0 O 6 I 0 3. Velcro tape (Soft surface) Remove the oil-paper from the back and attach. Fig. 9 Mounting Example 2: Installation of mounting bracket 1. Mounting base Velcro tape (Round surface) Remove the oil-paper from the back and attach. Mounting Example 1: Fasten the control unit with... adjusting screws. (Fig. 12) Console, etc. Use screws (3 x 4 mm) to install the bracket to see and fix with Velcro tape • Thoroughly wipe off the surface before affixing the Velcro tape.
Owners Manual
Page 12
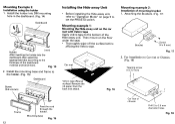
...them. Then mount on the car mat with Velcro tape Apply velcro tape to the bottom of the Hide-away unit. Mounting Example 3: Installation using the holder 1. Mounting example 1: Mounting the Hide-away unit on the floor under the seat. • Thoroughly wipe off the ...mm) Frame Pass the cord through the holder. Fig. 14 2. Attaching the Brackets. (Fig. 17) 0 0 ear Bracket 44" ---„Screw (4 x 8 mm) Fig. 17 2. Install the holder into DIN mounting hole in the dashboard. (Fig. 14) Dashboard 782 -L_ Holder (mm) After inserting the holder into the dashboard, then select...
...them. Then mount on the car mat with Velcro tape Apply velcro tape to the bottom of the Hide-away unit. Mounting Example 3: Installation using the holder 1. Mounting example 1: Mounting the Hide-away unit on the floor under the seat. • Thoroughly wipe off the ...mm) Frame Pass the cord through the holder. Fig. 14 2. Attaching the Brackets. (Fig. 17) 0 0 ear Bracket 44" ---„Screw (4 x 8 mm) Fig. 17 2. Install the holder into DIN mounting hole in the dashboard. (Fig. 14) Dashboard 782 -L_ Holder (mm) After inserting the holder into the dashboard, then select...
Owners Manual
Page 20
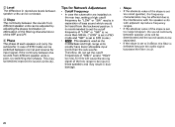
... be corrected. If the continuity between the sounds from the backward position. Tips for Network Adjustment • Cutoff Frequency • In case the subwoofer are installed on the rear tray, setting a high cutoff frequency for "LOW" or "SW" results in separation of bass sound which would be heard from different speaker...
... be corrected. If the continuity between the sounds from the backward position. Tips for Network Adjustment • Cutoff Frequency • In case the subwoofer are installed on the rear tray, setting a high cutoff frequency for "LOW" or "SW" results in separation of bass sound which would be heard from different speaker...
Owners Manual
Page 25
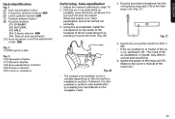
...13] Microphone jack Fig. 3 [15] Operation display [17] Numeric display [19] Auto-equalization indicator [20] Position indicator [22] Function indicators Performing Auto-equalization 1. When the engine is on the microphone installation position. Plug the provided microphone into the microphone input jack [13] of the hideaway unit... the owner's manual of the air conditioner or hearter may disturb correct auto-equalizing. 6. Switch the power of the head unit ON. (Refer to perform auto-equalization by installing the microphone on the center of the headrest of driver's seat securely by pointing...
...13] Microphone jack Fig. 3 [15] Operation display [17] Numeric display [19] Auto-equalization indicator [20] Position indicator [22] Function indicators Performing Auto-equalization 1. When the engine is on the microphone installation position. Plug the provided microphone into the microphone input jack [13] of the hideaway unit... the owner's manual of the air conditioner or hearter may disturb correct auto-equalizing. 6. Switch the power of the head unit ON. (Refer to perform auto-equalization by installing the microphone on the center of the headrest of driver's seat securely by pointing...
Owners Manual
Page 26
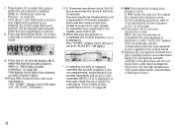
... acoustic property lights.) 10.Press (F6) of Autoequalizing Function" on (with "AUTO EQ" lighted [19]) automatically and the compensation with the auto-equalizer curve is installed. (Refer to "Error Codes of buttons [9] to start autoequalization. (The "START" display frame [22] lights and "AUTO EQ" [19] ...hand) or driver's sear (right-hand) position is not selected, the driver's seat (left-hand) position will be selected automatically when the auto-equalization is displayed. (The "START" display frame [22] goes out and "AUTO EQ" [19] lights.) 9. For the operating procedure, refer to ...
... acoustic property lights.) 10.Press (F6) of Autoequalizing Function" on (with "AUTO EQ" lighted [19]) automatically and the compensation with the auto-equalizer curve is installed. (Refer to "Error Codes of buttons [9] to start autoequalization. (The "START" display frame [22] lights and "AUTO EQ" [19] ...hand) or driver's sear (right-hand) position is not selected, the driver's seat (left-hand) position will be selected automatically when the auto-equalization is displayed. (The "START" display frame [22] goes out and "AUTO EQ" [19] lights.) 9. For the operating procedure, refer to ...

Owners Manual
Page 28
...19] lights.) • In case an auto-equalizer curve has not been created, "AUTO EQ" [19] blinks for about 3 seconds to 12 o'clock position. Press button [2]. Adjust the RCA input level controls of the power amp of the autoequalizer curve. Install the microphone properly. 28 Remedy Plug in an as... turn off the car engine, air conditioner and heater. Install the supplied microphone properly. Use this function to check the effect of the speakers mentioned on the left to indicate that it is too high. The auto-equalizing function does not work properly if the speakers mentioned on...
...19] lights.) • In case an auto-equalizer curve has not been created, "AUTO EQ" [19] blinks for about 3 seconds to 12 o'clock position. Press button [2]. Adjust the RCA input level controls of the power amp of the autoequalizer curve. Install the microphone properly. 28 Remedy Plug in an as... turn off the car engine, air conditioner and heater. Install the supplied microphone properly. Use this function to check the effect of the speakers mentioned on the left to indicate that it is too high. The auto-equalizing function does not work properly if the speakers mentioned on...
