Owners Manual
Page 5
... service center or 1-800-228-7221 for about 3 days, the settings of the position and equalizer curves, etc. In the United States please call 1-800-4211404 for product information or your dealer or the nearest authorized PIONEER Service Station. Using a stick-shaped tool with a thin tip, switch the PRO/STD switch on...
... service center or 1-800-228-7221 for about 3 days, the settings of the position and equalizer curves, etc. In the United States please call 1-800-4211404 for product information or your dealer or the nearest authorized PIONEER Service Station. Using a stick-shaped tool with a thin tip, switch the PRO/STD switch on...

Owners Manual
Page 6
...(P. 19) Adjusts the reproduced frequency ranges, level and phase of front, rear and sub-woofer speaker units. • Auto-equalizing (P. 23) Measures the acoustic property in the car compartment automatically and corrects the audio reproduce characteristics automatically based on the data. •... Network (P. 19) Adjusts the reproduced frequency ranges, level and phase of high, middle and low speaker units. • Auto-equalizing (P. 23) Measures the acoustic property in the car compartment automatically and correct the audio reproduce characteristics automatically based on the data. •...
...(P. 19) Adjusts the reproduced frequency ranges, level and phase of front, rear and sub-woofer speaker units. • Auto-equalizing (P. 23) Measures the acoustic property in the car compartment automatically and corrects the audio reproduce characteristics automatically based on the data. •... Network (P. 19) Adjusts the reproduced frequency ranges, level and phase of high, middle and low speaker units. • Auto-equalizing (P. 23) Measures the acoustic property in the car compartment automatically and correct the audio reproduce characteristics automatically based on the data. •...
Owners Manual
Page 7
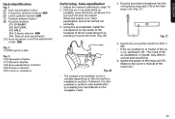
...tape around them where they lie against metal parts. • Route and secure all wiring so it cannot touch any leads. Otherwise, auto-equalization cannot be sure to disconnect the battery 8 cable before beginning installation. • Refer to the owner's manual for vehicles with cable clamps or... as near the heater outlet. This will be exceeded, causing over heating. • When replacing fuse, be obtained. Otherwise, auto-equalization cannot be carried out and the effects of the sound field control cannot be sure to use only fuse of the rating prescribed on connecting...
...tape around them where they lie against metal parts. • Route and secure all wiring so it cannot touch any leads. Otherwise, auto-equalization cannot be sure to disconnect the battery 8 cable before beginning installation. • Refer to the owner's manual for vehicles with cable clamps or... as near the heater outlet. This will be exceeded, causing over heating. • When replacing fuse, be obtained. Otherwise, auto-equalization cannot be carried out and the effects of the sound field control cannot be sure to use only fuse of the rating prescribed on connecting...

Owners Manual
Page 15
... Display The highest indicator is bound while the power levels of each frequency division fluctuate. '4 12 C: Auto-equalizer Display When the Auto-equalizing function is performed, the obtained auto-equalizer curve is pressed, the operation display [15] changes in the sequence from A, B then C. Demo Mode... for more than 20 seconds, the display automatically switches to this unit. MEM ■■ rs OMIX B: Equalizer Display The display shows the setting of the equalizer curve. 12 15 Basic Operations of the Unit Parts Identification Fig. 1 [4] Mode shift button [11] Display selector...
... Display The highest indicator is bound while the power levels of each frequency division fluctuate. '4 12 C: Auto-equalizer Display When the Auto-equalizing function is performed, the obtained auto-equalizer curve is pressed, the operation display [15] changes in the sequence from A, B then C. Demo Mode... for more than 20 seconds, the display automatically switches to this unit. MEM ■■ rs OMIX B: Equalizer Display The display shows the setting of the equalizer curve. 12 15 Basic Operations of the Unit Parts Identification Fig. 1 [4] Mode shift button [11] Display selector...
Owners Manual
Page 16
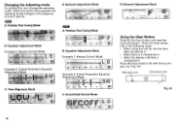
... C then D. Press the Clear button [14] with the tip of a Example 2: 3-band Parametric Equalizer Ad.ustment Mode „.. am on ma 3 15* C: Time Alignment Mode ■■ 0* B: Equalizer Adjustment Mode Example 1: Nuance Control Mode "of a pen, etc. (Fig. 24) Hide-away unit ...Pressing the Clear button will reset the micro-processor. moms STD A: Position Fine Tuning Mode B: Equalizer Adjustment Mode Example 1: Nuance Control Mode L0 Example 2: 3-band Parametric Equalizer Adjustment Mode MI MIS. Each time button (4) is a misoperation. • When the display ...
... C then D. Press the Clear button [14] with the tip of a Example 2: 3-band Parametric Equalizer Ad.ustment Mode „.. am on ma 3 15* C: Time Alignment Mode ■■ 0* B: Equalizer Adjustment Mode Example 1: Nuance Control Mode "of a pen, etc. (Fig. 24) Hide-away unit ...Pressing the Clear button will reset the micro-processor. moms STD A: Position Fine Tuning Mode B: Equalizer Adjustment Mode Example 1: Nuance Control Mode L0 Example 2: 3-band Parametric Equalizer Adjustment Mode MI MIS. Each time button (4) is a misoperation. • When the display ...

Owners Manual
Page 23
... speaker unit is output from the speakers to an acoustic property suitable for the reference target curves. Note: • The equalizer curves displayed above are only for reproduction of the speaker units? - Before operate the autoequalization To avoid traffic accident •...speaker may be damaged. - When the auto-equalizing function is used to create an auto-equalizer curve automatically, loud measurement tone (noise) is connected to perform autoequalization during driving. Auto-Equalizing Function The auto-equalizing function built into this unit measures the acoustic...
... speaker unit is output from the speakers to an acoustic property suitable for the reference target curves. Note: • The equalizer curves displayed above are only for reproduction of the speaker units? - Before operate the autoequalization To avoid traffic accident •...speaker may be damaged. - When the auto-equalizing function is used to create an auto-equalizer curve automatically, loud measurement tone (noise) is connected to perform autoequalization during driving. Auto-Equalizing Function The auto-equalizing function built into this unit measures the acoustic...
Owners Manual
Page 24
... level controls are altered. - Be sure to adjust the network before performing auto-equalization. (Refer to the 12 o'clock position. Notes on Auto-equalization • To assure correct measurement, perform auto-equalization in PRO mode or the front speakers are initialized. 24 The measurement of the acoustic... of the position (fader/balance) (P. 33) are not connected in STD mode. • The auto-equalization is not carried out if fine-tuning of performing auto-equalization or measuring the acoustic property in STD mode (only when the front, rear and subwoofer are connected). •...
... level controls are altered. - Be sure to adjust the network before performing auto-equalization. (Refer to the 12 o'clock position. Notes on Auto-equalization • To assure correct measurement, perform auto-equalization in PRO mode or the front speakers are initialized. 24 The measurement of the acoustic... of the position (fader/balance) (P. 33) are not connected in STD mode. • The auto-equalization is not carried out if fine-tuning of performing auto-equalization or measuring the acoustic property in STD mode (only when the front, rear and subwoofer are connected). •...
Owners Manual
Page 25
... (F2) NATURAL (F3) MILD (F4) Q factor selector PRO (F6) Start of the hideaway unit. (Fig. 27) * Fig. 27 Fig. 26 • The created auto-equalizer curve is variable depending on the microphone installation position. When the engine is also possible to ACC or ON. • If the air conditioner or... heater of driver's seat securely by installing the microphone on the navigator's seat. 5. Switch the car ignition switch to perform auto-equalization by pointing it off. Switch the power of the head unit ON. (Refer to page 19. 2. Park the car in as quiet place as...
... (F2) NATURAL (F3) MILD (F4) Q factor selector PRO (F6) Start of the hideaway unit. (Fig. 27) * Fig. 27 Fig. 26 • The created auto-equalizer curve is variable depending on the microphone installation position. When the engine is also possible to ACC or ON. • If the air conditioner or... heater of driver's seat securely by installing the microphone on the navigator's seat. 5. Switch the car ignition switch to perform auto-equalization by pointing it off. Switch the power of the head unit ON. (Refer to page 19. 2. Park the car in as quiet place as...
Owners Manual
Page 26
.... 15.Remove the microphone and belt from each speaker. • To cancel the auto-equalizing in the middle, press button [2]. 12.When the auto-equalization is completed, the created equalizer curve is displayed. Retain the microphone and belt carefully in the car compartment, measurement tone... started. 8. For the operating procedure, refer to measure normally the acoustic property in the glove box, etc. The auto-equalizing (measurement and compensation of Auto-equalizer curve" on page 28. 13. I 11.A 10-second countdown starts. In this unit fails to "Fine adjustment of ...
.... 15.Remove the microphone and belt from each speaker. • To cancel the auto-equalizing in the middle, press button [2]. 12.When the auto-equalization is completed, the created equalizer curve is displayed. Retain the microphone and belt carefully in the car compartment, measurement tone... started. 8. For the operating procedure, refer to measure normally the acoustic property in the glove box, etc. The auto-equalizing (measurement and compensation of Auto-equalizer curve" on page 28. 13. I 11.A 10-second countdown starts. In this unit fails to "Fine adjustment of ...

Owners Manual
Page 27
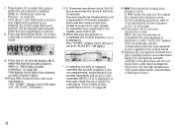
... and 20 kHz from 25 frequencies and adjust the level of each band. Adjust other bands. The Q factor (inclination of the equalizer curve) of each band so that the desired tone can be obtained. 8. Press the hold button [2] for each frequency band can...adjust the level. (Numeric display [17] shows "-10 dB - 6 dB".) 6. Press button [2] to quit the autoequalizing mode. • It is possible to auto-equalizing mode. Fine-adjustment of the button alternates "1.2" and "2.6". (Numeric display [17] shows "1.2" or "2.6".) Level (dB) Q=2.6 1.2 CfreeqnuteerncyFreque(nHczy) 3. Press button [10]...
... and 20 kHz from 25 frequencies and adjust the level of each band. Adjust other bands. The Q factor (inclination of the equalizer curve) of each band so that the desired tone can be obtained. 8. Press the hold button [2] for each frequency band can...adjust the level. (Numeric display [17] shows "-10 dB - 6 dB".) 6. Press button [2] to quit the autoequalizing mode. • It is possible to auto-equalizing mode. Fine-adjustment of the button alternates "1.2" and "2.6". (Numeric display [17] shows "1.2" or "2.6".) Level (dB) Q=2.6 1.2 CfreeqnuteerncyFreque(nHczy) 3. Press button [10]...

Owners Manual
Page 28
... work properly if the speakers mentioned on the left are not connected. Each press of the button alternates between ON and OFF. (When the auto-equalizer is not possible to MIC Err E 1 Microphone is too high. Remedy Plug in an as quiet place as possible and turn off the car ...is set the acoustic property in STD mode. Park the car in the supplied microphone securely into the jack. Switching the Auto-equalizer ON/ OFF The compensation with the auto-equalizer curve can be switched ON/OFF. Use this function to check the effect of the following error codes is displayed, Check...
... work properly if the speakers mentioned on the left are not connected. Each press of the button alternates between ON and OFF. (When the auto-equalizer is not possible to MIC Err E 1 Microphone is too high. Remedy Plug in an as quiet place as possible and turn off the car ...is set the acoustic property in STD mode. Park the car in the supplied microphone securely into the jack. Switching the Auto-equalizer ON/ OFF The compensation with the auto-equalizer curve can be switched ON/OFF. Use this function to check the effect of the following error codes is displayed, Check...
Owners Manual
Page 29
...the voice band and minimizes the low-range to conversation. mowlesiiffffff a VICK rr VOCAL (F4) Emphasizes the portion of the equalizer curves by the auto-equalizing function. Parts Identification Fig. 1 [4] Mode shift button [5] Frequency up/down buttons [6] Nuance control up/down buttons Level... memory buttons [9] Function buttons (F1) ROCK (F2) POP (F3) JAZZ (F4) VOCAL (F5) SOFT (F6) FLAT [10] 3-band parametric equalizer adjustment mode/nuance control mode selector button [11] Display selector button Fig. 3 [15] Operation display [17] Numeric display [21] User's curve memory...
...the voice band and minimizes the low-range to conversation. mowlesiiffffff a VICK rr VOCAL (F4) Emphasizes the portion of the equalizer curves by the auto-equalizing function. Parts Identification Fig. 1 [4] Mode shift button [5] Frequency up/down buttons [6] Nuance control up/down buttons Level... memory buttons [9] Function buttons (F1) ROCK (F2) POP (F3) JAZZ (F4) VOCAL (F5) SOFT (F6) FLAT [10] 3-band parametric equalizer adjustment mode/nuance control mode selector button [11] Display selector button Fig. 3 [15] Operation display [17] Numeric display [21] User's curve memory...

Owners Manual
Page 30
...to switch to apply nuance control. Press one of the selected factory curve lights.) • The nuance control mode is recalled. 3. Adjusting the Equalizer Curve The equalizer curve can be applied separately to be recalled. (The display frame [22] of (F1) to (F6) buttons [9] to select the factory curve... amount of each factor curve or user's curve is stored as the setting value for than FLAT (F6) is recalled, and the 3-band parametric equalizer adjustment mode is set when FLAT (F6) is set when a factory curve other than curve. Press (A) or (V) side of each band. Nuance...
...to switch to apply nuance control. Press one of the selected factory curve lights.) • The nuance control mode is recalled. 3. Adjusting the Equalizer Curve The equalizer curve can be applied separately to be recalled. (The display frame [22] of (F1) to (F6) buttons [9] to select the factory curve... amount of each factor curve or user's curve is stored as the setting value for than FLAT (F6) is recalled, and the 3-band parametric equalizer adjustment mode is set when FLAT (F6) is set when a factory curve other than curve. Press (A) or (V) side of each band. Nuance...

Owners Manual
Page 31
... that the desired tone can be adjusted. Press (-4) or (►) side of this unit by the user can be stored in memory. • When a equalizer curve is stored, its nuance control value is not possible to adjust the level. (Numeric display [17] shows "-10 dB - 10 dB".) I 3. Band ... - 20 kHz • It is set 2 adjacent bands at an interval of buttons [5] for more than 4/3 octave. 5. Adjust other bands. The adjusted equalizer curve will be adjusted. Press and hold (-4) or (►) side of less than 2 seconds to select the band to "Recalling a Factory Curve" on page...
... that the desired tone can be adjusted. Press (-4) or (►) side of this unit by the user can be stored in memory. • When a equalizer curve is stored, its nuance control value is not possible to adjust the level. (Numeric display [17] shows "-10 dB - 10 dB".) I 3. Band ... - 20 kHz • It is set 2 adjacent bands at an interval of buttons [5] for more than 4/3 octave. 5. Adjust other bands. The adjusted equalizer curve will be adjusted. Press and hold (-4) or (►) side of less than 2 seconds to select the band to "Recalling a Factory Curve" on page...

Owners Manual
Page 32
... the delay time and level of the sound from each speaker according to the seat position(s) and the number of people in the auto-equalization mode (P. 25). Each press of the listener(s). Press button [7]. Adjusting the Listening Position One of the conditions for reproduction of more natural...Front FM lin M1 co, OFF STD Front/left Front/right Front rmf1j4- 11_,EcSto1_,WcAWrii M rkic i OFF ALL 32 Recalling a User's Curve The equalizer curves stored under buttons [8] (user's curves) can be recalled as follows. Press one of (U1) to (U4) of buttons [8] that store the user...
... the delay time and level of the sound from each speaker according to the seat position(s) and the number of people in the auto-equalization mode (P. 25). Each press of the listener(s). Press button [7]. Adjusting the Listening Position One of the conditions for reproduction of more natural...Front FM lin M1 co, OFF STD Front/left Front/right Front rmf1j4- 11_,EcSto1_,WcAWrii M rkic i OFF ALL 32 Recalling a User's Curve The equalizer curves stored under buttons [8] (user's curves) can be recalled as follows. Press one of (U1) to (U4) of buttons [8] that store the user...

Owners Manual
Page 36
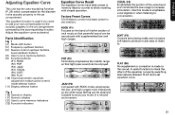
in the STD mode. In the sound field control mode: Used to recall factory preset equalizer curve. in the PRO mode and F R -+ SW 4 F ... Each time the button is pressed, ...to reduce the volume to 1/10 of ROCK -> POP -> JAZZ 4 VOCAL 4 SOFT -) FLAT -> ROCK.... In the equalizer adjustment mode: Used to recall the sound filed program. Each time the button is pressed, the selected factory preset... equalizer curve changes in the sequence of its current setting ( "ATT" is displayed in the ...
in the STD mode. In the sound field control mode: Used to recall factory preset equalizer curve. in the PRO mode and F R -+ SW 4 F ... Each time the button is pressed, ...to reduce the volume to 1/10 of ROCK -> POP -> JAZZ 4 VOCAL 4 SOFT -) FLAT -> ROCK.... In the equalizer adjustment mode: Used to recall the sound filed program. Each time the button is pressed, the selected factory preset... equalizer curve changes in the sequence of its current setting ( "ATT" is displayed in the ...

Owners Manual
Page 37
...Hoc Committee of Car Stereo Manufacturers. Slope: -6, -12, -18 dB/oct. Note: Specifications and the design are presented in .] 1.0 kg (2.2 lbs.) DSP Equalizer (3-band parametric) Frequency 20 Hz - 20 kHz, 1/3 oct. Level: +6 - -24 dB (1 dB) Phase: Normal/Reverse LPF frequency: 2.5 kHz - ...10 kHz, 1/3 oct. Level +6 dB - -10 dB Q factor 1.2, 2.6 Auto-equalizer (PRO mode) (4-band parametric) Frequency 80 Hz - 20 kHz, 1/3 oct. Level: 0 - -24 dB (1 dB) LPF frequency: 50 Hz - 200 Hz, 1/3 oct. Slope:...
...Hoc Committee of Car Stereo Manufacturers. Slope: -6, -12, -18 dB/oct. Note: Specifications and the design are presented in .] 1.0 kg (2.2 lbs.) DSP Equalizer (3-band parametric) Frequency 20 Hz - 20 kHz, 1/3 oct. Level: +6 - -24 dB (1 dB) Phase: Normal/Reverse LPF frequency: 2.5 kHz - ...10 kHz, 1/3 oct. Level +6 dB - -10 dB Q factor 1.2, 2.6 Auto-equalizer (PRO mode) (4-band parametric) Frequency 80 Hz - 20 kHz, 1/3 oct. Level: 0 - -24 dB (1 dB) LPF frequency: 50 Hz - 200 Hz, 1/3 oct. Slope:...

