Owner's Manual
Page 2
...with any other areas may result in a safe and accessible place for purchasing this PIONEER product To ensure proper use, please read and observe WARNINGs and CAUTIONs in a residential installation. This equipment has very low levels of the FCC Rules. Reorient or relocate the ...to radio communications. CAUTION: THE USE OF OPTICAL INSTRUMENTS WITH THIS PRODUCT WILL INCREASE EYE HAZARD. FCC ID: AJDK054 MODEL NO.: DEH-X6500BT/DEH-X65BT/DEH4500BT IC: 775E-K054 This device complies with the product may cause harmful interference to operate the equipment. Important (Serial ...
...with any other areas may result in a safe and accessible place for purchasing this PIONEER product To ensure proper use, please read and observe WARNINGs and CAUTIONs in a residential installation. This equipment has very low levels of the FCC Rules. Reorient or relocate the ...to radio communications. CAUTION: THE USE OF OPTICAL INSTRUMENTS WITH THIS PRODUCT WILL INCREASE EYE HAZARD. FCC ID: AJDK054 MODEL NO.: DEH-X6500BT/DEH-X65BT/DEH4500BT IC: 775E-K054 This device complies with the product may cause harmful interference to operate the equipment. Important (Serial ...
Owner's Manual
Page 4
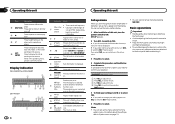
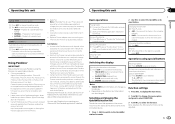
... damaging the device or vehicle inte- to select YES. # If you need to start talking on page 13. Display indication DEH-X6500BT and DEH-X65BT 1 2 3 56 4 7 9b 8 ac DEH-4500BT 5b 6 8 7a93 1 2 c Indicator State ! Sub infor- 6 mation Sub information is operated from the system menu... it. 3 Press M.C. rior, remove any cables and devices attached to select. to select. 4 Complete the procedure outlined below . 1 After installation of direct sunlight and high temperatures. ! CLOCK SET (setting the clock) 1 Turn M.C. to switch to pause or resume playback. m LIST/...
... damaging the device or vehicle inte- to select YES. # If you need to start talking on page 13. Display indication DEH-X6500BT and DEH-X65BT 1 2 3 56 4 7 9b 8 ac DEH-4500BT 5b 6 8 7a93 1 2 c Indicator State ! Sub infor- 6 mation Sub information is operated from the system menu... it. 3 Press M.C. rior, remove any cables and devices attached to select. to select. 4 Complete the procedure outlined below . 1 After installation of direct sunlight and high temperatures. ! CLOCK SET (setting the clock) 1 Turn M.C. to switch to pause or resume playback. m LIST/...
Owner's Manual
Page 5
...panel into the slots on the next page. Use one level higher) 1 Press /DIMMER. If the battery leaks, wipe the remote control completely clean and install a new battery. ! Switching preset stations 1 Press c or d. ! Select MAN (manual tuning) under SEEK to use this function. While pressing and...adjust the volume. 3 Always keep the detached front panel in damage to the front panel or head unit. Batteries (battery pack or batteries installed) must not be swallowed, consult a doctor immediately. ! Do not handle the battery with metallic objects. ! Do not let the remote ...
...panel into the slots on the next page. Use one level higher) 1 Press /DIMMER. If the battery leaks, wipe the remote control completely clean and install a new battery. ! Switching preset stations 1 Press c or d. ! Select MAN (manual tuning) under SEEK to use this function. While pressing and...adjust the volume. 3 Always keep the detached front panel in damage to the front panel or head unit. Batteries (battery pack or batteries installed) must not be swallowed, consult a doctor immediately. ! Do not handle the battery with metallic objects. ! Do not let the remote ...
Owner's Manual
Page 9
... that is subject to change without notice and could be compatible with the Pandora application installed. to display the main menu. 2 Turn M.C. betically ! to select the QuickMix ... paid accounts available from your device (Search Apple iTunes App Store for "Pandora"). ! Optional Pioneer adapter cable connecting your favorite setting. ! SPEANA (spectrum analyzer) Notes ! Playing 1 When ...TIME (playback time) ! Enhancing compressed audio and restoring rich sound (sound retriever) Only for DEH-4500BT 1 Press 3/S.Rtrv to a version that appears on the iPhone. For details, refer...
... that is subject to change without notice and could be compatible with the Pandora application installed. to display the main menu. 2 Turn M.C. betically ! to select the QuickMix ... paid accounts available from your device (Search Apple iTunes App Store for "Pandora"). ! Optional Pioneer adapter cable connecting your favorite setting. ! SPEANA (spectrum analyzer) Notes ! Playing 1 When ...TIME (playback time) ! Enhancing compressed audio and restoring rich sound (sound retriever) Only for DEH-4500BT 1 Press 3/S.Rtrv to a version that appears on the iPhone. For details, refer...
Owner's Manual
Page 17
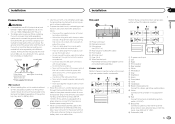
...cables away from moving parts, such as near the heater outlet. - Never cut the insulation of the power cable of the battery before installation. - Use a fuse of multiple speakers. ! Never band together negative cables of the rating prescribed. - If the vehicle is ground. When...with different screws. Ensure that the ground wire is properly connected to the car separately with a 12-volt battery and negative grounding only. When installing this unit in order to share the power with metal parts to the antenna booster power supply terminal. ! Use this unit or power amp...
...cables away from moving parts, such as near the heater outlet. - Never cut the insulation of the power cable of the battery before installation. - Use a fuse of multiple speakers. ! Never band together negative cables of the rating prescribed. - If the vehicle is ground. When...with different screws. Ensure that the ground wire is properly connected to the car separately with a 12-volt battery and negative grounding only. When installing this unit in order to share the power with metal parts to the antenna booster power supply terminal. ! Use this unit or power amp...

Owner's Manual
Page 18
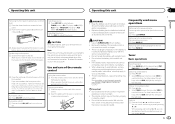
...face (5 mm × 9 mm) screws, depending on the bracket and the side of this unit. Check all connections and systems before final installation. ! Removing the unit 1 Remove the trim ring. 2 1 Dashboard 2 Mounting sleeve # Make sure that came with the notched tab down. ... 3 2 1 Screw 2 Mounting bracket 3 Dashboard or console ! cess to bend the metal tabs (90°) into both sides of a sudden stop. ! When installing, to ensure proper heat dispersal when using this unit. Releasing the front panel allows easier ac- l Subwoofer (4 W) × 2 Notes ! With a 2 speaker ...
...face (5 mm × 9 mm) screws, depending on the bracket and the side of this unit. Check all connections and systems before final installation. ! Removing the unit 1 Remove the trim ring. 2 1 Dashboard 2 Mounting sleeve # Make sure that came with the notched tab down. ... 3 2 1 Screw 2 Mounting bracket 3 Dashboard or console ! cess to bend the metal tabs (90°) into both sides of a sudden stop. ! When installing, to ensure proper heat dispersal when using this unit. Releasing the front panel allows easier ac- l Subwoofer (4 W) × 2 Notes ! With a 2 speaker ...
Owner's Manual
Page 19
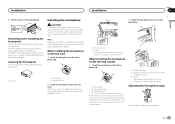
... angle can be adjusted. With the sun visor up the voice of the person operating the system. When installing the microphone on the steering column 1 Install the microphone on the sun visor. En 19 CAUTION It is extremely dangerous to allow the microphone lead to... groove. # Microphone can remove the front panel to protect your unit from the microphone clip, slide the microphone base. 3 1 Double-sided tape 2 Install the microphone clip on the steer- ing column. 1 2 2 1 Microphone clip 2 Clamp Use separately sold clamps to secure the lead where necessary inside...
... angle can be adjusted. With the sun visor up the voice of the person operating the system. When installing the microphone on the steering column 1 Install the microphone on the sun visor. En 19 CAUTION It is extremely dangerous to allow the microphone lead to... groove. # Microphone can remove the front panel to protect your unit from the microphone clip, slide the microphone base. 3 1 Double-sided tape 2 Install the microphone clip on the steer- ing column. 1 2 2 1 Microphone clip 2 Clamp Use separately sold clamps to secure the lead where necessary inside...
Owner's Manual
Page 21
... the Pandora application is undergoing maintenance. vice and connect. The USB device connected to ACC or ule of the Pandora application installed. Disconnect your device and replace it with FAT12, FAT16 or FAT12, FAT16 or FAT32. Turn the mum allowable ignition switch... to the USB source. Then, return to current. cable from your dealer or an authorized Pioneer Service Station. tion from the iPhone. iPhone. Pandora limits the number of failed. En 21 English Additional information Additional information Appendix...
... the Pandora application is undergoing maintenance. vice and connect. The USB device connected to ACC or ule of the Pandora application installed. Disconnect your device and replace it with FAT12, FAT16 or FAT12, FAT16 or FAT32. Turn the mum allowable ignition switch... to the USB source. Then, return to current. cable from your dealer or an authorized Pioneer Service Station. tion from the iPhone. iPhone. Pandora limits the number of failed. En 21 English Additional information Additional information Appendix...


