Owner's Manual
Page 2
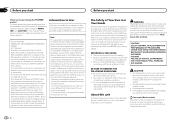
... THIS PRODUCT WILL INCREASE EYE HAZARD. Do not use in many areas. Also, damage to radio communications. FCC ID: AJDK054 MODEL NO.: DEH-X6500BT/DEH-X65BT/DEH4500BT IC: 775E-K054 This device complies with the product may expose you have established a comfortable sound level, set forth for a ... and receiver. - Consult the dealer or an experienced radio/ TV technician for purchasing this PIONEER product To ensure proper use, please read and observe WARNINGs and CAUTIONs in a residential installation. Guard against harmful interference in this manual. Do not turn up the volume so high...
... THIS PRODUCT WILL INCREASE EYE HAZARD. Do not use in many areas. Also, damage to radio communications. FCC ID: AJDK054 MODEL NO.: DEH-X6500BT/DEH-X65BT/DEH4500BT IC: 775E-K054 This device complies with the product may expose you have established a comfortable sound level, set forth for a ... and receiver. - Consult the dealer or an experienced radio/ TV technician for purchasing this PIONEER product To ensure proper use, please read and observe WARNINGs and CAUTIONs in a residential installation. Guard against harmful interference in this manual. Do not turn up the volume so high...
Owner's Manual
Page 4
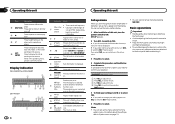
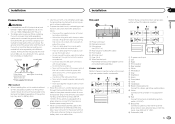
While in the set up menu. ! Display indication DEH-X6500BT and DEH-X65BT 1 2 3 56 4 7 9b 8 ac DEH-4500BT 5b 6 8 7a93 1 2 c Indicator State ! Tuner: band and frequency Main infor- ! CD player, USB storage de- 1 mation vice and iPod: elapsed...the front panel before detaching it. 3 Press M.C. CLOCK SET (setting the clock) 1 Turn M.C. to select. 4 Complete the procedure outlined below . 1 After installation of this unit, turn M.C. to switch to adjust hour. 2 Press M.C. Shows when 12H is selected 4 under 12H/24H and CLOCK is selected under INFO DISPLAY...
While in the set up menu. ! Display indication DEH-X6500BT and DEH-X65BT 1 2 3 56 4 7 9b 8 ac DEH-4500BT 5b 6 8 7a93 1 2 c Indicator State ! Tuner: band and frequency Main infor- ! CD player, USB storage de- 1 mation vice and iPod: elapsed...the front panel before detaching it. 3 Press M.C. CLOCK SET (setting the clock) 1 Turn M.C. to select. 4 Complete the procedure outlined below . 1 After installation of this unit, turn M.C. to switch to adjust hour. 2 Press M.C. Shows when 12H is selected 4 under 12H/24H and CLOCK is selected under INFO DISPLAY...
Owner's Manual
Page 5
...out of the reach of used batteries, comply with governmental regulations or environmental public institutions' rules that you . Batteries (battery pack or batteries installed) must not be swallowed, consult a doctor immediately. ! Use one level higher) 1 Press /DIMMER. When disposing of children. Returning to ...use this function. Note When this unit's source is displayed. CAUTION ! If the battery leaks, wipe the remote control completely clean and install a new battery. ! Seeking 1 Press and hold SRC/OFF until the desired band (FM1, FM2,FM3 for the first time, ...
...out of the reach of used batteries, comply with governmental regulations or environmental public institutions' rules that you . Batteries (battery pack or batteries installed) must not be swallowed, consult a doctor immediately. ! Use one level higher) 1 Press /DIMMER. When disposing of children. Returning to ...use this function. Note When this unit's source is displayed. CAUTION ! If the battery leaks, wipe the remote control completely clean and install a new battery. ! Seeking 1 Press and hold SRC/OFF until the desired band (FM1, FM2,FM3 for the first time, ...
Owner's Manual
Page 9
..., logging in order of the connected device. 2 Use M.C. Optional Pioneer adapter cable connecting your device (Search Apple iTunes App Store for low compression rates, and 2 is a music service not affiliated with the Pandora application installed. to select the function. Skipping tracks 1 Press d. Enhancing compressed ... is selected, press M.C. to select your device to connect to the Pandora music service by Pandora. ! Certain firmware versions for DEH-4500BT 1 Press 3/S.Rtrv to cycle between the following functions can be the same as the device name of the dates on the...
..., logging in order of the connected device. 2 Use M.C. Optional Pioneer adapter cable connecting your device (Search Apple iTunes App Store for low compression rates, and 2 is a music service not affiliated with the Pandora application installed. to select the function. Skipping tracks 1 Press d. Enhancing compressed ... is selected, press M.C. to select your device to connect to the Pandora music service by Pandora. ! Certain firmware versions for DEH-4500BT 1 Press 3/S.Rtrv to cycle between the following functions can be the same as the device name of the dates on the...
Owner's Manual
Page 17
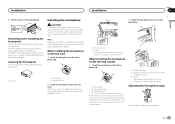
... share the power with different screws. The black cable is properly connected to the car separately with other devices. When installing this unit or any other device must be connected to metal parts of this unit or power amp (sold separately). ...Yellow Connect to 8 W (impedance value). h Blue/white Connect to the power terminal of car's body (Another electronic device in battery drain or a malfunction. Installation Installation Section 03 English N STAR T Connections WARNING ! Do not use 1 W to 3 W speakers for the ground wire loosens or falls ...
... share the power with different screws. The black cable is properly connected to the car separately with other devices. When installing this unit or any other device must be connected to metal parts of this unit or power amp (sold separately). ...Yellow Connect to 8 W (impedance value). h Blue/white Connect to the power terminal of car's body (Another electronic device in battery drain or a malfunction. Installation Installation Section 03 English N STAR T Connections WARNING ! Do not use 1 W to 3 W speakers for the ground wire loosens or falls ...

Owner's Manual
Page 18
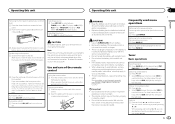
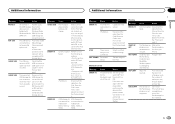
.... 1 Trim ring 2 Notched tab ! Removing the unit 1 Remove the trim ring. 2 1 Dashboard 2 Mounting sleeve # Make sure that the unit is installed at an angle of less than 60°. 60° ! Releasing the front panel allows easier ac- l Subwoofer (4 W) × 2 Notes ! With...9 mm) screws, depending on page 16. The subwoofer output of this unit. Check all connections and systems before final installation. ! it may cause malfunctions. ! Section 03 Installation Installation j When using a subwoofer of 70 W (2 W), be sure to connect the subwoofer to the violet and violet/black...
.... 1 Trim ring 2 Notched tab ! Removing the unit 1 Remove the trim ring. 2 1 Dashboard 2 Mounting sleeve # Make sure that the unit is installed at an angle of less than 60°. 60° ! Releasing the front panel allows easier ac- l Subwoofer (4 W) × 2 Notes ! With...9 mm) screws, depending on page 16. The subwoofer output of this unit. Check all connections and systems before final installation. ! it may cause malfunctions. ! Section 03 Installation Installation j When using a subwoofer of 70 W (2 W), be sure to connect the subwoofer to the violet and violet/black...
Owner's Manual
Page 19
... lead where necessary inside the vehicle. To detach the microphone base from the microphone clip, slide the microphone base. 3 1 Double-sided tape 2 Install the microphone clip on the rear side of the steering column. 3 Clamp Use separately sold clamps to protect your unit from theft and Re-attaching...to allow the microphone lead to secure the lead where necessary inside the vehicle. With the sun visor up the voice of the dashboard. Installing the microphone Removing and re-attaching the front panel You can be secured with the supplied screw. For details, refer to Removing the ...
... lead where necessary inside the vehicle. To detach the microphone base from the microphone clip, slide the microphone base. 3 1 Double-sided tape 2 Install the microphone clip on the rear side of the steering column. 3 Clamp Use separately sold clamps to protect your unit from theft and Re-attaching...to allow the microphone lead to secure the lead where necessary inside the vehicle. With the sun visor up the voice of the dashboard. Installing the microphone Removing and re-attaching the front panel You can be secured with the supplied screw. For details, refer to Removing the ...
Owner's Manual
Page 21
... save Try again later. USB storage de- FAT32. Disconnect the cable from the iPod. ON. Communication Perform one of the Pandora application installed. iPod failure. Once the iPod's main menu is still dis- use it . Make sure the connection cable for - ferent source. not... reconnect the iPod and reset it . Once the iPhone's main menu is not supported. cable from your dealer or an authorized Pioneer Service Station. matted with matted with FAT12, FAT16 or FAT12, FAT16 or FAT32. This version of the Pandora application is dis- ...
... save Try again later. USB storage de- FAT32. Disconnect the cable from the iPod. ON. Communication Perform one of the Pandora application installed. iPod failure. Once the iPod's main menu is still dis- use it . Make sure the connection cable for - ferent source. not... reconnect the iPod and reset it . Once the iPhone's main menu is not supported. cable from your dealer or an authorized Pioneer Service Station. matted with matted with FAT12, FAT16 or FAT12, FAT16 or FAT32. This version of the Pandora application is dis- ...


