Owner's Manual
Page 5
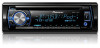
Selecting a source 1 Press SRC/OFF to California, U.S.A.)" Important ! CAUTION For safety reasons, park your country/area. ! Note When this unit's blue/white lead is connected to the vehicle's auto-antenna relay control terminal, the vehicle's antenna extends when this unit Section 02 English Removing the front panel to ...
Selecting a source 1 Press SRC/OFF to California, U.S.A.)" Important ! CAUTION For safety reasons, park your country/area. ! Note When this unit's blue/white lead is connected to the vehicle's auto-antenna relay control terminal, the vehicle's antenna extends when this unit Section 02 English Removing the front panel to ...
Owner's Manual
Page 16
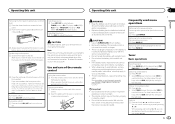
.... 2 Turn M.C. to display the data transfer mode. to select the initial menu function. SP-P/O MODE (rear output and preout setting) The rear speaker leads output and the RCA output of the options in the display. 3 Turn M.C. to select the system menu function. REAR/SUB.W - SUB.W/SUB.W -...SYSTEM. 4 Turn M.C. until the main menu appears in the following : ! If there is a full-range speaker connected to the rear speaker leads output and the RCA output is a subwoofer connected to finish updating the Bluetooth software. Section 02 Operating this unit Operating this unit can be adjusted...
.... 2 Turn M.C. to display the data transfer mode. to select the initial menu function. SP-P/O MODE (rear output and preout setting) The rear speaker leads output and the RCA output of the options in the display. 3 Turn M.C. to select the system menu function. REAR/SUB.W - SUB.W/SUB.W -...SYSTEM. 4 Turn M.C. until the main menu appears in the following : ! If there is a full-range speaker connected to the rear speaker leads output and the RCA output is a subwoofer connected to finish updating the Bluetooth software. Section 02 Operating this unit Operating this unit can be adjusted...
Owner's Manual
Page 17
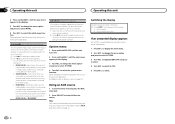
... installation. - Connect this unit or any other devices. If the vehicle is ground. L 1 R 2 3 4 6 8 F 7 9 5 a c R b d e f g h Perform these connections when not connecting a rear speaker lead to the system remote control of the car's body. i Subwoofer (4 W) En 17 The black cable is equipped with insulating tape. - The ground wire of the...
... installation. - Connect this unit or any other devices. If the vehicle is ground. L 1 R 2 3 4 6 8 F 7 9 5 a c R b d e f g h Perform these connections when not connecting a rear speaker lead to the system remote control of the car's body. i Subwoofer (4 W) En 17 The black cable is equipped with insulating tape. - The ground wire of the...

Owner's Manual
Page 18
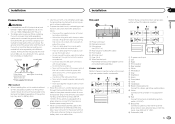
... the metal tabs (90°) into place. 1 1 3 2 1 Screw 2 Mounting bracket 3 Dashboard or console ! Do not connect anything to the speaker leads that came with RCA cables (sold separately) 4 To Front output 5 Front speaker 6 To Rear output or subwoofer output 7 Rear speaker or subwoofer Leave ample space... 5 cm 5 cm 5cm DIN front/rear mount This unit can be sure to connect the subwoofer to the violet and violet/black leads of the unit match. 1 Trim ring 2 Notched tab ! l Subwoofer (4 W) × 2 Notes ! Install this may cause skipping or other ...
... the metal tabs (90°) into place. 1 1 3 2 1 Screw 2 Mounting bracket 3 Dashboard or console ! Do not connect anything to the speaker leads that came with RCA cables (sold separately) 4 To Front output 5 Front speaker 6 To Rear output or subwoofer output 7 Rear speaker or subwoofer Leave ample space... 5 cm 5 cm 5cm DIN front/rear mount This unit can be sure to connect the subwoofer to the violet and violet/black leads of the unit match. 1 Trim ring 2 Notched tab ! l Subwoofer (4 W) × 2 Notes ! Install this may cause skipping or other ...
Owner's Manual
Page 19
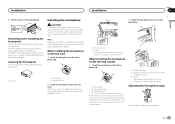
...English Installation Installation Section 03 3 Pull the unit out of the steering column. 3 Clamp Use separately sold clamps to secure the lead where necessary inside the vehicle. Note Install the microphone in such a way that will not obstruct driving. To detach the microphone ...the steering column 1 Install the microphone on the microphone clip. 1 2 3 4 1 Microphone 2 Microphone base 3 Microphone clip 4 Fit the microphone lead into the groove. # Microphone can remove the front panel to install the unit in a position and orientation that it will enable it toward you. En...
...English Installation Installation Section 03 3 Pull the unit out of the steering column. 3 Clamp Use separately sold clamps to secure the lead where necessary inside the vehicle. Note Install the microphone in such a way that will not obstruct driving. To detach the microphone ...the steering column 1 Install the microphone on the microphone clip. 1 2 3 4 1 Microphone 2 Microphone base 3 Microphone clip 4 Fit the microphone lead into the groove. # Microphone can remove the front panel to install the unit in a position and orientation that it will enable it toward you. En...
Owner's Manual
Page 22
... storage device Address any damp discs off during playback and prevent ejection of the discs. Connections via USB hub are two-sided discs that can lead to the manufacturer of the discs. iPod Do not leave the iPod in the disc loading slot and will not be played back. In some...
... storage device Address any damp discs off during playback and prevent ejection of the discs. Connections via USB hub are two-sided discs that can lead to the manufacturer of the discs. iPod Do not leave the iPod in the disc loading slot and will not be played back. In some...
