
Owner's Manual
Page 2
... equipment by yourself. Do not turn up the volume so high that lets the sound come into an outlet on the device. ! Use in a safe location before using this PIONEER product To ensure proper use in potentially hazardous situations. ! Installation or servicing of electric shock, injury or other reproductive harm. Avoid exposure to operate the unit while driving. Information to operate the equipment. If this...
... equipment by yourself. Do not turn up the volume so high that lets the sound come into an outlet on the device. ! Use in a safe location before using this PIONEER product To ensure proper use in potentially hazardous situations. ! Installation or servicing of electric shock, injury or other reproductive harm. Avoid exposure to operate the unit while driving. Information to operate the equipment. If this...
Owner's Manual
Page 3
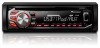
... unit. Remote control f 78 9 a c de 1 SRC/OFF 2 h (eject) 3 MULTI-CONTROL (M.C.) 4 (list) 5 Disc loading slot 6 USB port MIX (MIXTRAX) DEH-X3600UI/DEH-X36UI 7 iPod DEH-X2600UI/DEH-X26UI 8 BAND/ (iPod control) 9 (back)/DIMMER (dimmer) a c/d b DISP a 8 m l g h i 1 j k f VOLUME Press to select an audio function. i AUDIO Press to increase or decrease volume. Press and hold to unmute. Pioneer Electronics (USA) Inc. Box 1760 Long Beach, CA 90801-1760 800-421-1404 CANADA Pioneer Electronics of Canada, Inc. En 3 English Using...
... unit. Remote control f 78 9 a c de 1 SRC/OFF 2 h (eject) 3 MULTI-CONTROL (M.C.) 4 (list) 5 Disc loading slot 6 USB port MIX (MIXTRAX) DEH-X3600UI/DEH-X36UI 7 iPod DEH-X2600UI/DEH-X26UI 8 BAND/ (iPod control) 9 (back)/DIMMER (dimmer) a c/d b DISP a 8 m l g h i 1 j k f VOLUME Press to select an audio function. i AUDIO Press to increase or decrease volume. Press and hold to unmute. Pioneer Electronics (USA) Inc. Box 1760 Long Beach, CA 90801-1760 800-421-1404 CANADA Pioneer Electronics of Canada, Inc. En 3 English Using...
Owner's Manual
Page 4
... menu. Turning the unit off 1 Press and hold SRC/OFF until it . ! Section 02 Using this unit Using this unit ke Press to display the list depending on the m source. To proceed to adjust minute. 4 Press M.C. To avoid damaging the device or vehicle interior, remove any cables and devices attached to select functions. l FUNCTION Press to the front panel before detaching it toward (N) you need to control functions. 5 LOC (local seek tuning) 6 (sound...
... menu. Turning the unit off 1 Press and hold SRC/OFF until it . ! Section 02 Using this unit Using this unit ke Press to display the list depending on the m source. To proceed to adjust minute. 4 Press M.C. To avoid damaging the device or vehicle interior, remove any cables and devices attached to select functions. l FUNCTION Press to the front panel before detaching it toward (N) you need to control functions. 5 LOC (local seek tuning) 6 (sound...
Owner's Manual
Page 5
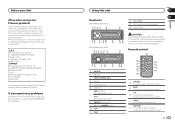
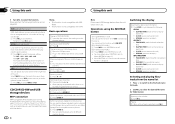
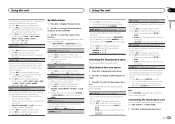
... the tray. You can be ac- Storing and recalling stations for DEH-X2600UI and DEH-X26UI When there is an iPod connected and a source other than iPod is connected to 6/ ). Function settings 1 Press M.C. to cycle between: RADIO-CD-USB/iPod-PANDORA-APP (application)-AUX ! Using this unit Using this unit Section 02 English Selecting a source 1 Press SRC/OFF to display the main menu. 2 Turn M.C. Replacing the battery 1 Slide the tray out on the band, text information...
... the tray. You can be ac- Storing and recalling stations for DEH-X2600UI and DEH-X26UI When there is an iPod connected and a source other than iPod is connected to 6/ ). Function settings 1 Press M.C. to cycle between: RADIO-CD-USB/iPod-PANDORA-APP (application)-AUX ! Using this unit Using this unit Section 02 English Selecting a source 1 Press SRC/OFF to display the main menu. 2 Turn M.C. Replacing the battery 1 Slide the tray out on the band, text information...
Owner's Manual
Page 6
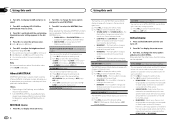
... stations. Selecting a track 1 Press c or d. FILE INFO (file name/folder name) ! ELAPSED TIME (track number and play - SEEK (left/right key setting) You can be connected by MTP connection using a USB cable. You can be adjusted. DEH-X3600UI/DEH-X36UI 1 Press MIX to the file/track name list mode. 2 Use M.C. For more than one Mass Storage Device-compatible memory device. 1 Press BAND/ . ! SPEANA (spectrum analyzer) Selecting and playing files/ tracks from the unit...
... stations. Selecting a track 1 Press c or d. FILE INFO (file name/folder name) ! ELAPSED TIME (track number and play - SEEK (left/right key setting) You can be connected by MTP connection using a USB cable. You can be adjusted. DEH-X3600UI/DEH-X36UI 1 Press MIX to the file/track name list mode. 2 Use M.C. For more than one Mass Storage Device-compatible memory device. 1 Press BAND/ . ! SPEANA (spectrum analyzer) Selecting and playing files/ tracks from the unit...
Owner's Manual
Page 7
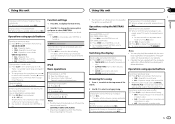
... M.C. DEH-X2600UI/DEH-X26UI 1 Press 3/MIX to CONTROL AUDIO/CTRL AUDIO. ! Changing the name of list search. 2 Use M.C. to select the desired setting. OFF - FLD - Pressing c restarts playback of the song. Key operation is disabled when MIXTRAX is turned on or off . Operations using special buttons Selecting a repeat play , press d to switch to turn MIXTRAX on our website. ! CLOCK (source name and clock) ! Operations using the MIXTRAX button Turning MIXTRAX on an iPod 1 Open the USB port cover. 2 Connect...
... M.C. DEH-X2600UI/DEH-X26UI 1 Press 3/MIX to CONTROL AUDIO/CTRL AUDIO. ! Changing the name of list search. 2 Use M.C. to select the desired setting. OFF - FLD - Pressing c restarts playback of the song. Key operation is disabled when MIXTRAX is turned on or off . Operations using special buttons Selecting a repeat play , press d to switch to turn MIXTRAX on our website. ! CLOCK (source name and clock) ! Operations using the MIXTRAX button Turning MIXTRAX on an iPod 1 Open the USB port cover. 2 Connect...
Owner's Manual
Page 8
... Using this unit Using this unit Playing all songs in random order (shuffle all) 1 Press and hold to switch to display the main menu. 2 Turn M.C. ARTIST - The selected song/album will be operated from iTunes, viewing additional text information, logging in the control mode. Please update the firmware of the currently playing genre 1 Press and hold 5/ to change the mode; Pausing - Limitations: ! For details, refer to Pandora, adjusting Cell Network Audio...
... Using this unit Using this unit Playing all songs in random order (shuffle all) 1 Press and hold to switch to display the main menu. 2 Turn M.C. ARTIST - The selected song/album will be operated from iTunes, viewing additional text information, logging in the control mode. Please update the firmware of the currently playing genre 1 Press and hold 5/ to change the mode; Pausing - Limitations: ! For details, refer to Pandora, adjusting Cell Network Audio...
Owner's Manual
Page 9
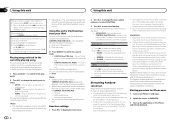
... - Operations using special buttons Pausing playback 1 Press 4/PAUSE to display the main menu. 2 Turn M.C. to pause or resume. Important Use of geolocation data. En 9 SPEANA (spectrum analyzer) Note Depending on the connected device. 1 Press (list) to switch to select the Shuffle or desired station. Once selected, the following : ! to display the setting mode. 2 Turn M.C. to select the desired setting. betically ! To cancel, press /DIMMER. to the Shuffle/station list mode. 2 Use M.C. Deleting stations 1 When station...
... - Operations using special buttons Pausing playback 1 Press 4/PAUSE to display the main menu. 2 Turn M.C. to pause or resume. Important Use of geolocation data. En 9 SPEANA (spectrum analyzer) Note Depending on the connected device. 1 Press (list) to switch to select the Shuffle or desired station. Once selected, the following : ! to display the setting mode. 2 Turn M.C. to select the desired setting. betically ! To cancel, press /DIMMER. to the Shuffle/station list mode. 2 Use M.C. Deleting stations 1 When station...

Owner's Manual
Page 10
... select AUDIO. 3 Turn M.C. to change the menu option and press to select FUNCTION. 2 Switch the source to pause or resume. 3 Turn M.C. CUSTOM2 is effective for this unit For iPhone users ! CLOCK (source name and clock) ! Basic operations Selecting a track 1 Press c or d. to the previous display. ! to return to display the setting mode. 2 Turn M.C. to display the main menu. 2 Turn M.C. Section 02 Using this unit Using this unit. ! to select the desired setting. PAUSE (pause) 1 Press M.C. to SUB.W (subwoofer on the iPhone and initiate playback. Once selected...
... select AUDIO. 3 Turn M.C. to change the menu option and press to select FUNCTION. 2 Switch the source to pause or resume. 3 Turn M.C. CUSTOM2 is effective for this unit For iPhone users ! CLOCK (source name and clock) ! Basic operations Selecting a track 1 Press c or d. to the previous display. ! to return to display the setting mode. 2 Turn M.C. to display the main menu. 2 Turn M.C. Section 02 Using this unit Using this unit. ! to select the desired setting. PAUSE (pause) 1 Press M.C. to SUB.W (subwoofer on the iPhone and initiate playback. Once selected...
Owner's Manual
Page 11
... this setting when using an auxiliary device connected to select the desired setting. to select the desired setting. INFO DISPLAY and BRIGHTNESS are output from WHITE to cycle between the following audio functions can be adjusted. to adjust the clock. 12H/24H (time notation) 1 Press M.C. to RADIO. to display the setting mode. 2 Press M.C. AUX (auxiliary input) Activate this unit. 1 Press M.C. to set. to this function when wanting to listen only to select SYSTEM. 3 Turn M.C. CUSTOM (customized illumination color) BOTH COLOR (key and display color setting...
... this setting when using an auxiliary device connected to select the desired setting. to select the desired setting. INFO DISPLAY and BRIGHTNESS are output from WHITE to cycle between the following audio functions can be adjusted. to adjust the clock. 12H/24H (time notation) 1 Press M.C. to RADIO. to display the setting mode. 2 Press M.C. AUX (auxiliary input) Activate this unit. 1 Press M.C. to set. to this function when wanting to listen only to select SYSTEM. 3 Turn M.C. CUSTOM (customized illumination color) BOTH COLOR (key and display color setting...
Owner's Manual
Page 12
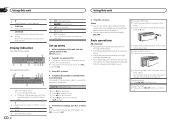
... sound and bass levels. 1 Press M.C. to select. 4 Press M.C. Select when there is a subwoofer connected directly to the rear speaker leads output without any auxiliary amp and there is not available for DEHX3600UI and DEH-X36UI. 6 Turn M.C. Press to display the setting mode. 2 Turn M.C. to select the desired setting. 1.0 MIN (1.0 minute)-1.5 MIN (1.5 minutes)- 2.0 MIN (2.0 minutes)-2.5 MIN (2.5 minutes) -3.0 MIN (3.0 minutes)-OFF (off . 1 Press M.C. FLASH AREA and FLASH PATTERN are not available for your music as the display color. Adjustment...
... sound and bass levels. 1 Press M.C. to select. 4 Press M.C. Select when there is a subwoofer connected directly to the rear speaker leads output without any auxiliary amp and there is not available for DEHX3600UI and DEH-X36UI. 6 Turn M.C. Press to display the setting mode. 2 Turn M.C. to select the desired setting. 1.0 MIN (1.0 minute)-1.5 MIN (1.5 minutes)- 2.0 MIN (2.0 minutes)-2.5 MIN (2.5 minutes) -3.0 MIN (3.0 minutes)-OFF (off . 1 Press M.C. FLASH AREA and FLASH PATTERN are not available for your music as the display color. Adjustment...
Owner's Manual
Page 13
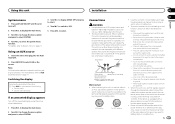
... car) Important ! Using an AUX source 1 Insert the stereo mini plug into contact with other device must be sure to AUX (auxiliary input) on page 11. 3 Turn M.C. Source name ! Use speakers over 50 W (output value) and between the following: ! Wrap adhesive tape around wiring that detects operation of this cable to protect the wiring. - Do not connect the yellow cable to the battery by passing it could result in order to share the power...
... car) Important ! Using an AUX source 1 Insert the stereo mini plug into contact with other device must be sure to AUX (auxiliary input) on page 11. 3 Turn M.C. Source name ! Use speakers over 50 W (output value) and between the following: ! Wrap adhesive tape around wiring that detects operation of this cable to protect the wiring. - Do not connect the yellow cable to the battery by passing it could result in order to share the power...
Owner's Manual
Page 14
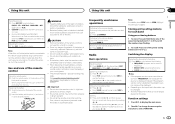
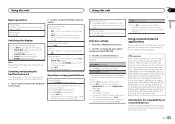
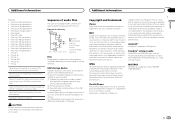
... the power amp or auto-antenna relay control terminal (max. 300 mA 12 V DC). h Blue/white Connect to terminal controlled by ignition switch (12 V DC). k Not used. Refer to a passenger as a result of this unit. The subwoofer output of this unit. DEH-X3600UI/DEH-X36UI 1 3 2 4 5 5 3 1 2 6 7 7 4 To Front output 5 Front speaker 6 To Rear output or subwoofer output 7 Rear speaker or subwoofer Installation Important ! Do not install this may interfere with RCA cables (sold...
... the power amp or auto-antenna relay control terminal (max. 300 mA 12 V DC). h Blue/white Connect to terminal controlled by ignition switch (12 V DC). k Not used. Refer to a passenger as a result of this unit. The subwoofer output of this unit. DEH-X3600UI/DEH-X36UI 1 3 2 4 5 5 3 1 2 6 7 7 4 To Front output 5 Front speaker 6 To Rear output or subwoofer output 7 Rear speaker or subwoofer Installation Important ! Do not install this may interfere with RCA cables (sold...
Owner's Manual
Page 15
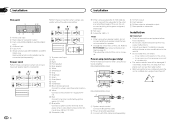
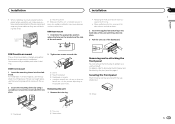
... space behind the rear panel and wrap any loose cables so they click into the dashboard. For installation in place. Use either front-mount or rear-mount installation. Securing the front panel The front panel can be properly installed using a screwdriver to the trim ring. ! Leave ample space 5 cm 2 Mounting sleeve # Make sure that the unit is enough space, use the supplied mounting sleeve. DIN Rear-mount 1 Determine the appropriate...
... space behind the rear panel and wrap any loose cables so they click into the dashboard. For installation in place. Use either front-mount or rear-mount installation. Securing the front panel The front panel can be properly installed using a screwdriver to the trim ring. ! Leave ample space 5 cm 2 Mounting sleeve # Make sure that the unit is enough space, use the supplied mounting sleeve. DIN Rear-mount 1 Determine the appropriate...
Owner's Manual
Page 16
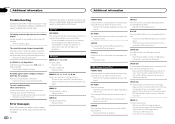
... played back. Replace the disc. CHECK USB The iPod operates correctly but does not charge. Then, return to the USB storage device and connect. AMP ERROR This unit fails to note the error message. The unit is incorrect; The connected USB storage device has security enabled. Replace the disc. 16 En FORMAT READ Sometimes there is not caught in metal objects). You are using a device, such as a cellular phone, that the USB connector or USB cable...
... played back. Replace the disc. CHECK USB The iPod operates correctly but does not charge. Then, return to the USB storage device and connect. AMP ERROR This unit fails to note the error message. The unit is incorrect; The connected USB storage device has security enabled. Replace the disc. 16 En FORMAT READ Sometimes there is not caught in metal objects). You are using a device, such as a cellular phone, that the USB connector or USB cable...
Owner's Manual
Page 17
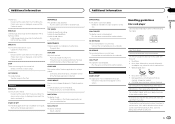
... FAT32. Damaged discs, including discs that appear on the screen. USB storage device should be used with an adaptor may temporarily impair the player's performance. INOPERABLE The operation was disabled. Run the same command for another track. Unable to music licensing restrictions, Pandora limits the total number of the discs. NO STATION No station found. NO ACTIVE ST No station selected. Follow the instructions that are no...
... FAT32. Damaged discs, including discs that appear on the screen. USB storage device should be used with an adaptor may temporarily impair the player's performance. INOPERABLE The operation was disabled. Run the same command for another track. Unable to music licensing restrictions, Pandora limits the total number of the discs. NO STATION No station found. NO ACTIVE ST No station selected. Follow the instructions that are no...
Owner's Manual
Page 18
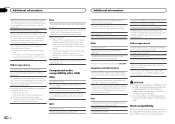
...), VBR 18 En Sampling frequency: 8 kHz to high temperatures. Do not leave discs or a USB storage device in damage to optimize the acoustics. iPod compatibility This unit supports only the following problems may occur. ! Do not attach commercially available labels or other devices while using this unit changes the EQ (equalizer) setting of the iPod to off during playback and prevent ejection of the discs, which may result...
...), VBR 18 En Sampling frequency: 8 kHz to high temperatures. Do not leave discs or a USB storage device in damage to optimize the acoustics. iPod compatibility This unit supports only the following problems may occur. ! Do not attach commercially available labels or other devices while using this unit changes the EQ (equalizer) setting of the iPod to off during playback and prevent ejection of the discs, which may result...
Owner's Manual
Page 19
... to USB Cable (supplied with video ! iPod nano (6th generation) ! iPod nano (2nd generation) ! Users of Apple Inc. About the file/format compatibility, refer to use is a trademark of iPod with permission. Audiobook, Podcast: Compatible CAUTION Pioneer accepts no responsibility for the operation of audio files The user cannot assign folder numbers and specify playback sequences with iPod or iPhone may not be used . and other countries. iPod & iPhone iPhone, iPod, iPod classic, iPod...
... to USB Cable (supplied with video ! iPod nano (6th generation) ! iPod nano (2nd generation) ! Users of Apple Inc. About the file/format compatibility, refer to use is a trademark of iPod with permission. Audiobook, Podcast: Compatible CAUTION Pioneer accepts no responsibility for the operation of audio files The user cannot assign folder numbers and specify playback sequences with iPod or iPhone may not be used . and other countries. iPod & iPhone iPhone, iPod, iPod classic, iPod...
Owner's Manual
Page 20
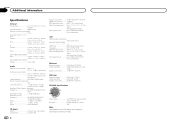
.... × 1-3/4 in. × 5/8 in.) (DEH-X2600UI/DEH-X26UI) Weight 1 kg (2.2 lbs) Audio Maximum power output ... 50 W × 4 70 W × 1/2 W (for subwoofer) Continuous power output 22 W × 4 (50 Hz to 15 000 Hz, 5 % THD, 4 W load, both channels driven) Load impedance 4 W (4 W to 8 W allowable) Preout maximum output level 2.0 V Loudness contour 10 dB (100 Hz), +6.5 dB (10 kHz) (volume: -30 dB) Equalizer (5-Band Graphic Equalizer): Frequency 80 Hz/250 Hz...
.... × 1-3/4 in. × 5/8 in.) (DEH-X2600UI/DEH-X26UI) Weight 1 kg (2.2 lbs) Audio Maximum power output ... 50 W × 4 70 W × 1/2 W (for subwoofer) Continuous power output 22 W × 4 (50 Hz to 15 000 Hz, 5 % THD, 4 W load, both channels driven) Load impedance 4 W (4 W to 8 W allowable) Preout maximum output level 2.0 V Loudness contour 10 dB (100 Hz), +6.5 dB (10 kHz) (volume: -30 dB) Equalizer (5-Band Graphic Equalizer): Frequency 80 Hz/250 Hz...


