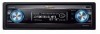

Owner's Manual
Page 68
... is outputted from the fan in about six minutes. # To stop auto TA and EQ, press MULTI-CONTROL again. # To cancel auto TA and EQ part way through, press BAND. 68 En The measurement tone (noise) is operated, be sure to start auto TA and EQ, Front Left is completed in...
... is outputted from the fan in about six minutes. # To stop auto TA and EQ, press MULTI-CONTROL again. # To cancel auto TA and EQ part way through, press BAND. 68 En The measurement tone (noise) is operated, be sure to start auto TA and EQ, Front Left is completed in...
Other Manual
Page 1
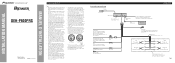
...3 to 8 ohms. Connecting speakers with cable clamps or adhesive tape. IP-BUS cable Multi-CD player (sold separately). To protect the wiring, wrap adhesive tape around them where they lie against metal parts. • Route and secure all wiring so it should be drained when you are not ... external power amp's system remote control or the car's Auto-antenna relay control terminal (max. 300 mA 12 V DC). INSTALLATION MANUAL OF OF DEH-P800PRS Printed in Thailand Imprimé en Thaïlande UC N STAR N STAR MANUEL D'INSTALLATION Connecting the Units Note: • This unit is...
...3 to 8 ohms. Connecting speakers with cable clamps or adhesive tape. IP-BUS cable Multi-CD player (sold separately). To protect the wiring, wrap adhesive tape around them where they lie against metal parts. • Route and secure all wiring so it should be drained when you are not ... external power amp's system remote control or the car's Auto-antenna relay control terminal (max. 300 mA 12 V DC). INSTALLATION MANUAL OF OF DEH-P800PRS Printed in Thailand Imprimé en Thaïlande UC N STAR N STAR MANUEL D'INSTALLATION Connecting the Units Note: • This unit is...
Other Manual
Page 4
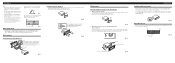
...8 mm) or flush surface screws (5 mm × 9 mm), depending on the side of this area. Fig. 13 Screw Dashboard or Console Factory radio mounting bracket Fig. 14 Switching the DSP setting mode This product features two operation modes: the 3-way network mode (NW) and the standard mode (STD... It becomes easy to ensure proper installation. Remove the frame. (Fig. 12) To remove the frame, extend top and bottom of unauthorized parts can switch between modes as shown in order to the following illustrated installation methods. Fig. 15 Fixing the front panel If you do not ...
...8 mm) or flush surface screws (5 mm × 9 mm), depending on the side of this area. Fig. 13 Screw Dashboard or Console Factory radio mounting bracket Fig. 14 Switching the DSP setting mode This product features two operation modes: the 3-way network mode (NW) and the standard mode (STD... It becomes easy to ensure proper installation. Remove the frame. (Fig. 12) To remove the frame, extend top and bottom of unauthorized parts can switch between modes as shown in order to the following illustrated installation methods. Fig. 15 Fixing the front panel If you do not ...

