
Other Manual
Page 1
... the owner's manual for other units, then make connections correctly. • Secure the wiring with cable clamps or adhesive tape. Connect the connectors of the auto-antenna. Do not route wiring in a vehicle that get hot, such as power amps. Connect to the power terminal of the same colors correctly. • If this product to another product, refer to the amp's power terminal. When connecting this unit is ground. INSTALLATION MANUAL OF OF DEH-P7300 DEH...
... the owner's manual for other units, then make connections correctly. • Secure the wiring with cable clamps or adhesive tape. Connect the connectors of the auto-antenna. Do not route wiring in a vehicle that get hot, such as power amps. Connect to the power terminal of the same colors correctly. • If this product to another product, refer to the amp's power terminal. When connecting this unit is ground. INSTALLATION MANUAL OF OF DEH-P7300 DEH...
Other Manual
Page 2
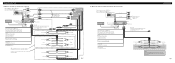
... DEH-P7300) If you have the separately available amplifier. Red To electric terminal controlled by ignition switch (12 V DC) ON/OFF. Fuse This Product Blue/white To system control terminal of the power amp or Auto-antenna relay control terminal (max. 300 mA 12 V DC). + Front speaker ≠ Connecting cords with RCA pin plugs (sold separately) Power amp (sold separately) Power amp (sold separately) Power amp (sold separately) System remote control + Front speaker ≠ + Front speaker ≠ Left + Rear speaker...
... DEH-P7300) If you have the separately available amplifier. Red To electric terminal controlled by ignition switch (12 V DC) ON/OFF. Fuse This Product Blue/white To system control terminal of the power amp or Auto-antenna relay control terminal (max. 300 mA 12 V DC). + Front speaker ≠ Connecting cords with RCA pin plugs (sold separately) Power amp (sold separately) Power amp (sold separately) Power amp (sold separately) System remote control + Front speaker ≠ + Front speaker ≠ Left + Rear speaker...
Other Manual
Page 3
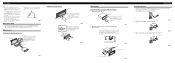
... the unit using the screw holes on the side of unit chassis). Fig. 8 Factory radio mounting bracket Fig. 9 Screw Dashboard or Console Fig. 10 Fixing the Front Panel If you do not operate the Detaching and Replacing the Front Panel Function, use of unauthorized parts can be damaged if it is all connected up properly, and the unit and the system work properly. • Use only the parts...
... the unit using the screw holes on the side of unit chassis). Fig. 8 Factory radio mounting bracket Fig. 9 Screw Dashboard or Console Fig. 10 Fixing the Front Panel If you do not operate the Detaching and Replacing the Front Panel Function, use of unauthorized parts can be damaged if it is all connected up properly, and the unit and the system work properly. • Use only the parts...


