Owner's Manual
Page 3
...display 36 - Selecting a channel in the channel category 39 - Introduction of advanced operations 44 - Switching the scroll setting 39 - Displaying the Radio ID 41 Playing songs on Bluetooth audio player 45 - Playing songs on iPod 41 - Changing audiobook speed 24 Audio...- Displaying the Radio ID 37 SIRIUS Satellite Radio tuner 38 - Basic Operations 43 - Adjusting the brightness 31 - Storing and recalling broadcast stations 36 - Storing and recalling broadcast stations 39 - Introduction of advanced operations 38 - Using the equalizer 26 - Setting the clock 30 - Using...
...display 36 - Selecting a channel in the channel category 39 - Introduction of advanced operations 44 - Switching the scroll setting 39 - Displaying the Radio ID 41 Playing songs on Bluetooth audio player 45 - Playing songs on iPod 41 - Changing audiobook speed 24 Audio...- Displaying the Radio ID 37 SIRIUS Satellite Radio tuner 38 - Basic Operations 43 - Adjusting the brightness 31 - Storing and recalling broadcast stations 36 - Storing and recalling broadcast stations 39 - Introduction of advanced operations 38 - Using the equalizer 26 - Setting the clock 30 - Using...
Owner's Manual
Page 10
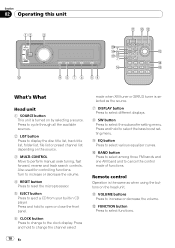
... track title list, folder list, file list or preset channel list depending on the source. 3 MULTI-CONTROL Move to select the subwoofer setting menu. Press and hold to change to increase or decrease the volume. c FUNCTION button Press to select various equalizer curves. Press and ... control mode of functions. a BAND button Press to select among three FM bands and one AM band and to eject a CD from your built-in CD player. b VOLUME buttons Press to the clock display. Section 02 Operating this unit 12 3 a 9 8 7 6 54 b ac k j h 1 i 7 d e g f What's What Head unit 1 SOURCE ...
... track title list, folder list, file list or preset channel list depending on the source. 3 MULTI-CONTROL Move to select the subwoofer setting menu. Press and hold to change to increase or decrease the volume. c FUNCTION button Press to select various equalizer curves. Press and ... control mode of functions. a BAND button Press to select among three FM bands and one AM band and to eject a CD from your built-in CD player. b VOLUME buttons Press to the clock display. Section 02 Operating this unit 12 3 a 9 8 7 6 54 b ac k j h 1 i 7 d e g f What's What Head unit 1 SOURCE ...
Owner's Manual
Page 29
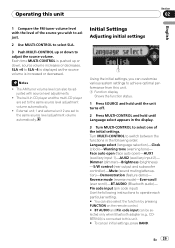
... En 29 Pin code input (pin code input) Use the following order: Language select (language selection)-Clock (clock)-Warning tone (warning tone)- Initial Settings Adjusting initial settings 1 Using the initial settings, you wish to adjust. 2 Use MULTI-CONTROL to select SLA. 3 Push MULTI-CONTROL up or ...down to achieve optimal performance from this unit. # To cancel initial settings, press BAND. The built-in CD player and the multi-CD player are set to the same source level adjustment volume automatically. Reverse mode (reverse mode)-Ever-scroll (ever ...
... En 29 Pin code input (pin code input) Use the following order: Language select (language selection)-Clock (clock)-Warning tone (warning tone)- Initial Settings Adjusting initial settings 1 Using the initial settings, you wish to adjust. 2 Use MULTI-CONTROL to select SLA. 3 Push MULTI-CONTROL up or ...down to achieve optimal performance from this unit. # To cancel initial settings, press BAND. The built-in CD player and the multi-CD player are set to the same source level adjustment volume automatically. Reverse mode (reverse mode)-Ever-scroll (ever ...
Owner's Manual
Page 30
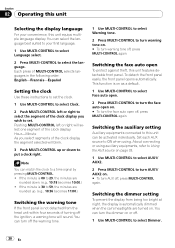
...language best suited to turn the face auto open on. # To turn the dimmer on . Switching the dimmer setting To prevent the display from the head unit within four seconds of the clock display: Hour-Minute As you wish to 59, the minutes are rounded up or down . (e.g., 10:18 ...:00.) ! Each press of MULTI-CONTROL selects languages in the following order: English-Français-Español Setting the clock Use these instructions to set the clock. 1 Use MULTI-CONTROL to select Clock. 2 Push MULTI-CONTROL left or right will select one segment of turning off the ignition, a warning tone will ...
...language best suited to turn the face auto open on. # To turn the dimmer on . Switching the dimmer setting To prevent the display from the head unit within four seconds of the clock display: Hour-Minute As you wish to 59, the minutes are rounded up or down . (e.g., 10:18 ...:00.) ! Each press of MULTI-CONTROL selects languages in the following order: English-Français-Español Setting the clock Use these instructions to set the clock. 1 Use MULTI-CONTROL to select Clock. 2 Push MULTI-CONTROL left or right will select one segment of turning off the ignition, a warning tone will ...

Owner's Manual
Page 34
...the display. # If the auxiliary setting is not turned on when selecting tuner as the source. ENT. Multi CD - USB portable audio player/USB memory ! iPod ! Even when the sources and the feature demo are off, the clock display appears on the display. % Press CLOCK to turn pause on or off... . ! Turn to change the menu option; Built-in CD player ! For more details, see Switching the auxiliary setting on page 17. For details concerning operation, refer to...
...the display. # If the auxiliary setting is not turned on when selecting tuner as the source. ENT. Multi CD - USB portable audio player/USB memory ! iPod ! Even when the sources and the feature demo are off, the clock display appears on the display. % Press CLOCK to turn pause on or off... . ! Turn to change the menu option; Built-in CD player ! For more details, see Switching the auxiliary setting on page 17. For details concerning operation, refer to...

Owner's Manual
Page 37
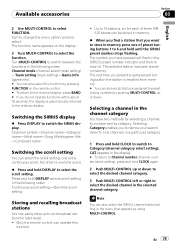
...-CONTROL up or down . Selecting a channel in memory, press one after the other. 1 Press and hold CLOCK to switch to Category (channel category select setting). Channel category select setting RADIO ID is provided as a channel category for selecting a channel: by number and by using MULTI-CONTROL. The ... to only channels in a particular category. # To return to Channel number (channel number select setting), press and hold CLOCK again. 2 Push MULTI-CONTROL up or down to select RADIO ID from memory. # You can also recall stations assigned to change the station by pushing MULTI...
...-CONTROL up or down . Selecting a channel in memory, press one after the other. 1 Press and hold CLOCK to switch to Category (channel category select setting). Channel category select setting RADIO ID is provided as a channel category for selecting a channel: by number and by using MULTI-CONTROL. The ... to only channels in a particular category. # To return to Channel number (channel number select setting), press and hold CLOCK again. 2 Push MULTI-CONTROL up or down to select RADIO ID from memory. # You can also recall stations assigned to change the station by pushing MULTI...
Owner's Manual
Page 39
...hold DISPLAY to select the desired channel in a particular category. 1 Press and hold DISPLAY selects scroll setting in the following order: Channel mode (channel select mode setting) -Team setting (team setting)-Game info (game info) # You can also recall stations assigned to Category (channel category select...the continuous scroll, the other is automatically returned to Channel number (channel number select setting), press and hold until the SIRIUS preset number stops flashing. press to 6 and hold CLOCK again. 2 Push MULTI-CONTROL up or down to select the desired channel category....
...hold DISPLAY to select the desired channel in a particular category. 1 Press and hold DISPLAY selects scroll setting in the following order: Channel mode (channel select mode setting) -Team setting (team setting)-Game info (game info) # You can also recall stations assigned to Category (channel category select...the continuous scroll, the other is automatically returned to Channel number (channel number select setting), press and hold until the SIRIUS preset number stops flashing. press to 6 and hold CLOCK again. 2 Push MULTI-CONTROL up or down to select the desired channel category....


