
Owner's Manual
Page 3
... filter 28 Boosting the bass 28 Adjusting source levels 28 Initial Settings Adjusting initial settings 29 Setting the clock 29 Switching the warning tone 29 Switching the auxiliary setting 29 Switching the dimmer setting 29 Setting the rear output and subwoofer controller 30 Switching the feature demo ... 38 - Fine-adjusting equalizer curve 26 Adjusting loudness 27 Using subwoofer output 27 - Selecting AUX as the source 33 - Setting the AUX title 32 Turning the clock display on iPod 34 - Playing songs in a random order (shuffle) 35 Bluetooth Audio 35 - Connecting a Bluetooth audio ...
... filter 28 Boosting the bass 28 Adjusting source levels 28 Initial Settings Adjusting initial settings 29 Setting the clock 29 Switching the warning tone 29 Switching the auxiliary setting 29 Switching the dimmer setting 29 Setting the rear output and subwoofer controller 30 Switching the feature demo ... 38 - Fine-adjusting equalizer curve 26 Adjusting loudness 27 Using subwoofer output 27 - Selecting AUX as the source 33 - Setting the AUX title 32 Turning the clock display on iPod 34 - Playing songs in a random order (shuffle) 35 Bluetooth Audio 35 - Connecting a Bluetooth audio ...
Owner's Manual
Page 10
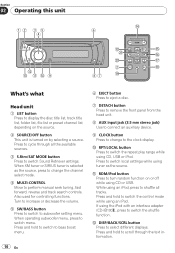
... sources. 3 S.Rtrv/SAT MODE button Press to switch the control mode while using CD, USB or iPod. Press and hold to switch Sound Retriever settings. b RDM/iPod button Press to switch local settings while using CD or USB. Press to turn random function on by selecting a source. Press and ...hold to switch menu. Press to the clock display. When XM tuner or SIRIUS tuner is ...
... sources. 3 S.Rtrv/SAT MODE button Press to switch the control mode while using CD, USB or iPod. Press and hold to switch Sound Retriever settings. b RDM/iPod button Press to switch local settings while using CD or USB. Press to turn random function on by selecting a source. Press and ...hold to switch menu. Press to the clock display. When XM tuner or SIRIUS tuner is ...
Owner's Manual
Page 29
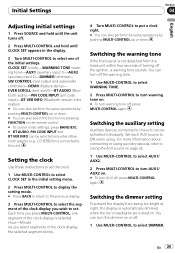
...BAND/ESC. # BT AUDIO, PIN CODE INPUT and BT VER INFO can be selected only when Bluetooth adapter (e.g., CD-BTB200) is connected to this unit. Set each AUX source to put a clock right. # You can turn off the warning tone. 1 Use MULTI-CONTROL to select WARNING TONE. 2 Press MULTI...hold until the unit turns off. 2 Press MULTI-CONTROL and hold until CLOCK SET appears in the display. 3 Turn MULTI-CONTROL to set the clock. 1 Use MULTI-CONTROL to select CLOCK SET in the initial setting menu. 2 Press MULTI-CONTROL to display the setting mode. # Press BACK to return to the previous display. 3 Press...
...BAND/ESC. # BT AUDIO, PIN CODE INPUT and BT VER INFO can be selected only when Bluetooth adapter (e.g., CD-BTB200) is connected to this unit. Set each AUX source to put a clock right. # You can turn off the warning tone. 1 Use MULTI-CONTROL to select WARNING TONE. 2 Press MULTI...hold until the unit turns off. 2 Press MULTI-CONTROL and hold until CLOCK SET appears in the display. 3 Turn MULTI-CONTROL to set the clock. 1 Use MULTI-CONTROL to select CLOCK SET in the initial setting menu. 2 Press MULTI-CONTROL to display the setting mode. # Press BACK to return to the previous display. 3 Press...
Owner's Manual
Page 32
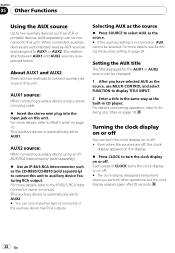
...What's what on or off . Even when the sources are off, the clock display appears on the display. % Press CLOCK to turn the clock display on page 10. The relationship between AUX1 and AUX2 sources is automatically set to AUX1. This auxiliary device is explained below. For details concerning operation, ... AUX source Up to two auxiliary devices such as the CD-RB20/CD-RB10 (sold separately) can be connected to this unit. Turning the clock display on or off You can turn the clock display on or off. # The clock display disappears temporarily when you have selected AUX as the source...
...What's what on or off . Even when the sources are off, the clock display appears on the display. % Press CLOCK to turn the clock display on page 10. The relationship between AUX1 and AUX2 sources is automatically set to AUX1. This auxiliary device is explained below. For details concerning operation, ... AUX source Up to two auxiliary devices such as the CD-RB20/CD-RB10 (sold separately) can be connected to this unit. Turning the clock display on or off You can turn the clock display on or off. # The clock display disappears temporarily when you have selected AUX as the source...


