

Owner's Manual
Page 49
... information Appendix Additional information Specifications General Power source 14.4 V DC (10.8 V to 15.1 V allowable) Grounding system Negative type Maximum current consumption 10.0 A Dimensions (W × H × D): DIN Chassis 178 mm × 50 mm × 165 mm (7 in. × 2 in. × 6-1/2 in.) Nose 188 mm × 58 mm × 17 mm (7-3/8 in.×...
... information Appendix Additional information Specifications General Power source 14.4 V DC (10.8 V to 15.1 V allowable) Grounding system Negative type Maximum current consumption 10.0 A Dimensions (W × H × D): DIN Chassis 178 mm × 50 mm × 165 mm (7 in. × 2 in. × 6-1/2 in.) Nose 188 mm × 58 mm × 17 mm (7-3/8 in.×...
Installation Manual
Page 4
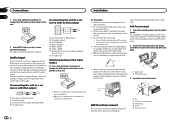
... an audio device with RCA output, or to one with operation of the vehicle. - Change settings as illustrated. 1 2 3 4 5 cm 5cm 5 DIN front/rear mount This unit can set it up so that came with RCA cable (sold separately) 4 To audio input ! If inputting from the speaker...tabs (90°) into the dashboard. L (Low) - Check all connections and systems before final installation. ! For details, refer to the operation manual. DIN Front-mount 1 Insert the mounting sleeve into place. 1 60° 2 ! For more details on change settings, refer to the operation manual or Switching ...
... an audio device with RCA output, or to one with operation of the vehicle. - Change settings as illustrated. 1 2 3 4 5 cm 5cm 5 DIN front/rear mount This unit can set it up so that came with RCA cable (sold separately) 4 To audio input ! If inputting from the speaker...tabs (90°) into the dashboard. L (Low) - Check all connections and systems before final installation. ! For details, refer to the operation manual. DIN Front-mount 1 Insert the mounting sleeve into place. 1 60° 2 ! For more details on change settings, refer to the operation manual or Switching ...

Installation Manual
Page 5
... front panel, the front panel can remove the front panel to the unit using fixing screws. 1 Trim ring 2 Notched tab 1 Screw Section 02 En 5 English DIN Rear-mount 1 Determine the appropriate position where the holes on the bracket screw holes. Removing and re-attaching the front panel You can be fastened...
... front panel, the front panel can remove the front panel to the unit using fixing screws. 1 Trim ring 2 Notched tab 1 Screw Section 02 En 5 English DIN Rear-mount 1 Determine the appropriate position where the holes on the bracket screw holes. Removing and re-attaching the front panel You can be fastened...
