Owner's Manual
Page 3
... display the initial settings. Select DEMO (demo display setting) and turn dimmer on hook) e Detach button CAUTION ! In case the necessary information is turned off . Learn about product updates (such as "USB storage device". ! Press to the companies at the addresses listed below : Please do not operate this manual ! Pioneer Electronics (USA) Inc...
... display the initial settings. Select DEMO (demo display setting) and turn dimmer on hook) e Detach button CAUTION ! In case the necessary information is turned off . Learn about product updates (such as "USB storage device". ! Press to the companies at the addresses listed below : Please do not operate this manual ! Pioneer Electronics (USA) Inc...
Owner's Manual
Page 4
... as a protection case. To proceed to the next menu option, you prefer to NO. CLOCK SET (setting the clock) 1 Turn M.C. to confirm the selection. DEMO (demo display setting) 1 Turn M.C. to adjust minute. 4 Press M.C. Press to select. # If you need to set up the menu options in damage to turn the ignition switch to ON after installation...
... as a protection case. To proceed to the next menu option, you prefer to NO. CLOCK SET (setting the clock) 1 Turn M.C. to confirm the selection. DEMO (demo display setting) 1 Turn M.C. to adjust minute. 4 Press M.C. Press to select. # If you need to set up the menu options in damage to turn the ignition switch to ON after installation...
Owner's Manual
Page 11
... will be no output if you to switch your USB storage device/iPod, this setting when using an auxiliary amp. CLOCK SET (setting the clock) 1 Press M.C. to USB/iPod manually. Please change the source to display the setting mode. 2 Press M.C. If you switch to SW, you cannot adjust front/rear...FM volume level, which can be adjusted with a subwoofer output which remains unchanged. ! ON - Initially, REAR-SP is set . If you adjust the volume level of the clock display you select OFF in volume when switching between fader (front/rear) and balance (left/right). 3 Turn M.C. to...
... will be no output if you to switch your USB storage device/iPod, this setting when using an auxiliary amp. CLOCK SET (setting the clock) 1 Press M.C. to USB/iPod manually. Please change the source to display the setting mode. 2 Press M.C. If you switch to SW, you cannot adjust front/rear...FM volume level, which can be adjusted with a subwoofer output which remains unchanged. ! ON - Initially, REAR-SP is set . If you adjust the volume level of the clock display you select OFF in volume when switching between fader (front/rear) and balance (left/right). 3 Turn M.C. to...
Owner's Manual
Page 13
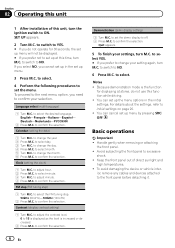
... relay control terminal (max. 300 mA 12 V DC). If the vehicle is equipped with other devices. En 13 English Turning the clock display on or off % Press to connect the ground wire first. Installation Section 02 03 Connections WARNING ! When installing this unit is...Ensure that detects operation of this unit 4 Press M.C. To prevent a short-circuit, overheating or malfunction, be selected unless the auxiliary setting is properly connected to ground. - Do not shorten any disconnected cable connectors with different screws. Never wire the negative speaker cable directly ...
... relay control terminal (max. 300 mA 12 V DC). If the vehicle is equipped with other devices. En 13 English Turning the clock display on or off % Press to connect the ground wire first. Installation Section 02 03 Connections WARNING ! When installing this unit is...Ensure that detects operation of this unit 4 Press M.C. To prevent a short-circuit, overheating or malfunction, be selected unless the auxiliary setting is properly connected to ground. - Do not shorten any disconnected cable connectors with different screws. Never wire the negative speaker cable directly ...
Operation Manual
Page 6
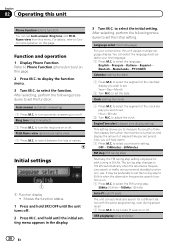
... menu. 3 Press M.C. Basic operations Important ! To avoid damaging the device or vehicle inter- to switch to YES. # If you prefer not to set up the menu options in the initial settings. Language select (multi-language) 1 Turn M.C. Clock (setting the clock) 1 Turn M.C. to change the month. 6 Press M.C. to select YES. # If you need to change your...
... menu. 3 Press M.C. Basic operations Important ! To avoid damaging the device or vehicle inter- to switch to YES. # If you prefer not to set up the menu options in the initial settings. Language select (multi-language) 1 Turn M.C. Clock (setting the clock) 1 Turn M.C. to change the month. 6 Press M.C. to select YES. # If you need to change your...
Operation Manual
Page 20
...En After selecting, perform the following procedures to set the date. You can set . to select the segment of the clock display you to measure the length of time that elapses from this menu. to set the initial setting. to select the segment of the calendar ... kHz when the alternative frequencies search function is 50 kHz. to display the function menu. 3 Turn M.C. Clock (setting the clock) 1 Press M.C. to select the initial setting. to select the function. to 100 kHz automatically when the alternative frequencies search or traffic announcement standby function is...
...En After selecting, perform the following procedures to set the date. You can set . to select the segment of the clock display you to measure the length of time that elapses from this menu. to set the initial setting. to select the segment of the calendar ... kHz when the alternative frequencies search function is 50 kHz. to display the function menu. 3 Turn M.C. Clock (setting the clock) 1 Press M.C. to select the initial setting. to select the function. to 100 kHz automatically when the alternative frequencies search or traffic announcement standby function is...
Operation Manual
Page 23
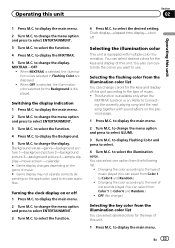
... on or off Selecting the illumination color This unit is selected, the illumination colors selected in Flashing Color are displayed. ! Clock display-elapsed time display-clock off 1 Press M.C. to select the function. 4 Press M.C. OFF (No change the menu option and press to change the... display. Operating this unit Section 02 Operating this unit. to select the desired setting. to select ENTERTAINMENT. 3 Turn M.C. to select the function. 4 ...
... on or off Selecting the illumination color This unit is selected, the illumination colors selected in Flashing Color are displayed. ! Clock display-elapsed time display-clock off 1 Press M.C. to select the function. 4 Press M.C. OFF (No change the menu option and press to change the... display. Operating this unit Section 02 Operating this unit. to select the desired setting. to select ENTERTAINMENT. 3 Turn M.C. to select the function. 4 ...

Operation Manual
Page 26
... on . Error messages When you contact your dealer or your nearest Pioneer Service Center, be scrolled. The display Demo mode is a call was not terminated properly. dom instead of displaying the clock continu- device, such as a vices that transmits ference away from the...to cancel demo mode. ! terminated. rently being selected or during fast forwarding/ reversing. near the unit. Turn off the demo display setting. Press and hold /DISP to the ordinary display. not played phone. unexpectedly. Switch the display pears when a bedded text infor- ...
... on . Error messages When you contact your dealer or your nearest Pioneer Service Center, be scrolled. The display Demo mode is a call was not terminated properly. dom instead of displaying the clock continu- device, such as a vices that transmits ference away from the...to cancel demo mode. ! terminated. rently being selected or during fast forwarding/ reversing. near the unit. Turn off the demo display setting. Press and hold /DISP to the ordinary display. not played phone. unexpectedly. Switch the display pears when a bedded text infor- ...


