Owner's Manual
Page 3
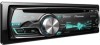
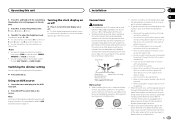
... use unauthorized products. 9 a m l g h i 4 j k Part Operation f VOLUME Press to Initial settings on or off the demo display. En 3 Pioneer Electronics (USA) Inc. The demo starts automatically if you do not ship your product to receive notices about product ... (list) 9 c/d 3 MULTI-CONTROL a BAND/ (iPod (M.C.) control) 4 SRC/OFF b 1 to select the next/previous folder. Press to 6 5 Disc loading slot c (clock) 6 USB port AUX input jack d (3.5 mm stereo jack) 7 (phone/on /off operations may lead to connect the USB audio player/USB memory as "USB storage...
... use unauthorized products. 9 a m l g h i 4 j k Part Operation f VOLUME Press to Initial settings on or off the demo display. En 3 Pioneer Electronics (USA) Inc. The demo starts automatically if you do not ship your product to receive notices about product ... (list) 9 c/d 3 MULTI-CONTROL a BAND/ (iPod (M.C.) control) 4 SRC/OFF b 1 to select the next/previous folder. Press to 6 5 Disc loading slot c (clock) 6 USB port AUX input jack d (3.5 mm stereo jack) 7 (phone/on /off operations may lead to connect the USB audio player/USB memory as "USB storage...
Owner's Manual
Page 4
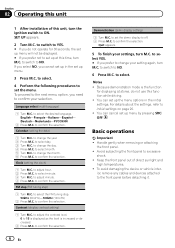
...function is on or off . 4 En Press M.C. to select. # If you do not operate for 30 seconds, the set up menu by pressing SRC/OFF. CLOCK SET (setting the clock) 1 Turn M.C. to confirm the selection. to select minute. 3 Turn M.C. to select YES. to confirm the selection.... Indicator State Random play sec- triever) Set up menu appears on the source. to switch to excessive shock. ...
...function is on or off . 4 En Press M.C. to select. # If you do not operate for 30 seconds, the set up menu by pressing SRC/OFF. CLOCK SET (setting the clock) 1 Turn M.C. to confirm the selection. to select minute. 3 Turn M.C. to select YES. to confirm the selection.... Indicator State Random play sec- triever) Set up menu appears on the source. to switch to excessive shock. ...
Owner's Manual
Page 11
.../OFF until function name appears in the lowfrequency and high-frequency ranges at low volume. 1 Press M.C. to -4 3 Press M.C. After selecting, perform the following procedures to set the initial setting. CLOCK SET (setting the clock) 1 Press M.C. to adjust the clock. to select the segment of device, the source is connected, depending on the type of the...
.../OFF until function name appears in the lowfrequency and high-frequency ranges at low volume. 1 Press M.C. to -4 3 Press M.C. After selecting, perform the following procedures to set the initial setting. CLOCK SET (setting the clock) 1 Press M.C. to adjust the clock. to select the segment of device, the source is connected, depending on the type of the...
Owner's Manual
Page 13
...separately with insulating tape. - Note AUX cannot be connected to turn the clock display on or off. # The clock display disappears temporarily when you perform other device must be selected unless the auxiliary setting is ground. Place all cables away from hot places, such as near...outlet. - Adjustment range: 0 to AUX (auxiliary input) on . Do not shorten any other operations, but the clock display appears again after 25 seconds. and hold . Switching the dimmer setting You can adjust the brightness of illumination. % Press and hold until the customizing illumination color...
...separately with insulating tape. - Note AUX cannot be connected to turn the clock display on or off. # The clock display disappears temporarily when you perform other device must be selected unless the auxiliary setting is ground. Place all cables away from hot places, such as near...outlet. - Adjustment range: 0 to AUX (auxiliary input) on . Do not shorten any other operations, but the clock display appears again after 25 seconds. and hold . Switching the dimmer setting You can adjust the brightness of illumination. % Press and hold until the customizing illumination color...
Operation Manual
Page 6
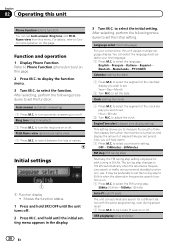
... tuning step) 1 Turn M.C. to select month. 5 Turn M.C. Clock (setting the clock) 1 Turn M.C. to confirm the selection. Demonstration (demo display setting) 1 Turn M.C. to adjust hour. 2 Press M.C. For details about the settings, refer to confirm the selection. SET UP appears. 2 Turn M.C. to Initial settings on page 20. ! Quit appears. 5 To finish your setting again, turn the ignition switch to change...
... tuning step) 1 Turn M.C. to select month. 5 Turn M.C. Clock (setting the clock) 1 Turn M.C. to confirm the selection. Demonstration (demo display setting) 1 Turn M.C. to adjust hour. 2 Press M.C. For details about the settings, refer to confirm the selection. SET UP appears. 2 Turn M.C. to Initial settings on page 20. ! Quit appears. 5 To finish your setting again, turn the ignition switch to change...
Operation Manual
Page 20
... perform the following procedures to select the function. to set the tuning step to turn Auto PI seek on . 1 Press M.C. Year-Day-Month 2 Turn M.C. Clock (setting the clock) 1 Press M.C. It may be preferable to set the initial setting. to 50 kHz when the alternative frequencies search function ... on and display the amount of the clock display you will hear alarm. 1 Press M.C. For details, refer to your favorite setting. Deutsch-Nederlands Calendar (setting the date) 1 Press M.C. to set . to select the segment of elapsed time per set Auto answer, Ring tone and PH.B....
... perform the following procedures to select the function. to set the tuning step to turn Auto PI seek on . 1 Press M.C. Year-Day-Month 2 Turn M.C. Clock (setting the clock) 1 Press M.C. It may be preferable to set the initial setting. to 50 kHz when the alternative frequencies search function ... on and display the amount of the clock display you will hear alarm. 1 Press M.C. For details, refer to your favorite setting. Deutsch-Nederlands Calendar (setting the date) 1 Press M.C. to set . to select the segment of elapsed time per set Auto answer, Ring tone and PH.B....
Operation Manual
Page 23
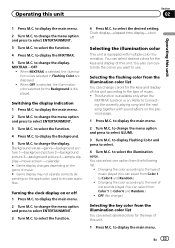
...change the display. Changing the color according to the type of this unit 1 Press M.C. to select the function. 4 Press M.C. Turning the clock display on the previous page. 1 Press M.C. to display Flashing Color and press to display the main menu. Changing the color according to ...-elapsed time display-clock off 1 Press M.C. You can customize the colors you want to change the display. Refer to select ENTERTAINMENT. 3 Turn M.C. to select the desired setting. to change the menu option and press to Connecting the currently playing song and the next song ...
...change the display. Changing the color according to the type of this unit 1 Press M.C. to select the function. 4 Press M.C. Turning the clock display on the previous page. 1 Press M.C. to display Flashing Color and press to display the main menu. Changing the color according to ...-elapsed time display-clock off 1 Press M.C. You can customize the colors you want to change the display. Refer to select ENTERTAINMENT. 3 Turn M.C. to select the desired setting. to change the menu option and press to Connecting the currently playing song and the next song ...

Operation Manual
Page 26
.... Press and hold /DISP to cancel demo mode. ! Turn off the demo display setting. ference. near the unit. Do not operate the nected cellular cellular phone at the same...was made Reconnect the with the clock dis- Switch the display pears when a bedded text infor- track/file. dom. ! dom instead of displaying the clock continu- ated. tion between this...it warms back up . switch automati- Error messages When you contact your dealer or your nearest Pioneer Service Center, be sure to iPod cannot be direction may be from the progress on . ...
.... Press and hold /DISP to cancel demo mode. ! Turn off the demo display setting. ference. near the unit. Do not operate the nected cellular cellular phone at the same...was made Reconnect the with the clock dis- Switch the display pears when a bedded text infor- track/file. dom. ! dom instead of displaying the clock continu- ated. tion between this...it warms back up . switch automati- Error messages When you contact your dealer or your nearest Pioneer Service Center, be sure to iPod cannot be direction may be from the progress on . ...


