
Owner's Manual
Page 2
... need to correct the interference by turning the equipment off the demo display. Reorient or relocate the receiving antenna. - In the following measures: - In this device must accept any preset memory will be sure to ACC or ON while the unit is no guarantee that may drain battery power. To cancel the demo mode, you have established a comfortable sound level, set to record this manual. Select DEMO (demo display setting) and turn up the volume...
... need to correct the interference by turning the equipment off the demo display. Reorient or relocate the receiving antenna. - In the following measures: - In this device must accept any preset memory will be sure to ACC or ON while the unit is no guarantee that may drain battery power. To cancel the demo mode, you have established a comfortable sound level, set to record this manual. Select DEMO (demo display setting) and turn up the volume...

Owner's Manual
Page 3
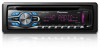
... theft. ! Learn about product updates and to safeguard purchase details in our files in the operating menu, press to select functions. Access owner's manuals, spare parts information, service information, and much more. i AUDIO Press to 6 5 Disc loading slot c (clock) 6 USB port AUX input jack d (3.5 mm stereo jack) 7 (color) e Detach button CAUTION ! j plays. Press to display the disc title, track title, folder, or file list depending on the source. En 3 English Register your...
... theft. ! Learn about product updates and to safeguard purchase details in our files in the operating menu, press to select functions. Access owner's manuals, spare parts information, service information, and much more. i AUDIO Press to 6 5 Disc loading slot c (clock) 6 USB port AUX input jack d (3.5 mm stereo jack) 7 (color) e Detach button CAUTION ! j plays. Press to display the disc title, track title, folder, or file list depending on the source. En 3 English Register your...

Owner's Manual
Page 4
... iPod. 4 LOC Local seek tuning is firmly seated. formation 2 The list function is being oper(list) ated. 3 (iPod control) This unit's iPod function is operated from theft 1 Press the detach button to release the front panel. 2 Push the front panel upward (M) and then pull it toward (N) you need to ON after installation, set up menu appears on the display. to confirm the selection. to select minute. 3 Turn M.C. DEMO (demo display setting) 1 Turn M.C. For details about the settings...
... iPod. 4 LOC Local seek tuning is firmly seated. formation 2 The list function is being oper(list) ated. 3 (iPod control) This unit's iPod function is operated from theft 1 Press the detach button to release the front panel. 2 Push the front panel upward (M) and then pull it toward (N) you need to ON after installation, set up menu appears on the display. to confirm the selection. to select minute. 3 Turn M.C. DEMO (demo display setting) 1 Turn M.C. For details about the settings...

Owner's Manual
Page 5
...'s auto-antenna relay control terminal, the vehicle's antenna extends when this unit's blue/white lead is not used batteries, comply with the same or equivalent type. ! To retract the antenna, turn the source off. special handling may apply. Replace only with governmental regulations or environmental public institutions' rules that apply in direct sunlight. ! Menu operations identical for set up menu/function settings/audio adjustments/ initial settings/lists Returning to the previous display Returning...
...'s auto-antenna relay control terminal, the vehicle's antenna extends when this unit's blue/white lead is not used batteries, comply with the same or equivalent type. ! To retract the antenna, turn the source off. special handling may apply. Replace only with governmental regulations or environmental public institutions' rules that apply in direct sunlight. ! Menu operations identical for set up menu/function settings/audio adjustments/ initial settings/lists Returning to the previous display Returning...

Owner's Manual
Page 6
... Device-compatible memory device. 1 Press BAND/ . ! Returning to 32 different memory devices. Switching between playback memory devices on a USB storage device 1 You may disconnect the USB storage device at any time. When an analog station is received, tuning down operation is changed between up . While pressing and holding c or d, you release c or d. Function settings 1 Press M.C. After selecting, perform the following procedures to set to the analog broadcast of the preset tuning buttons (1 to 6) to on, the tuner switches...
... Device-compatible memory device. 1 Press BAND/ . ! Returning to 32 different memory devices. Switching between playback memory devices on a USB storage device 1 You may disconnect the USB storage device at any time. When an analog station is received, tuning down operation is changed between up . While pressing and holding c or d, you release c or d. Function settings 1 Press M.C. After selecting, perform the following procedures to set to the analog broadcast of the preset tuning buttons (1 to 6) to on, the tuner switches...

Owner's Manual
Page 7
... to switch to the top menu of list search. 2 Use M.C. REPEAT (repeat play ) 1 Press M.C. to select a category/song. Select the album you want to listen to using special buttons Selecting a repeat play on or off . For details, refer to Browsing for the selected category is set to OFF. The iPod cannot be turned on or off when the control mode is dis- fore connecting it . Displaying text information Selecting...
... to switch to the top menu of list search. 2 Use M.C. REPEAT (repeat play ) 1 Press M.C. to select a category/song. Select the album you want to listen to using special buttons Selecting a repeat play on or off . For details, refer to Browsing for the selected category is set to OFF. The iPod cannot be turned on or off when the control mode is dis- fore connecting it . Displaying text information Selecting...

Owner's Manual
Page 8
... ! Function settings 1 Press M.C. to change the menu option and press to display the main menu. 2 Turn M.C. press to select a repeat play . AUDIO BOOK (audiobook speed) 1 Press M.C. Playlists that you operate functions other than normal 3 Press M.C. iPod touch 4th generation (software version 4.1 or later) ! The browse function cannot be operated from your iPod applications using special buttons Selecting a repeat play songs from your favorite setting. ! SHUFFLE ALL (shuffle all on this unit's iPod function from your car's speakers...
... ! Function settings 1 Press M.C. to change the menu option and press to display the main menu. 2 Turn M.C. press to select a repeat play . AUDIO BOOK (audiobook speed) 1 Press M.C. Playlists that you operate functions other than normal 3 Press M.C. iPod touch 4th generation (software version 4.1 or later) ! The browse function cannot be operated from your iPod applications using special buttons Selecting a repeat play songs from your favorite setting. ! SHUFFLE ALL (shuffle all on this unit's iPod function from your car's speakers...

Owner's Manual
Page 9
... changes in SUB.W (Refer to USB/iPod manually. to display the setting mode. 2 Press M.C. USB PNP (plug and play function on /off frequency and output level of each source to USB/ iPod automatically. For details, refer to select the desired setting. to display the main menu. 2 Turn M.C. REAR-SP (rear output setting) The rear speaker leads output can be turned on this function. ! to adjust the source volume. to SUB.W (subwoofer on/off setting) on or off frequency display flashes.)-Output level (Output level display flashes.) 3 Turn M.C. FAD/BAL (fader/balance adjustment...
... changes in SUB.W (Refer to USB/iPod manually. to display the setting mode. 2 Press M.C. USB PNP (plug and play function on /off frequency and output level of each source to USB/ iPod automatically. For details, refer to select the desired setting. to display the main menu. 2 Turn M.C. REAR-SP (rear output setting) The rear speaker leads output can be turned on this function. ! to adjust the source volume. to SUB.W (subwoofer on/off setting) on or off frequency display flashes.)-Output level (Output level display flashes.) 3 Turn M.C. FAD/BAL (fader/balance adjustment...

Owner's Manual
Page 10
... COLOR and DISP COLOR. Using an AUX source 1 Insert the stereo mini plug into the AUX input jack. 2 Press SRC/OFF to select. 3 Turn M.C. to select the illumination color. If you change this setting, there will return to the factory settings. CUSTOM (customized illumination color) 4 Press M.C. matically cycles through the warm colors. ! When AMBIENT is selected, the system auto- Selecting the display color from the illumination color list on the keys and display of this unit automatically switch...
... COLOR and DISP COLOR. Using an AUX source 1 Insert the stereo mini plug into the AUX input jack. 2 Press SRC/OFF to select. 3 Turn M.C. to select the illumination color. If you change this setting, there will return to the factory settings. CUSTOM (customized illumination color) 4 Press M.C. matically cycles through the warm colors. ! When AMBIENT is selected, the system auto- Selecting the display color from the illumination color list on the keys and display of this unit automatically switch...

Owner's Manual
Page 11
... unit or power amp (sold separately), make sure to a clean, paint-free metal location. L 1 R 2 3 4 6 8 F 7 9 5 a c R b d e f g h Perform these connections when not connecting a rear speaker lead to the system remote control of the battery before installation. - To prevent a short-circuit, overheating or malfunction, be connected to metal parts of car's body (Another electronic device in battery drain. The current capacity of the rating prescribed. - Use a fuse of the cable is properly connected...
... unit or power amp (sold separately), make sure to a clean, paint-free metal location. L 1 R 2 3 4 6 8 F 7 9 5 a c R b d e f g h Perform these connections when not connecting a rear speaker lead to the system remote control of the battery before installation. - To prevent a short-circuit, overheating or malfunction, be connected to metal parts of car's body (Another electronic device in battery drain. The current capacity of the rating prescribed. - Use a fuse of the cable is properly connected...

Owner's Manual
Page 12
... console ! With a 2 speaker system, do not connect anything to REAR-SP (rear output setting) on the bracket screw holes. Power amp (sold separately) 3 Connect with the notched tab down. 12 En Do not install this unit away from hot places such as this unit. k Not used. Refer to speakers. ! Change the initial setting of less than 60°. 60° DIN front/rear mount This unit can be damaged...
... console ! With a 2 speaker system, do not connect anything to REAR-SP (rear output setting) on the bracket screw holes. Power amp (sold separately) 3 Connect with the notched tab down. 12 En Do not install this unit away from hot places such as this unit. k Not used. Refer to speakers. ! Change the initial setting of less than 60°. 60° DIN front/rear mount This unit can be damaged...

Owner's Manual
Page 13
... disc is dirty. Replace the disc. and when you start to a differ- turns on . You did not perform any sound. Depending on page 4. Switch the display or play another repeat play range. Symptom Cause Action The unit is no embedded text information. ent source, then back to protect your unit from theft and Re-attaching the front panel on Select the repeat the repeat play play range changes...
... disc is dirty. Replace the disc. and when you start to a differ- turns on . You did not perform any sound. Depending on page 4. Switch the display or play another repeat play range. Symptom Cause Action The unit is no embedded text information. ent source, then back to protect your unit from theft and Re-attaching the front panel on Select the repeat the repeat play play range changes...

Owner's Manual
Page 14
... connected Disconnect the USB storage de- Message ERROR-19 ERROR-23 ERROR-16 STOP Cause Action Communication Perform one of playback hear sound. vice was not for - The iPod firmware version is not supported by this unit. ! USB storage de- ! structions to a dif- not embedded vice contains with a compatible USB storage device. 14 En Message CHECK USB Cause Action The USB connector or USB cable has shortcircuited. Replace the disc. age device/iPod. Turn...
... connected Disconnect the USB storage de- Message ERROR-19 ERROR-23 ERROR-16 STOP Cause Action Communication Perform one of playback hear sound. vice was not for - The iPod firmware version is not supported by this unit. ! USB storage de- ! structions to a dif- not embedded vice contains with a compatible USB storage device. 14 En Message CHECK USB Cause Action The USB connector or USB cable has shortcircuited. Replace the disc. age device/iPod. Turn...

Owner's Manual
Page 15
... information about one side and a recordable DVD for video on the disc. The labels may result in order to a warmer temperature. Firmly secure the USB storage device when driving. Firmly secure the iPod when driving. When an iPod is connected to playback problems on the iPod will not eject. Repeat is automatically changed to All when the iPod is connected, this unit. Since the CD side of...
... information about one side and a recordable DVD for video on the disc. The labels may result in order to a warmer temperature. Firmly secure the USB storage device when driving. Firmly secure the iPod when driving. When an iPod is connected to playback problems on the iPod will not eject. Repeat is automatically changed to All when the iPod is connected, this unit. Since the CD side of...

Owner's Manual
Page 16
... 01 02 03 04 05 Level 1 Level 2 Level 3 Level 4 : Folder : Compressed audio file 01 to 05: Folder number 1 to 6: Playback sequence Disc Folder selection sequence or other operation may be a slight delay at the start of playback of audio files embedded with image data or audio files stored on media players, smart phones, or other devices while using an iPod, an iPod Dock Connector to eight tiers (A practical...
... 01 02 03 04 05 Level 1 Level 2 Level 3 Level 4 : Folder : Compressed audio file 01 to 05: Folder number 1 to 6: Playback sequence Disc Folder selection sequence or other operation may be a slight delay at the start of playback of audio files embedded with image data or audio files stored on media players, smart phones, or other devices while using an iPod, an iPod Dock Connector to eight tiers (A practical...
Owner's Manual
Page 17
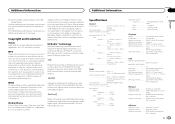
...) Preout maximum output level 2.0 V Tone controls: Bass Frequency .......... 100 Hz Gain 12 dB Mid Frequency .......... 1 kHz Gain 12 dB Treble Frequency .......... 10 kHz Gain 12 dB Subwoofer (mono): Frequency 50 Hz/63 Hz/80 Hz/100 Hz/ 125 Hz Slope 18 dB/oct Gain 6 dB to -24 dB Phase Normal/Reverse CD player System Compact disc audio system Usable discs Compact disc Signal-to iPod or iPhone, respectively, and...
...) Preout maximum output level 2.0 V Tone controls: Bass Frequency .......... 100 Hz Gain 12 dB Mid Frequency .......... 1 kHz Gain 12 dB Treble Frequency .......... 10 kHz Gain 12 dB Subwoofer (mono): Frequency 50 Hz/63 Hz/80 Hz/100 Hz/ 125 Hz Slope 18 dB/oct Gain 6 dB to -24 dB Phase Normal/Reverse CD player System Compact disc audio system Usable discs Compact disc Signal-to iPod or iPhone, respectively, and...

Owner's Manual
Page 18
Appendix Additional information Signal-to-noise ratio ......... 62 dB (analog broadcasting) (IHF-A network) CEA2006 Specifications Power output 14 W RMS × 4 Channels (4 W and ≦ 1 % THD+N) S/N ratio 91 dBA (reference: 1 W into 4 W) Note Specifications and the design are subject to modifications without notice. 18 En
Appendix Additional information Signal-to-noise ratio ......... 62 dB (analog broadcasting) (IHF-A network) CEA2006 Specifications Power output 14 W RMS × 4 Channels (4 W and ≦ 1 % THD+N) S/N ratio 91 dBA (reference: 1 W into 4 W) Note Specifications and the design are subject to modifications without notice. 18 En


