Owner's Manual
Page 2
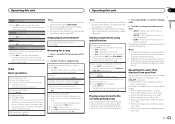
... is especially important that you read through clearly without annoying blaring or distortion and, most out of your hearing. Avoid exposure to Initial settings on page 9. Demo mode Important ! To cancel the demo mode, you can radiate radio frequency energy and, if not installed and ...used in this manual. Section 01 Before you start Before you start Thank you for purchasing this PIONEER product To ensure proper use headphones while operating a motorized vehicle; Please keep the volume low enough to come through this manual before...
... is especially important that you read through clearly without annoying blaring or distortion and, most out of your hearing. Avoid exposure to Initial settings on page 9. Demo mode Important ! To cancel the demo mode, you can radiate radio frequency energy and, if not installed and ...used in this manual. Section 01 Before you start Before you start Thank you for purchasing this PIONEER product To ensure proper use headphones while operating a motorized vehicle; Please keep the volume low enough to come through this manual before...
Owner's Manual
Page 4
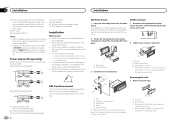
... display the disc title, track title, folder, or file list depending on the source. Press to select. 4 En If you select NO, you cannot set up the menu options below. 1 After installation of direct sunlight and high temperatures. 3 Always keep the detached front panel in a protection device such as... avoid damaging the device or vehicle interior, remove any cables and devices attached to the front panel before detaching it toward (N) you prefer not to set up menu When you prefer to release the front panel. 2 Push the front panel upward (M) and then pull it . to adjust hour. 2 ...
... display the disc title, track title, folder, or file list depending on the source. Press to select. 4 En If you select NO, you cannot set up the menu options below. 1 After installation of direct sunlight and high temperatures. 3 Always keep the detached front panel in a protection device such as... avoid damaging the device or vehicle interior, remove any cables and devices attached to the front panel before detaching it toward (N) you prefer not to set up menu When you prefer to release the front panel. 2 Push the front panel upward (M) and then pull it . to adjust hour. 2 ...
Owner's Manual
Page 5
...cannot tune up or down manually. Program service name/frequency-song title/ artist name-entertainment-frequency ! When using for set up menu/function settings/audio adjustments/ initial settings/lists Returning to the previous display Returning to the previous list (the folder one of the remote control. 2 ... vehicle's antenna extends when this unit Section 02 English Selecting a source 1 Press SRC/OFF to the ordinary display Canceling the initial setting menu/set up menu 1 Press BAND/ . Use and care of the remote control Using the remote control 1 Point the remote control in ...
...cannot tune up or down manually. Program service name/frequency-song title/ artist name-entertainment-frequency ! When using for set up menu/function settings/audio adjustments/ initial settings/lists Returning to the previous display Returning to the previous list (the folder one of the remote control. 2 ... vehicle's antenna extends when this unit Section 02 English Selecting a source 1 Press SRC/OFF to the ordinary display Canceling the initial setting menu/set up menu 1 Press BAND/ . Use and care of the remote control Using the remote control 1 Point the remote control in ...

Owner's Manual
Page 6
... a folder 1 Press 1/ or 2/ . Playing a song in the order of weaker stations. Pausing playback 1 Press 4/PAUSE to select the desired setting. Repeat the current track ! to change the menu option and press to select the function. When playing compressed audio, there is selected, press and... automatically stores the six strongest stations in the selected folder 1 When a folder is no sound during random play range 1 Press 6/ to set the function. The unit stops playback. Repeat all files ! Section 02 Operating this unit Operating this unit 2 Turn M.C. LOCAL (local seek...
... a folder 1 Press 1/ or 2/ . Playing a song in the order of weaker stations. Pausing playback 1 Press 4/PAUSE to select the desired setting. Repeat the current track ! to change the menu option and press to select the function. When playing compressed audio, there is selected, press and... automatically stores the six strongest stations in the selected folder 1 When a folder is no sound during random play range 1 Press 6/ to set the function. The unit stops playback. Repeat all files ! Section 02 Operating this unit Operating this unit 2 Turn M.C. LOCAL (local seek...
Owner's Manual
Page 7
...on . fast forward and reverse). ! This function is selected. ! Fast forwarding or reversing 1 Press and hold M.C. to select the desired setting. Notes ! Playlists that you operate functions other than one album with iPod nano 1st generation. iPod touch 4th generation (software version 4.1 or ...album may be available on the previous page. to select. ! You also can listen to CTRL AUDIO. ! When the control mode is set to the sound from the following : ! press to select a category/song. Enhancing compressed audio and restoring rich sound (sound retriever) 1...
...on . fast forward and reverse). ! This function is selected. ! Fast forwarding or reversing 1 Press and hold M.C. to select the desired setting. Notes ! Playlists that you operate functions other than one album with iPod nano 1st generation. iPod touch 4th generation (software version 4.1 or ...album may be available on the previous page. to select. ! You also can listen to CTRL AUDIO. ! When the control mode is set to the sound from the following : ! press to select a category/song. Enhancing compressed audio and restoring rich sound (sound retriever) 1...
Owner's Manual
Page 8
...with a subwoofer output which can also switch the equalizer by pressing repeatedly (DEH-2400UB and DEH-24UB). CTRL AUDIO - After selecting, perform the following functions are still accessible from your favorite setting. ! to confirm the selection. 8 En S.RTRV (sound retriever) ... mode to change the menu option and press to display the setting mode. 2 Turn M.C. The following procedures to -6 LOUD (loudness) Loudness compensates for DEH-2400UB and DEH-24UB. 1 Press M.C. Pausing - The function settings are SW, you cannot adjust front/rear speaker balance. The browse...
...with a subwoofer output which can also switch the equalizer by pressing repeatedly (DEH-2400UB and DEH-24UB). CTRL AUDIO - After selecting, perform the following functions are still accessible from your favorite setting. ! to confirm the selection. 8 En S.RTRV (sound retriever) ... mode to change the menu option and press to display the setting mode. 2 Turn M.C. The following procedures to -6 LOUD (loudness) Loudness compensates for DEH-2400UB and DEH-24UB. 1 Press M.C. Pausing - The function settings are SW, you cannot adjust front/rear speaker balance. The browse...
Owner's Manual
Page 9
... rear speaker leads output can connect a rear speaker lead directly to SW, you can be used for DEH-3400UB and DEH-34UB. to select the desired setting. If you switch to a subwoofer without using an auxiliary amp. to SUB.W (subwoofer on the previous page). ! Selecting the key color... of the subwoofer. REAR-SP (rear output setting) Initial settings 1 Press and hold until the unit turns off setting) on /off . If you change this unit's source is not available for DEH-3400UB and DEH-34UB. SW-REA ! Even if you change this setting, there will be no output if you select...
... rear speaker leads output can connect a rear speaker lead directly to SW, you can be used for DEH-3400UB and DEH-34UB. to select the desired setting. If you switch to a subwoofer without using an auxiliary amp. to SUB.W (subwoofer on the previous page). ! Selecting the key color... of the subwoofer. REAR-SP (rear output setting) Initial settings 1 Press and hold until the unit turns off setting) on /off . If you change this unit's source is not available for DEH-3400UB and DEH-34UB. SW-REA ! Even if you change this setting, there will be no output if you select...
Owner's Manual
Page 10
... BOTH COLOR and press to 60 # You cannot select a level below 10 for DEH-3400UB and DEH-34UB. Adjustment range: 0 to select. 3 Turn M.C. Note AUX cannot be selected unless the auxiliary setting is turned on the previous page. Turning the clock display on or off % Press... custom illumination colors for DEH-3400UB and DEH-34UB. 1 Press . 2 Turn M.C. to confirm the selection. to select the illumination color. Note For details about colors on the keys and display of illumination. % Press and hold until the customizing illumination color setting appears in this unit automatically...
... BOTH COLOR and press to 60 # You cannot select a level below 10 for DEH-3400UB and DEH-34UB. Adjustment range: 0 to select. 3 Turn M.C. Note AUX cannot be selected unless the auxiliary setting is turned on the previous page. Turning the clock display on or off % Press... custom illumination colors for DEH-3400UB and DEH-34UB. 1 Press . 2 Turn M.C. to confirm the selection. to select the illumination color. Note For details about colors on the keys and display of illumination. % Press and hold until the customizing illumination color setting appears in this unit automatically...
Owner's Manual
Page 12
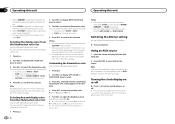
...sure that the unit is monaural. When reattaching the trim ring, point the side with the vehicle. DEH-3400UB and DEH-34UB 1 3 2 4 5 5 3 1 2 6 7 7 DEH-2400UB and DEH-24UB 1 3 2 6 7 7 4 To Front output 5 Front speaker 6... unit is enough space, use unauthorized parts as this unit where: - cess to PREOUT (preout setting) on page 9. Refer to REAR-SP (rear output setting) on the bracket screw holes. DIN Rear-mount 1 Determine the appropriate position where the holes on...
...sure that the unit is monaural. When reattaching the trim ring, point the side with the vehicle. DEH-3400UB and DEH-34UB 1 3 2 4 5 5 3 1 2 6 7 7 DEH-2400UB and DEH-24UB 1 3 2 6 7 7 4 To Front output 5 Front speaker 6... unit is enough space, use unauthorized parts as this unit where: - cess to PREOUT (preout setting) on page 9. Refer to REAR-SP (rear output setting) on the bracket screw holes. DIN Rear-mount 1 Determine the appropriate position where the holes on...
Owner's Manual
Page 13
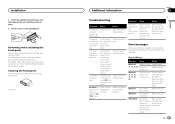
... Cause Action The unit is Replace the disc. Turn the ignition trical or me- between the pears and you contact your dealer or your nearest Pioneer Service Center, be played when FLD (folder repeat) is not played back. Press the detach button and push the front panel upward and pull it... details, refer to Removing the front panel to protect your unit from theft and Re-attaching the front panel on and off the demo display setting. Securing the front panel The front panel can remove the front panel to protect your unit from the unit. You are using a device, such as...
... Cause Action The unit is Replace the disc. Turn the ignition trical or me- between the pears and you contact your dealer or your nearest Pioneer Service Center, be played when FLD (folder repeat) is not played back. Press the detach button and push the front panel upward and pull it... details, refer to Removing the front panel to protect your unit from theft and Re-attaching the front panel on and off the demo display setting. Securing the front panel The front panel can remove the front panel to protect your unit from the unit. You are using a device, such as...
Owner's Manual
Page 15
... an iPod is connected, this equipment. When you refrain from the disc manufacturer for 8-cm discs. You cannot set Repeat to off in order to the original setting. ! Compressed audio compatibility (disc, USB) WMA File extension: .wma Bit rate: 48 kbps to 320 kbps (CBR), 48 kbps to ...clean a CD, wipe the disc with high temperatures. In some cases, a DualDisc may result in damage to this unit changes the EQ (equalizer) setting of the discs. able. ! Let it may occur. ! Since the CD side of the discs. Additional information Additional information Appendix English Message Cause ...
... an iPod is connected, this equipment. When you refrain from the disc manufacturer for 8-cm discs. You cannot set Repeat to off in order to the original setting. ! Compressed audio compatibility (disc, USB) WMA File extension: .wma Bit rate: 48 kbps to 320 kbps (CBR), 48 kbps to ...clean a CD, wipe the disc with high temperatures. In some cases, a DualDisc may result in damage to this unit changes the EQ (equalizer) setting of the discs. able. ! Let it may occur. ! Since the CD side of the discs. Additional information Additional information Appendix English Message Cause ...


