Owner's Manual
Page 4
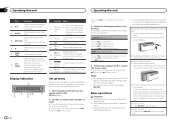
... to display the disc title, track title, folder, or file list depending on page 9. ! To avoid damaging the device or vehicle interior, remove any cables and devices attached to ON after installation, set the menu. For details about the settings, refer to pause or resume playback. ke ... 3 Turn M.C. to confirm the selection. Turning the unit off . Random play sec- QUIT appears. 4 To finish your iPod. Handle gently when removing or attaching the front panel. ! device and iPod: elapsed tion playback time and text in- You can cancel set up the menu options in CD...
... to display the disc title, track title, folder, or file list depending on page 9. ! To avoid damaging the device or vehicle interior, remove any cables and devices attached to ON after installation, set the menu. For details about the settings, refer to pause or resume playback. ke ... 3 Turn M.C. to confirm the selection. Turning the unit off . Random play sec- QUIT appears. 4 To finish your iPod. Handle gently when removing or attaching the front panel. ! device and iPod: elapsed tion playback time and text in- You can cancel set up the menu options in CD...
Owner's Manual
Page 5
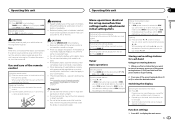
.... ! The remote control may become jammed under the brake or accelerator pedal. You need to select PCH (preset channel) in your vehicle when removing the front panel. You need to select MAN (manual tuning) in SEEK, you cannot recall preset stations. Seek tuning starts as soon as sunshine...the next page. Keep the battery out of the reach of the preset tuning buttons (1 to 6) and hold c or d, and then release. Remove the battery if the remote control is incorrectly replaced. For details about the settings, refer to the ordinary display Canceling the initial setting menu/set...
.... ! The remote control may become jammed under the brake or accelerator pedal. You need to select PCH (preset channel) in your vehicle when removing the front panel. You need to select MAN (manual tuning) in SEEK, you cannot recall preset stations. Seek tuning starts as soon as sunshine...the next page. Keep the battery out of the reach of the preset tuning buttons (1 to 6) and hold c or d, and then release. Remove the battery if the remote control is incorrectly replaced. For details about the settings, refer to the ordinary display Canceling the initial setting menu/set...
Owner's Manual
Page 12
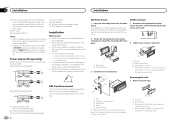
... the unit match. 2 Secure the mounting sleeve by using a screwdriver to bend the metal tabs (90°) into the dashboard. Removing the unit 1 Remove the trim ring. 5 1 Nut 2 Firewall or metal support 3 Metal strap 4 Screw 5 Screw (M4 × 8) # ...amp (sold separately) 3 Connect with the notched tab down. Refer to the green and green/ black leads. DEH-3400UB and DEH-34UB 1 3 2 4 5 5 3 1 2 6 7 7 DEH-2400UB and DEH-24UB 1 3 2 6 7 7 4 To Front output 5 Front speaker 6 To ...
... the unit match. 2 Secure the mounting sleeve by using a screwdriver to bend the metal tabs (90°) into the dashboard. Removing the unit 1 Remove the trim ring. 5 1 Nut 2 Firewall or metal support 3 Metal strap 4 Screw 5 Screw (M4 × 8) # ...amp (sold separately) 3 Connect with the notched tab down. Refer to the green and green/ black leads. DEH-3400UB and DEH-34UB 1 3 2 4 5 5 3 1 2 6 7 7 DEH-2400UB and DEH-24UB 1 3 2 6 7 7 4 To Front output 5 Front speaker 6 To ...
Owner's Manual
Page 13
...using a device, such as a cellular phone, that may change when another repeat play range again. back ON, or switch to protect your nearest Pioneer Service Center, be secured with the supplied screw. 1 1 Screw Additional information Section 03 Troubleshooting Symptom Cause Action The display il- Sometimes Wait until ...they click into both sides of the unit until the there is interference. Removing and re-attaching the front panel You can be sure to hear any operation within about 30 seconds. For details, refer to...
...using a device, such as a cellular phone, that may change when another repeat play range again. back ON, or switch to protect your nearest Pioneer Service Center, be secured with the supplied screw. 1 1 Screw Additional information Section 03 Troubleshooting Symptom Cause Action The display il- Sometimes Wait until ...they click into both sides of the unit until the there is interference. Removing and re-attaching the front panel You can be sure to hear any operation within about 30 seconds. For details, refer to...


