Owner's Manual
Page 2
... Adjusting source levels 14 Other Functions Setting the time 15 Setting the time display on 7 Selecting a source 7 Turning the unit off 15 Additional Information CD player and care 16 CD-R/CD-RW discs 16 Understanding built-in a random order 11 Repeating play 11 Pausing CD playback 11 Audio Adjustments Introduction of the remote control (DEH-340) 5 • Installing the battery 5 • Using the remote control 5 What's what 6 Remote control (DEH-340) 7 Power ON/OFF Turning the unit on or off 7 Tuner Listening to operate your model properly...
... Adjusting source levels 14 Other Functions Setting the time 15 Setting the time display on 7 Selecting a source 7 Turning the unit off 15 Additional Information CD player and care 16 CD-R/CD-RW discs 16 Understanding built-in a random order 11 Repeating play 11 Pausing CD playback 11 Audio Adjustments Introduction of the remote control (DEH-340) 5 • Installing the battery 5 • Using the remote control 5 What's what 6 Remote control (DEH-340) 7 Power ON/OFF Turning the unit on or off 7 Tuner Listening to operate your model properly...
Owner's Manual
Page 4
... CANADA Pioneer Electronics of sophisticated functions ensuring superior reception and operation. CUSTOMER SATISFACTION DEPARTMENT 300 Allstate Parkway Markham, Ontario L3R OP2 (905) 479-4411 1-877-283-5901 For warranty information please see the Limited Warranty sheet included with the remote control (DEH-340). Before You Start About this unit The tuner frequencies on this unit are not selfexplanatory. This manual explains head unit operation. We...
... CANADA Pioneer Electronics of sophisticated functions ensuring superior reception and operation. CUSTOMER SATISFACTION DEPARTMENT 300 Allstate Parkway Markham, Ontario L3R OP2 (905) 479-4411 1-877-283-5901 For warranty information please see the Limited Warranty sheet included with the remote control (DEH-340). Before You Start About this unit The tuner frequencies on this unit are not selfexplanatory. This manual explains head unit operation. We...
Owner's Manual
Page 7
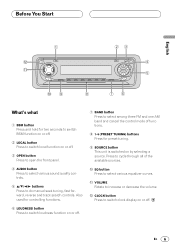
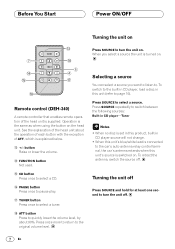
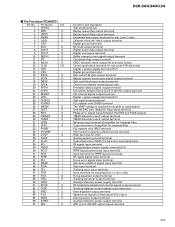
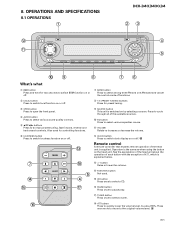
... control mode of the available sources. 0 EQ button Press to do manual seek tuning, fast forward, reverse and track search controls. Also used for controlling functions. 6 LOUDNESS button Press to switch loudness function on or off. 7 BAND button Press to switch clock display on or off . 3 OPEN button Press to open the front panel. 4 AUDIO button Press to select various sound quality controls. 5 5/∞/2/3 buttons Press to select various equalizer curves. - Press to cycle through all of functions. 8 1-6 (PRESET TUNING) buttons...
... control mode of the available sources. 0 EQ button Press to do manual seek tuning, fast forward, reverse and track search controls. Also used for controlling functions. 6 LOUDNESS button Press to switch loudness function on or off. 7 BAND button Press to switch clock display on or off . 3 OPEN button Press to open the front panel. 4 AUDIO button Press to select various sound quality controls. 5 5/∞/2/3 buttons Press to select various equalizer curves. - Press to cycle through all of functions. 8 1-6 (PRESET TUNING) buttons...
Owner's Manual
Page 8
... select a source you select a source the unit is explained below. ~ +/- Before You Start Power ON/OFF Turning the unit on the head unit. To switch to page 10). Operation is the same as when using the button on 7 ! @ # ~ % 5 4 $ Remote control (DEH-340) A remote controller that enables remote operation of the head unit about 90%. Press SOURCE repeatedly to . When you want to listen to switch between the following sources: Built-in CD player-Tuner Notes • When no disc is set...
... select a source you select a source the unit is explained below. ~ +/- Before You Start Power ON/OFF Turning the unit on the head unit. To switch to page 10). Operation is the same as when using the button on 7 ! @ # ~ % 5 4 $ Remote control (DEH-340) A remote controller that enables remote operation of the head unit about 90%. Press SOURCE repeatedly to . When you want to listen to switch between the following sources: Built-in CD player-Tuner Notes • When no disc is set...

Owner's Manual
Page 9
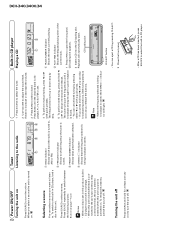
... to adjust the sound level. The tuner will light. English Español Tuner Listening to the radio 1 2 34 1 BAND indicator Shows which band the radio is tuned to, AM or FM. 2 FREQUENCY indicator Shows to which frequency the tuner is tuned. 3 PRESET NUMBER indicator Shows what preset has been selected. 4 STEREO () indicator Shows that the frequency selected is being broadcast in stereo. 1 Press SOURCE to select the tuner. 2 Use VOLUME to select a band. Seek tuning starts...
... to adjust the sound level. The tuner will light. English Español Tuner Listening to the radio 1 2 34 1 BAND indicator Shows which band the radio is tuned to, AM or FM. 2 FREQUENCY indicator Shows to which frequency the tuner is tuned. 3 PRESET NUMBER indicator Shows what preset has been selected. 4 STEREO () indicator Shows that the frequency selected is being broadcast in stereo. 1 Press SOURCE to select the tuner. 2 Use VOLUME to select a band. Seek tuning starts...

Owner's Manual
Page 13
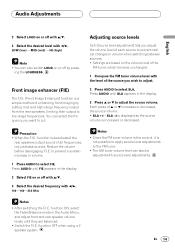
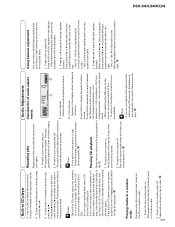
... (front image enhancer)-SLA (source level adjustment) • When selecting the FM tuner as the left/right speaker balance moves from front to rear. • FAD 0 is the proper setting when only two speakers are used. 3 Press 2 or 3 to the display of audio adjustments 1 2 1 AUDIO display Shows the audio adjustments status. 2 LOUD indicator Appears in the display. • If the balance setting has been previously adjusted, BAL will be displayed. 2 Press 5 or ∞...
... (front image enhancer)-SLA (source level adjustment) • When selecting the FM tuner as the left/right speaker balance moves from front to rear. • FAD 0 is the proper setting when only two speakers are used. 3 Press 2 or 3 to the display of audio adjustments 1 2 1 AUDIO display Shows the audio adjustments status. 2 LOUD indicator Appears in the display. • If the balance setting has been previously adjusted, BAL will be displayed. 2 Press 5 or ∞...
Owner's Manual
Page 15
.... function ON, select the Fader/Balance mode in the Audio Menu, and adjust front and rear speaker volume levels until SLA appears in volume when switching between sources. • Settings are balanced. • Switch the F.I.E. Press AUDIO until FIE appears in volume. 1 Press AUDIO to low-range frequencies. Adjusting source levels SLA (Source level adjustment) lets you adjust the volume level of the FM tuner, which remains unchanged. 1 Compare the FM tuner volume level with 2/3. and high-range frequency output from the rear speakers, limiting their output to select FIE...
.... function ON, select the Fader/Balance mode in the Audio Menu, and adjust front and rear speaker volume levels until SLA appears in volume when switching between sources. • Settings are balanced. • Switch the F.I.E. Press AUDIO until FIE appears in volume. 1 Press AUDIO to low-range frequencies. Adjusting source levels SLA (Source level adjustment) lets you adjust the volume level of the FM tuner, which remains unchanged. 1 Compare the FM tuner volume level with 2/3. and high-range frequency output from the rear speakers, limiting their output to select FIE...

Owner's Manual
Page 16
Setting the time display on the unit's clock display. 1 Press SOURCE and hold until TIME appears in the display. 3 Select the portion of the clock display the portion selected will blink. Press CLOCK to set the time on or off You can also cancel time settings by holding down AUDIO until the unit turns off. 15 En Pressing ∞ will increase the selected hour or minute. Other Functions Setting the time This is displayed again after 25...
Setting the time display on the unit's clock display. 1 Press SOURCE and hold until TIME appears in the display. 3 Select the portion of the clock display the portion selected will blink. Press CLOCK to set the time on or off You can also cancel time settings by holding down AUDIO until the unit turns off. 15 En Pressing ∞ will increase the selected hour or minute. Other Functions Setting the time This is displayed again after 25...
Owner's Manual
Page 18
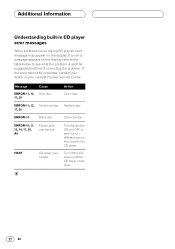
...-in CD player error messages When problems occur during CD play an error message may appear on the display refer to the table below to the CD player. ERROR-11, 12, Scratched disc Replace disc. 17, 30 ERROR-14 Blank disc Check the disc. ERROR-10, 11, 12, 14, 17, 30, A0 Electrical or mechanical Turn the ignition ON and OFF, or switch to a different source, then back...
...-in CD player error messages When problems occur during CD play an error message may appear on the display refer to the table below to the CD player. ERROR-11, 12, Scratched disc Replace disc. 17, 30 ERROR-14 Blank disc Check the disc. ERROR-10, 11, 12, 14, 17, 30, A0 Electrical or mechanical Turn the ignition ON and OFF, or switch to a different source, then back...
Other Manual
Page 1
... being used with minimum rating of 50 W (45 W)* and impedance of the unit and tapping into the engine compartment to connect to other units, then make connections correctly. • Secure the wiring with power regardless of both products and connect cords that does not have the same function. INSTALLATION MANUAL OF OF DEH-340 DEH-240F This product conforms to an external power amp's system remote control or the car's Auto-antenna relay control...
... being used with minimum rating of 50 W (45 W)* and impedance of the unit and tapping into the engine compartment to connect to other units, then make connections correctly. • Secure the wiring with power regardless of both products and connect cords that does not have the same function. INSTALLATION MANUAL OF OF DEH-340 DEH-240F This product conforms to an external power amp's system remote control or the car's Auto-antenna relay control...
Other Manual
Page 4
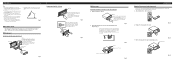
... and pull out to the factory radio mounting bracket. (Fig. 8) (Fig. 9) Select a position where the screw holes of the bracket and the screw holes of the head unit become aligned (are fitted), and tighten the screws at the sides of the unit 1. Installation Note: • Before finally installing the unit, connect the wiring temporarily, making sure it overheats, so don't install the unit anywhere hot -
... and pull out to the factory radio mounting bracket. (Fig. 8) (Fig. 9) Select a position where the screw holes of the bracket and the screw holes of the head unit become aligned (are fitted), and tighten the screws at the sides of the unit 1. Installation Note: • Before finally installing the unit, connect the wiring temporarily, making sure it overheats, so don't install the unit anywhere hot -
Service Manual
Page 1
... Road, #04-01, Singapore 159936 C PIONEER CORPORATION 2001 K-ZZD. This service manual should be used together with the following manual(s): Model No. BLOCK DIAGRAM AND SCHEMATIC DIAGRAM ...12 4. OPERATIONS AND SPECIFICATIONS 61 For details, refer to "Important symbols for good services" on the next page. Service DEH-340/XN/UC Manual HIGH POWER CD PLAYER WITH FM/AM TUNER DEH-340 XN/UC DEH-3400 XN/UC DEH-34 XN/UC ORDER NO.
... Road, #04-01, Singapore 159936 C PIONEER CORPORATION 2001 K-ZZD. This service manual should be used together with the following manual(s): Model No. BLOCK DIAGRAM AND SCHEMATIC DIAGRAM ...12 4. OPERATIONS AND SPECIFICATIONS 61 For details, refer to "Important symbols for good services" on the next page. Service DEH-340/XN/UC Manual HIGH POWER CD PLAYER WITH FM/AM TUNER DEH-340 XN/UC DEH-3400 XN/UC DEH-34 XN/UC ORDER NO.
Service Manual
Page 16
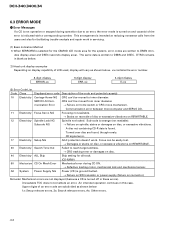
... Skip setting for facilitating trouble analysis and repair work . CD signal error. 17 Electricity Setup NG AGC protection doesn't work in blank as before. 2) Head unit display examples Depending on REWRITABLE. 12 Electricity Spindle Lock NG Spindle not locked. Unreadable TOC does not constitute an error. An intended operation continues in these errors). DEH-340,3400,34 6.3 ERROR MODE - Turned over disc are subdivided as shown below : 1x: Setup relevant errors, 3x...
... Skip setting for facilitating trouble analysis and repair work . CD signal error. 17 Electricity Setup NG AGC protection doesn't work in blank as before. 2) Head unit display examples Depending on REWRITABLE. 12 Electricity Spindle Lock NG Spindle not locked. Unreadable TOC does not constitute an error. An intended operation continues in these errors). DEH-340,3400,34 6.3 ERROR MODE - Turned over disc are subdivided as shown below : 1x: Setup relevant errors, 3x...
Service Manual
Page 18
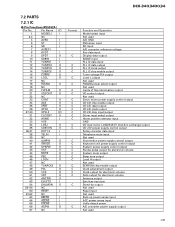
... Illumination power supply control output Keyboard unit power supply control output System power supply control output Strobe pulse output for electronic volume System mute output Beep tone output Local H output Not used EEPROM chip enable output Clock adjustment output Clock output for electronic volume Data output for electronic volume Antenna output Eject key input pin Stand-by output Not used Reset input Not used Back up power sense input ACC power sense input Grille detach sense A/D converter power supply output Not used 49 Pin Functions(PE5262A) Pin No. DEH-340,3400,34 7.2 PARTS...
... Illumination power supply control output Keyboard unit power supply control output System power supply control output Strobe pulse output for electronic volume System mute output Beep tone output Local H output Not used EEPROM chip enable output Clock adjustment output Clock output for electronic volume Data output for electronic volume Antenna output Eject key input pin Stand-by output Not used Reset input Not used Back up power sense input ACC power sense input Grille detach sense A/D converter power supply output Not used 49 Pin Functions(PE5262A) Pin No. DEH-340,3400,34 7.2 PARTS...
Service Manual
Page 22
... SEL O Function and Operation Test mode terminal Replay speed flag output terminal Replay speed flag output terminal Emphasis flag output terminal for sub code Q data Channel clock (44.1 kHz) output terminal Digital ground terminal Bit clock output terminal Digital audio data output terminal Digital out output terminal Buffer memory over signal output terminal Correction flag output terminal CRCC decision result output for sub code Q data Clock input/output terminal for sub code P-W data read Digital + power supply terminal...
... SEL O Function and Operation Test mode terminal Replay speed flag output terminal Replay speed flag output terminal Emphasis flag output terminal for sub code Q data Channel clock (44.1 kHz) output terminal Digital ground terminal Bit clock output terminal Digital audio data output terminal Digital out output terminal Buffer memory over signal output terminal Correction flag output terminal CRCC decision result output for sub code Q data Clock input/output terminal for sub code P-W data read Digital + power supply terminal...
Service Manual
Page 30
... play. & TUNER button Press once to select a tuner. ^ * ATT button Press to quickly lower the volume level, by selecting a source. Remote control A remote controller that enables remote operation of the head unit is the same as when using the button on or off . Operation is supplied. VOLUME Rotate to increase or decrease the volume. 6 LOUDNESS button Press to switch loudness function on or off. # 7 * @ CLOCK button Press to switch clock display on or off . 8 1-6 (PRESET TUNING) buttons Press for preset tuning. 3 OPEN button Press to open the front panel. 4 AUDIO button...
... play. & TUNER button Press once to select a tuner. ^ * ATT button Press to quickly lower the volume level, by selecting a source. Remote control A remote controller that enables remote operation of the head unit is the same as when using the button on or off . Operation is supplied. VOLUME Rotate to increase or decrease the volume. 6 LOUDNESS button Press to switch loudness function on or off. # 7 * @ CLOCK button Press to switch clock display on or off . 8 1-6 (PRESET TUNING) buttons Press for preset tuning. 3 OPEN button Press to open the front panel. 4 AUDIO button...
Service Manual
Page 31
... player-Tuner 3 PRESET NUMBER indicator is being broadcast in stereo. nected to the car's auto-antenna relay control terminal, the car's antenna Note extends when this unit's blue/white lead is tuned to, The frequencies move up or down step by pressing CD EJECT. 3 Close the front panel. tor will not change. Press BAND until a the following sources: broadcast strong enough for FM or AM. 1 2 Selecting a source 1 BAND indicator 4 To perform manual tuning...
... player-Tuner 3 PRESET NUMBER indicator is being broadcast in stereo. nected to the car's auto-antenna relay control terminal, the car's antenna Note extends when this unit's blue/white lead is tuned to, The frequencies move up or down step by pressing CD EJECT. 3 Close the front panel. tor will not change. Press BAND until a the following sources: broadcast strong enough for FM or AM. 1 2 Selecting a source 1 BAND indicator 4 To perform manual tuning...
Service Manual
Page 32
... to the source dis- Pressing 2 once skips to turn random play and then repeat. 1 2 2 Press 5 to eject the disc, and the CD. turned on . • When selecting the FM tuner as ERROR- check the disc for damage before inserting ment) the disc again. 1 Press 6 to the start of 5 or ∞ moves the front/rear speaker balance towards the left /right speaker balance. Using balance adjustment You can select a fader/balance setting that...
... to the source dis- Pressing 2 once skips to turn random play and then repeat. 1 2 2 Press 5 to eject the disc, and the CD. turned on . • When selecting the FM tuner as ERROR- check the disc for damage before inserting ment) the disc again. 1 Press 6 to the start of 5 or ∞ moves the front/rear speaker balance towards the left /right speaker balance. Using balance adjustment You can select a fader/balance setting that...
Service Manual
Page 33
... the display. 3 Press 5 or ∞ to select SLA. curve. Adjusting loudness 3 Select the desired frequency with the level of the equalizer curves by the display. This is an adjusted equalizer curve that previously selected equalizer curve will replace the previous cies, not just bass sounds. different depending on the volume level of the adjustments are memorized in volume. SLA -4 is selected. function ON, select the Fader/Balance mode in the Audio Menu, and adjust front and rear speaker volume levels until...
... the display. 3 Press 5 or ∞ to select SLA. curve. Adjusting loudness 3 Select the desired frequency with the level of the equalizer curves by the display. This is an adjusted equalizer curve that previously selected equalizer curve will replace the previous cies, not just bass sounds. different depending on the volume level of the adjustments are memorized in volume. SLA -4 is selected. function ON, select the Fader/Balance mode in the Audio Menu, and adjust front and rear speaker volume levels until...

Service Manual
Page 34
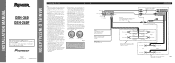
DEH-340/XN/UC This Product Rear output Antenna jack Front output Yellow To terminal always supplied with RCA pin plugs (sold separately) Power amp (sold separately) Power amp (sold separately). Fuse Blue/white To system control terminal of ignition switch position. Red To electric terminal controlled by ignition switch (12 V DC) ON/OFF. Front speaker Left Rear speaker Front speaker Right Rear speaker Perform these connections when using a different amp (sold separately) System remote control + Front speaker ≠ Left + Rear speaker ≠...
DEH-340/XN/UC This Product Rear output Antenna jack Front output Yellow To terminal always supplied with RCA pin plugs (sold separately) Power amp (sold separately) Power amp (sold separately). Fuse Blue/white To system control terminal of ignition switch position. Red To electric terminal controlled by ignition switch (12 V DC) ON/OFF. Front speaker Left Rear speaker Front speaker Right Rear speaker Perform these connections when using a different amp (sold separately) System remote control + Front speaker ≠ Left + Rear speaker ≠...


