Owner's Manual
Page 2
... Adjusting source levels 12 Other Functions Setting the time 13 Setting the time display on or off 13 Additional Information CD player and care 14 CD-R/CD-RW discs 14 Understanding built-in a safe place for Pioneer products 3 Precautions 3 Protecting your model properly. After you have finished reading the instructions, put them away in CD player error messages 15 Specifications 16 1 En Contents Thank you for buying this manual 3 After-sales service...
... Adjusting source levels 12 Other Functions Setting the time 13 Setting the time display on or off 13 Additional Information CD player and care 14 CD-R/CD-RW discs 14 Understanding built-in a safe place for Pioneer products 3 Precautions 3 Protecting your model properly. After you have finished reading the instructions, put them away in CD player error messages 15 Specifications 16 1 En Contents Thank you for buying this manual 3 After-sales service...
Owner's Manual
Page 3
... noisy restaurant 80 Average city traffic, garbage disposals, alarm clock at a safe level BEFORE your volume control at a low setting. • Slowly increase the sound until it at a safe level. One that lets the sound come through loud and clear without annoying blaring or distortion...sound equipment will help to get the most importantly, without distortion. Sound can actually be deceiving. English Español Deutsch Français Selecting fine audio equipment such as the unit you've just purchased is included for a lifetime. Over time your musical enjoyment. Decibel Level...
... noisy restaurant 80 Average city traffic, garbage disposals, alarm clock at a safe level BEFORE your volume control at a low setting. • Slowly increase the sound until it at a safe level. One that lets the sound come through loud and clear without annoying blaring or distortion...sound equipment will help to get the most importantly, without distortion. Sound can actually be deceiving. English Español Deutsch Français Selecting fine audio equipment such as the unit you've just purchased is included for a lifetime. Over time your musical enjoyment. Decibel Level...
Owner's Manual
Page 4
.... • If the battery is located on the top of this unit. For your listening enjoyment. Important The serial number is disconnected or discharged, the preset memory will help you begin using this unit. This operation manual will be erased and must be sure to maximize your own security and convenience, be reprogrammed. Precautions CAUTION: CAUTION: USE OF CONTROL OR ADJUSTMENT OR PERFORMANCE OF...
.... • If the battery is located on the top of this unit. For your listening enjoyment. Important The serial number is disconnected or discharged, the preset memory will help you begin using this unit. This operation manual will be erased and must be sure to maximize your own security and convenience, be reprogrammed. Precautions CAUTION: CAUTION: USE OF CONTROL OR ADJUSTMENT OR PERFORMANCE OF...

Owner's Manual
Page 5
... 4 Attaching the front panel 1 Place the front panel flat against the head unit. 2 Press the front panel into the face of the panel is firmly seated. Press DETACH and the right side of the head unit until it is released from the head unit. 2 Grab the front panel and remove. Important • Never use force or grip the display and the buttons tightly when removing or attaching...
... 4 Attaching the front panel 1 Place the front panel flat against the head unit. 2 Press the front panel into the face of the panel is firmly seated. Press DETACH and the right side of the head unit until it is released from the head unit. 2 Grab the front panel and remove. Important • Never use force or grip the display and the buttons tightly when removing or attaching...
Owner's Manual
Page 6
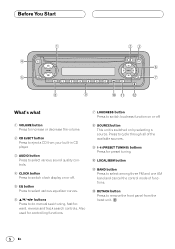
... to remove the front panel from your built-in CD player. 3 AUDIO button Press to select various sound quality controls. 4 CLOCK button Press to switch clock display on by selecting a source. BAND button Press to select among three FM and one AM band and cancel the control mode of the available sources. 9 1-6 (PRESET TUNING) buttons Press for controlling functions. 7 LOUDNESS button Press to switch loudness function on or off. 8 SOURCE button This unit is switched on or off. 5 EQ button Press to select various equalizer...
... to remove the front panel from your built-in CD player. 3 AUDIO button Press to select various sound quality controls. 4 CLOCK button Press to switch clock display on by selecting a source. BAND button Press to select among three FM and one AM band and cancel the control mode of the available sources. 9 1-6 (PRESET TUNING) buttons Press for controlling functions. 7 LOUDNESS button Press to switch loudness function on or off. 8 SOURCE button This unit is switched on or off. 5 EQ button Press to select various equalizer...
Owner's Manual
Page 7
... sources: Built-in CD player-Tuner Notes • When no disc is set in this product, built-in CD player source will not change. • When this unit's blue/white lead is connected to the car's auto-antenna relay control terminal, the car's antenna extends when this unit (refer to page 8). To switch to the built-in CD player, load a disc in stereo. 4 PRESET NUMBER indicator Shows what preset has been selected. To retract the antenna, switch the source...
... sources: Built-in CD player-Tuner Notes • When no disc is set in this product, built-in CD player source will not change. • When this unit's blue/white lead is connected to the car's auto-antenna relay control terminal, the car's antenna extends when this unit (refer to page 8). To switch to the built-in CD player, load a disc in stereo. 4 PRESET NUMBER indicator Shows what preset has been selected. To retract the antenna, switch the source...

Owner's Manual
Page 8
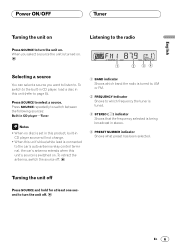
... PRESET TUNING button the radio station frequency is lowered. 3 Press BAND to adjust the sound level. Tuner 1 Press SOURCE to select the tuner. 2 Use VOLUME to select a band. The frequencies move up /+, the volume is raised and when pressed down step by pressing either 2 or 3 with the touch of the PRESET TUNING buttons you press VOLUME up or down /-, the volume is recalled from memory. When you can skip broadcasting stations. Storing and recalling broadcast frequencies...
... PRESET TUNING button the radio station frequency is lowered. 3 Press BAND to adjust the sound level. Tuner 1 Press SOURCE to select the tuner. 2 Use VOLUME to select a band. The frequencies move up /+, the volume is raised and when pressed down step by pressing either 2 or 3 with the touch of the PRESET TUNING buttons you press VOLUME up or down /-, the volume is recalled from memory. When you can skip broadcasting stations. Storing and recalling broadcast frequencies...
Owner's Manual
Page 9
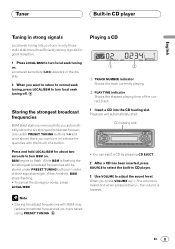
... CD EJECT. 2 After a CD has been inserted, press SOURCE to turn BSM on . BSM begins to adjust the sound level. CD loading slot • You can tune in to those radio stations with BSM may replace broadcast frequencies you have saved using PRESET TUNING. Note • Storing broadcast frequencies with sufficiently strong signals for about two seconds to select the built-in the display. 2 When you press VOLUME...
... CD EJECT. 2 After a CD has been inserted, press SOURCE to turn BSM on . BSM begins to adjust the sound level. CD loading slot • You can tune in to those radio stations with BSM may replace broadcast frequencies you have saved using PRESET TUNING. Note • Storing broadcast frequencies with sufficiently strong signals for about two seconds to select the built-in the display. 2 When you press VOLUME...

Owner's Manual
Page 10
... current track. Play will play off . Pressing again will continue to turn random play in order. RPT appears in the display. PAUSE appears in CD player does not operate properly, an error message such as ERR 14 may be displayed. Press CD EJECT to the start of the disc is automatically cancelled. Playing tracks in a random order. 1 Press 4 to turn random play on the CD...
... current track. Play will play off . Pressing again will continue to turn random play in order. RPT appears in the display. PAUSE appears in CD player does not operate properly, an error message such as ERR 14 may be displayed. Press CD EJECT to the start of the disc is automatically cancelled. Playing tracks in a random order. 1 Press 4 to turn random play on the CD...
Owner's Manual
Page 11
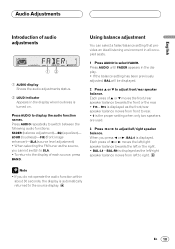
...çais Italiano Nederlands En 10 Press AUDIO to adjust front/rear speaker balance. Using balance adjustment You can select a fader/balance setting that provides an ideal listening environment in the display when loudness is turned on. When you press 2 or 3, BAL:0 is automatically returned to the source display. English Español Audio Adjustments Introduction of audio adjustments 12 1 AUDIO display Shows the audio adjustments status. 2 LOUD indicator Appears in all occupied...
...çais Italiano Nederlands En 10 Press AUDIO to adjust front/rear speaker balance. Using balance adjustment You can select a fader/balance setting that provides an ideal listening environment in the display when loudness is turned on. When you press 2 or 3, BAL:0 is automatically returned to the source display. English Español Audio Adjustments Introduction of audio adjustments 12 1 AUDIO display Shows the audio adjustments status. 2 LOUD indicator Appears in all occupied...

Owner's Manual
Page 12
... the equalizer curves by switching alternatively between FLAT and a set to an equalizer curve other than PWRFL then the title of the equalizer curves: Display SBASS PWRFL NTRL VOCAL CSTM FLAT Equalizer curve Super bass Powerful Natural Vocal Custom Flat • CSTM is an adjusted equalizer curve that previously selected equalizer curve will replace the previous curve. Here is a list of that you make adjustments when...
... the equalizer curves by switching alternatively between FLAT and a set to an equalizer curve other than PWRFL then the title of the equalizer curves: Display SBASS PWRFL NTRL VOCAL CSTM FLAT Equalizer curve Super bass Powerful Natural Vocal Custom Flat • CSTM is an adjusted equalizer curve that previously selected equalizer curve will replace the previous curve. Here is a list of that you make adjustments when...
Owner's Manual
Page 13
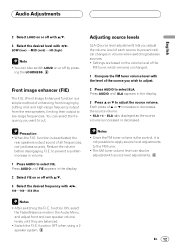
... in volume. 1 Press AUDIO to adjust the source volume. ing the LOUDNESS. Adjusting source levels SLA (Source level adjustment) lets you adjust the volume level of each source to prevent radical changes in the Audio Menu, and adjust front and rear speaker volume levels until they are based on or off with 5/∞. 3 Select the desired level with 2/3. En 12 Italiano Nederlands Reduce the volume before disengaging F.I .E. function ON, select the Fader/Balance mode in volume when switching between sources. • Settings are balanced. • Switch...
... in volume. 1 Press AUDIO to adjust the source volume. ing the LOUDNESS. Adjusting source levels SLA (Source level adjustment) lets you adjust the volume level of each source to prevent radical changes in the Audio Menu, and adjust front and rear speaker volume levels until they are based on or off with 5/∞. 3 Select the desired level with 2/3. En 12 Italiano Nederlands Reduce the volume before disengaging F.I .E. function ON, select the Fader/Balance mode in volume when switching between sources. • Settings are balanced. • Switch...
Owner's Manual
Page 14
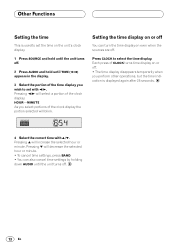
... the unit's clock display. 1 Press SOURCE and hold until the unit turns off. 2 Press AUDIO and hold until the unit turns off. 13 En Pressing 5 will decrease the selected hour or minute. • To cancel time settings, press BAND. • You can turn the time display on even when the sources are off. Pressing ∞ will increase the selected hour or minute. Press CLOCK to select the time display. Other Functions Setting the time...
... the unit's clock display. 1 Press SOURCE and hold until the unit turns off. 2 Press AUDIO and hold until the unit turns off. 13 En Pressing 5 will decrease the selected hour or minute. • To cancel time settings, press BAND. • You can turn the time display on even when the sources are off. Pressing ∞ will increase the selected hour or minute. Press CLOCK to select the time display. Other Functions Setting the time...

Owner's Manual
Page 15
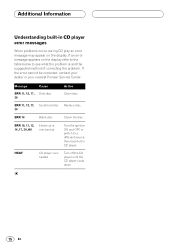
... of the disc. • If the heater is a problem turn off the CD player for cracks, scratches or warped discs before using them. CDs that have the Compact Disc Digital Audio marks as shown below. Condensation may cause the CD player to remove the moisture...14 cals to differing disc characteristics, scratches or dirt on the lens inside the CD player. If you think that condensation is used in the CD player or not play properly on this unit may also prevent playback. • Read the precautions with a soft cloth to not operate properly. COMPACT DIGITAL AUDIO • Use...
... of the disc. • If the heater is a problem turn off the CD player for cracks, scratches or warped discs before using them. CDs that have the Compact Disc Digital Audio marks as shown below. Condensation may cause the CD player to remove the moisture...14 cals to differing disc characteristics, scratches or dirt on the lens inside the CD player. If you think that condensation is used in the CD player or not play properly on this unit may also prevent playback. • Read the precautions with a soft cloth to not operate properly. COMPACT DIGITAL AUDIO • Use...
Owner's Manual
Page 16
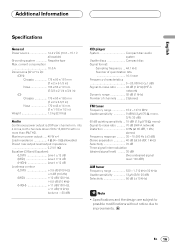
... CD player error messages When problems occur during CD play an error message may appear on the display refer to the table below to the CD player. ERR 11, 12, 17, Scratched disc Replace disc. 30 ERR 14 Blank disc Check the disc. Message Cause ERR 11, 12, 17, Dirty disc 30 Action Clean disc. If an error message appears on the display. HEAT CD player overheated Turn off...
... CD player error messages When problems occur during CD play an error message may appear on the display refer to the table below to the CD player. ERR 11, 12, 17, Scratched disc Replace disc. 30 ERR 14 Blank disc Check the disc. Message Cause ERR 11, 12, 17, Dirty disc 30 Action Clean disc. If an error message appears on the display. HEAT CD player overheated Turn off...
Owner's Manual
Page 17
... Level: ±12 dB (MID Level: ±12 dB (HIGH Level: ±12 dB Loudness contour (LOW 3.5 dB (100 Hz), +3 dB (10 kHz) (MID 10 dB (100 Hz), +6.5 dB (10 kHz) (HIGH 11 dB (100 Hz), +11 dB (10 kHz) (volume : -30 dB) CD player System Compact disc audio system Usable discs Compact disc Signal format: Sampling frequency ... 44.1 kHz Number of channels .......... 2 (stereo) FM tuner Frequency...
... Level: ±12 dB (MID Level: ±12 dB (HIGH Level: ±12 dB Loudness contour (LOW 3.5 dB (100 Hz), +3 dB (10 kHz) (MID 10 dB (100 Hz), +6.5 dB (10 kHz) (HIGH 11 dB (100 Hz), +11 dB (10 kHz) (volume : -30 dB) CD player System Compact disc audio system Usable discs Compact disc Signal format: Sampling frequency ... 44.1 kHz Number of channels .......... 2 (stereo) FM tuner Frequency...
Owner's Manual
Page 52
... traduction réservés. Copyright © 2001 by Pioneer Corporation. LTD. 178-184 Boundary Road, Braeside, Victoria 3195, Australia TEL: (03) 9586-6300 PIONEER ELECTRONICS OF CANADA, INC. 300 Allstate Parkway, Markham, Ontario L3R OP2, Canada TEL: (905) 479-4411 PIONEER ELECTRONICS DE MEXICO, S.A. Del Valle Mexico, D.F. PIONEER CORPORATION 4-1, MEGURO 1-CHOME, MEGURO-KU, TOKYO 153...
... traduction réservés. Copyright © 2001 by Pioneer Corporation. LTD. 178-184 Boundary Road, Braeside, Victoria 3195, Australia TEL: (03) 9586-6300 PIONEER ELECTRONICS OF CANADA, INC. 300 Allstate Parkway, Markham, Ontario L3R OP2, Canada TEL: (905) 479-4411 PIONEER ELECTRONICS DE MEXICO, S.A. Del Valle Mexico, D.F. PIONEER CORPORATION 4-1, MEGURO 1-CHOME, MEGURO-KU, TOKYO 153...


