Owner's Manual
Page 2
...Canadian model 3 About this unit What's what 6 - Adjusting the volume 7 Tuner 7 - Storing and recalling broadcast frequencies 8 - Setting the clock 12 - Installing the battery 5 - Repeating play 9 - Playing tracks in strong signals 8 - Pausing disc playback 10 - Adjusting loudness 11 ...balance adjustment 11 - Adjusting source levels 11 Other Functions 12 - Using the remote control 5 Operating this unit 3 After-sales service for Pioneer products 4 Visit our website 4 Protecting your unit from theft 4 - Playing a disc 8 - Tuning in random order 9 - ...
...Canadian model 3 About this unit What's what 6 - Adjusting the volume 7 Tuner 7 - Storing and recalling broadcast frequencies 8 - Setting the clock 12 - Installing the battery 5 - Repeating play 9 - Playing tracks in strong signals 8 - Pausing disc playback 10 - Adjusting loudness 11 ...balance adjustment 11 - Adjusting source levels 11 Other Functions 12 - Using the remote control 5 Operating this unit 3 After-sales service for Pioneer products 4 Visit our website 4 Protecting your unit from theft 4 - Playing a disc 8 - Tuning in random order 9 - ...
Owner's Manual
Page 6
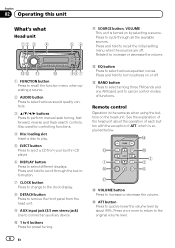
... level. 6 En Also used for preset tuning. f ATT button Press to connect an auxiliary device. Press to cycle through the text information. 7 CLOCK button Press to change to the clock display. 8 DETACH button Press to remove the front panel from your built-in CD player. 6 DISPLAY button Press to recall the initial...
... level. 6 En Also used for preset tuning. f ATT button Press to connect an auxiliary device. Press to cycle through the text information. 7 CLOCK button Press to change to the clock display. 8 DETACH button Press to remove the front panel from your built-in CD player. 6 DISPLAY button Press to recall the initial...
Owner's Manual
Page 12
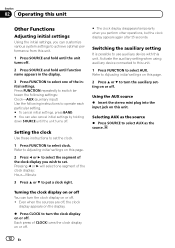
...a or b to set . Selecting AUX as the source % Press SOURCE to select one segment of CLOCK turns the clock display on or off . 12 En Setting the clock Use these instructions to turn the clock display on or off . 2 Press SOURCE and hold until the unit turns off . ! Refer to...initial settings, press BAND. # You can turn the auxiliary setting on or off . Press FUNCTION repeatedly to switch between the following settings: Clock-AUX (auxiliary input) Use the following instructions to Adjusting initial settings on or off You can also cancel initial settings by holding down SOURCE ...
...a or b to set . Selecting AUX as the source % Press SOURCE to select one segment of CLOCK turns the clock display on or off . 12 En Setting the clock Use these instructions to turn the clock display on or off . 2 Press SOURCE and hold until the unit turns off . ! Refer to...initial settings, press BAND. # You can turn the auxiliary setting on or off . Press FUNCTION repeatedly to switch between the following settings: Clock-AUX (auxiliary input) Use the following instructions to Adjusting initial settings on or off You can also cancel initial settings by holding down SOURCE ...

